How to Fix Windows 11 Slow Startup? Your Complete Guide
Microsoft's recently released Windows 11 has been met with excitement, especially for Windows 10 users who can easily upgrade to the new operating system. However, many users have been experiencing a frustrating issue with Windows 11 - a slow startup time. Despite the numerous improvements and added features in Windows 11 compared to Windows 10, the slow startup has been a major concern for many users. This article aims to provide fixes and solutions to address this issue and get Windows 11 up and running smoothly.
| Workable Solutions | Step-by-step Troubleshooting |
|---|---|
| 1. Update the graphic card | Open the Quickstart menu by pressing Windows+X on your keyboard...Full steps |
| 2. End Unnecessary Tasks | Open the task manager by searching or pressing Ctrl+Shift+Esc keys...Full steps |
| 3. Delete Temp Files | Open the dialogue box in your windows by pressing the Windows+R...Full steps |
Why is Windows 11 startup so slow?
Windows 11 slow startup can be caused by various reasons, including outdated drivers, corrupted system files, and disk errors. Other common causes include excessive startup programs, malware infections, and insufficient disk space. Additionally, issues like the Windows Update service not running properly, the Windows Search service being stuck, or the Windows Defender service not functioning correctly can also contribute to slow startup times.
- A system with low specifications is one of the main reasons for Windows 11 slow startup.
- Your PC may be affected by a virus.
- You may have enabled the visual effects option, or it can also be enabled by default, causing the issue.
- You may be using an outdated graphic driver.
- You may have enabled unnecessary notifications on your PC.
- Having corrupted windows files.
How do I fix slow startup on Windows 11?
To fix a slow start on Windows 11, identify the major cause and apply the relevant solution. Various methods can be employed to address this issue, and understanding the underlying reason is key to resolving the problem effectively.
1. Update the graphic card
Upgrading your computer's graphic card can significantly improve its performance, including faster startup times and smoother gameplay. Using outdated graphic cards can lead to slow startup, crashes during gameplay, and other issues. To resolve this, follow these steps: follow the steps below.
- Open the Quickstart menu by pressing Windows+X on your keyboard.
- Look for device managers and click on it.
- Now double tap on the display adaptors option.
- To select the graphic card that you are using, right-click on it. This action will open a menu where you can choose the desired graphic card.
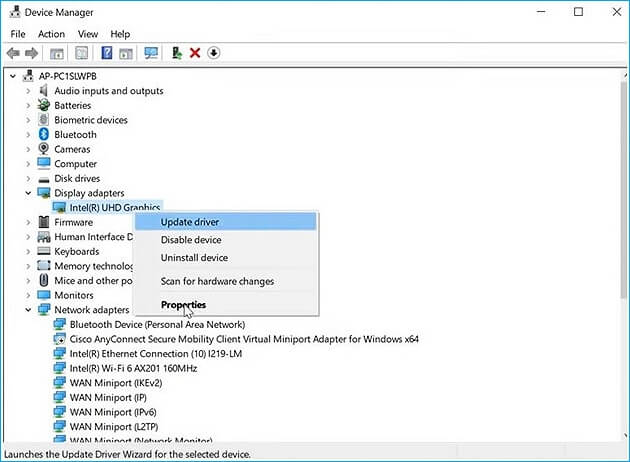
- Then select the Update driver option from the popup menu.
- Select Search automatically for drivers from the available options.
- If there's an update option available, the default process will be to download and install it.
- You can restart the system after the update process completes.
2. End Unnecessary Tasks on Task Manager
To boost your Windows 11's startup speed, consider ending unnecessary tasks running in the background. This can be easily done by following a few simple steps in the Task Manager, which can help reduce the load and increase the speed of your system.
- To open the task manager, you can either manually search for it or simply press Ctrl+Shift+Esc on your keyboard.
- Click on the process option from all the available options.
- Then go through each option and select the unnecessary tasks.
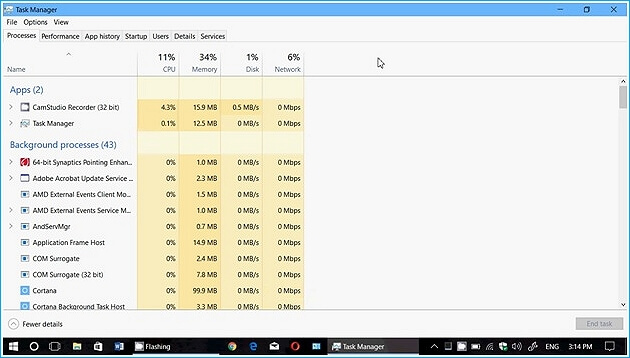
- Tap on the end task option on the right.
- After completing the entire process, restart Windows 11 once again to ensure all changes take effect.
3. Delete Temp Files
Temporary files can be created by default in Windows to complete tasks without interruptions, but it's essential to delete unwanted files to avoid trouble. Having old temporary files can cause slow startup of Windows 11, among other issues. To delete unwanted temporary files, follow these steps: follow the steps below.
- To open the run dialogue box in Windows, press the Windows+R keys on your keyboard. This will open the dialogue box where you can type the name of a program, file, or folder and press Enter to run it.
- Now, look for %temp% from all the available options.
- Select the file folder.
- Select all the elements you see and delete them.
- Apply all the changes and then all your files will be deleted.
4. Shut Down Notifications on Settings
Notifications can be not only disturbing but also troublesome, and they can even slow down your Windows 11 startup. To speed up the startup system, you can try turning off the notification bar, which can be done by following some simple steps.
- To access the settings, open the search bar and look for the Settings option, then tap on it.
- Click on the System option from the available options.
- To access the Notifications and actions tab, click on the Notifications and actions tab present in the display menu on the left.
- Turn off notifications by clicking on the swipe bar on the left side of the notifications option.
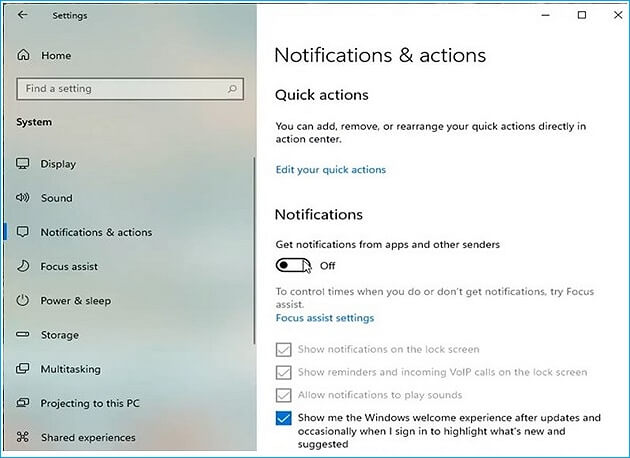
You can choose the type of notifications to be turned off by ticking the below square boxes available. This allows you to customize your notification preferences and only receive alerts for the types of notifications that are most important to you.
5. Optimize Windows 11 Drive by Qiling Partition Master
You can also boost the startup speed of your Windows 11 using the external partition tool Qiling Partition Master. This tool not only manages your disk space but also performs additional tasks to maintain a fast startup, making it a useful utility to have.
- Manage disk space:The software allows you to perform various disk-related operations, including resizing and moving partitions, merging them, copying or cloning entire disks, creating new partitions, formatting existing ones, deleting partitions, and migrating the operating system to a Hard Disk Drive (HDD) or Solid-State Drive (SSD).
- Partition converter:To convert a Master Boot Record (MBR) to a GUID Partition Table (GPT) or vice versa, and to change a dynamic disk to a basic disk or vice versa, you can use the built-in disk management tool in Windows. This process involves creating a backup of the disk, deleting all partitions on the disk, and then converting the disk type.
- More features: Recover partitions, Create WinPE bootable disk.
Qiling Partition Master
6. Turn off Visual Effect
Turning off the visual effect option is a very simple process. To do it, follow these steps.
- Open the search bar.
- Type sysdm.cploptionin the search bar and then open it.
- Then a system property window will pop up.
- Select the advanced option from the available options.
- Click on settings under the performance section.
- To improve the performance of your device, click on the circle present beside "adjust for a better performance" option.
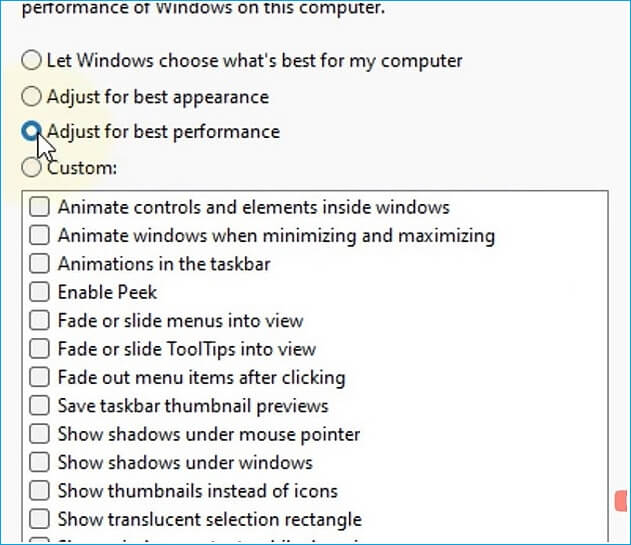
- Then finally click on the OK option present below.
- This will turn off the visual effect option in Windows 11.
7. Run Antivirus Software
Using a PC with a virus can cause numerous threats and unnecessary troubles, making it unsafe and inconvenient to use. To avoid this, you can opt for paid virus protection software or utilize Windows 11's built-in virus protection. To scan and eliminate the virus through Windows 11, follow the steps provided.
- Go to the Settings option.
- To find the Windows security options, go to the Start menu and type "Windows Security" in the search bar. This will bring up the Windows Security app, where you can access various security features and settings, such as Firewall and Windows Defender.
- Click on virus and threat protection.
- Look for the protection updates option by scrolling down.
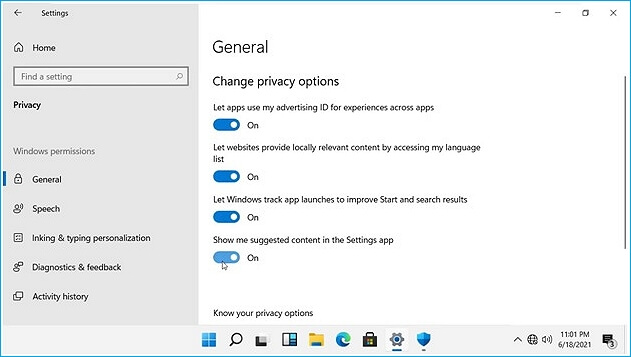
- Click on the privacy settings option.
- Enable the four options present under the change privacy settings option.
- To resolve the issue, go back and click on the "Manage settings" option under "Virus and threat protection".
- Then turn on or enable all the available options.
- Now, click on scan options in Virus and threat protection options.
- Then click on the full scan option.
- Open the task manager and click on the "File" option.
- Click on browse to run a new task.
- Find the running task file and click on OK.
- To update Group Policy settings, type the command "gpupdate" and then restart your computer by closing all running applications. This will ensure that the updated settings are applied.
To speed up the startup of Windows 11, try one or a combination of the methods mentioned: disable startup programs, enable the Windows Search feature, disable the Windows Search feature, enable the Windows Defender Firewall, disable the Windows Defender Firewall, disable unnecessary services, disable the Windows Update service, and enable the Windows Update service. By following these quick and effective solutions, you can get your Windows 11 to start up faster once again.
Related Articles
- Change GPT Disk to MBR Disk Without Formatting
- Extend C drive or system partition in Windows 11/10
- How to Convert GPT to MBR (Without Data Loss) with 3 GPT to MBR Converter
- 3 Best CHKDSK Alternatives for Disk Error Checking Free Download [Beginners' Guide]
- How to Repair Pen Drive Not Detected Problems in Windows 10, 8, 7?
This tutorial tells how to repair USB flash drive not detected effortlessly, as well as probes into the problem and explains the probable reasons for you. - How to Split Local Disk in Windows 11, 10, 8, 7?
Wanna split local disk in Windows 10? Here we introduce two ways to separate local disk into multiple partitions in Windows 11, 10, 8, 7.