How to Clear Cache in Windows 11/10
Cache files are temporary files generated when you use the system and applications, serving as a repository of data that has been previously processed to speed up future access and usage.
The cache is a buffer for data exchange, allowing hardware to first look for desired data in the cache, and if not found, in memory. This enables faster access to frequently used data, such as browser history, as seen when Chrome's search box auto-fills with previously searched content. This process optimizes data retrieval and improves system performance.
However, too many temporary files can become a drag on computer performance.
Clearing cache files can improve computer speed, free up disk space, and resolve freezing issues, making it a useful troubleshooting step.
QUICK FIXES:
1. Clear System Cache with Qiling CleanGenius
2. Clear Browser Cache in Windows 10 (Chrome/Internet Explorer/Edge/Firefox)
3. Clear Temp Files of Settings
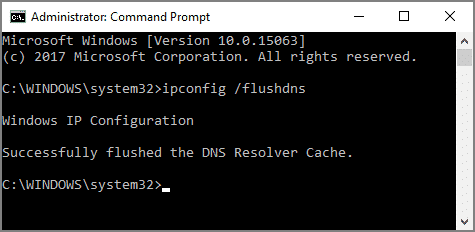
To clear DNS cache in Windows 10 via CMD, open Command Prompt as administrator, type `ipconfig /flushdns` and press Enter. This command will clear the DNS cache and update the DNS resolver cache with the current DNS server settings. The changes will take effect immediately.
5. Run Disk Cleanup to Clear Cache
6. Clear Cache in Microsoft Store
Extra Tip: Optimize Your SSD Performance With 4K Alignment Software
1. Clear System Cache with Qiling CleanGenius
To delete cache files, you can use a simple cleanup tool that allows you to wipe the system cache with just one click. Follow these straightforward steps to quickly and easily get rid of unwanted cache files.
Step 1. To get started, download and install Qiling Partition Master Suite on your PC, and then click to download PC Cleaner from the panel.
Step 2. Install Qiling CleanGenius on your PC. To begin with, navigate to "Cleanup" and click "Scan."
Step 3.Qiling CleanGenius will start scanning and selecting system junk files and invalid entries, and then click "Clean" to remove them from your PC.
Step 4.Once you've finished cleaning the data, you can see how many MBs or GBs of data have been cleaned. To complete the process, click the "Done" button.
2. Clear Browser Cache in Windows 11/10 (Chrome/Internet Explorer/Edge/Firefox)
Want to clear cache files in Chrome, Internet Explorer, Edge, or Firefox? Check the browser you're using and apply the steps to remove unnecessary data: clear cache in Chrome, Internet Explorer, Edge, or Firefox.
1 - Clear Cache Files in Chrome
Step 1. Open Chrome Browser on computer.
Step 2. Click More at the top right corner.
Step 3. Choose "More tools" > Click "browsing data"
Step 4. On the Clear browsing data window, select a time range, such as "all time" to delete all browsing data.
Step 5. Check "Cookies and other site data" and "Cached images and files".
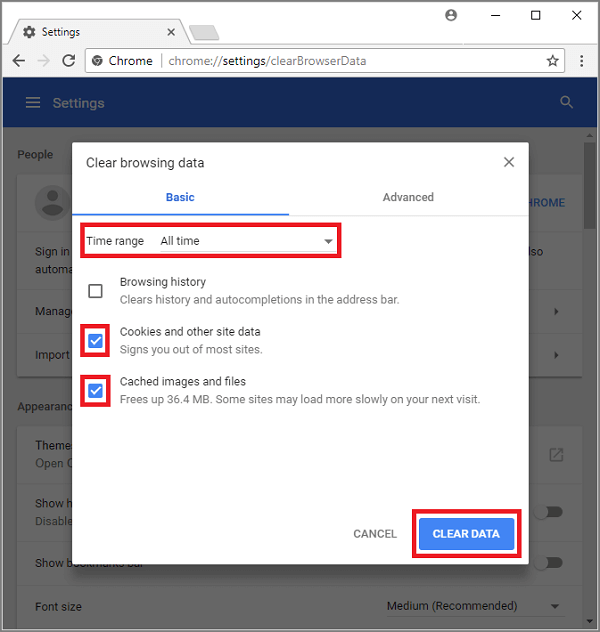
Step 6. Click Clear data.
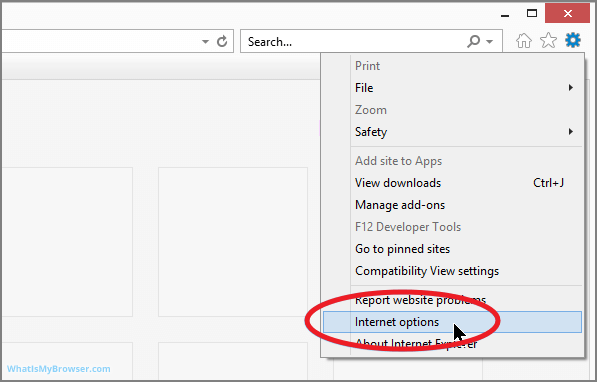
2 - Clear Internet Explorer Cache Files
Step 1. Run Internet Explorer.
Step 2. To begin, select the tool menu or gear icon located at the upper right corner of the screen.
Step 3. Click "Internet Options" in the drop-down menu.
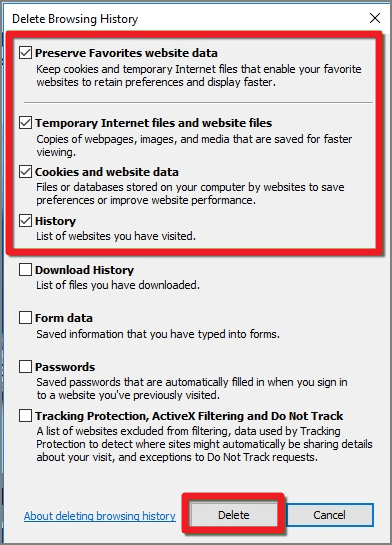
Step 4. The Internet Options window pops up, where you can click the "General" tab.
Step 5. Go to the "Browsing History" section and click the "Delete" button.
Step 6. On the "Delete Browsing History" window, check the boxes next to "Preserve Favorites website data" (if desired), "Temporary Internet files and website files", "Cookies and website files", and "History". Then, select "Delete" to confirm the action.
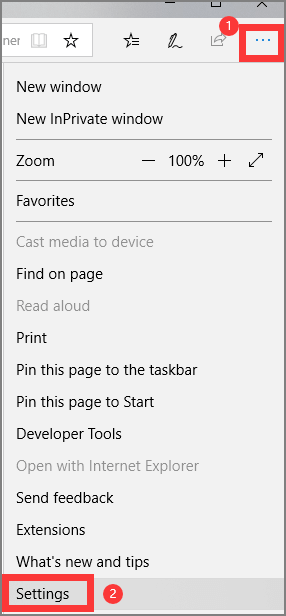
3 - Clear Microsoft Edge Cache Files in Windows 10
Step 1. Click three-dot on the top right corner.
Step 2. In the drop-down menu, click "Settings".
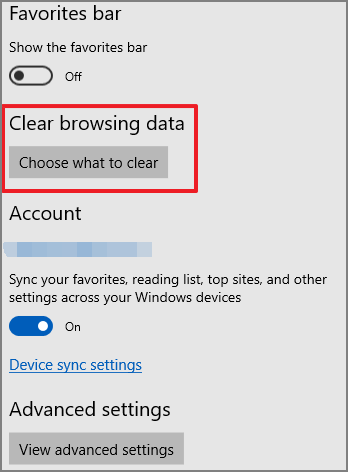
Step 3. Under the "Clear browsing data" section, click "Choose What to Clear".
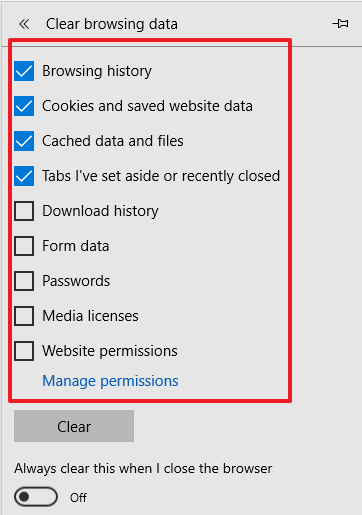
Step 4. You can review a list of checkboxes, select the one you want to delete, and proceed with the deletion process.
Step 5. Click the "Clear" button.
4 - Clear Cache Files in Firefox
Step 1. To access the options menu, click the menu button located on the top right corner of the screen and select "Options" from the drop-down menu.

Step 2. Choose "Privacy & Security" on the left panel.
Step 3. To clear cached web content, scroll down to the "Cookies and Site Data" section in your browser settings, and click on it. Then, click on the "Cached Web Content" option to clear it.
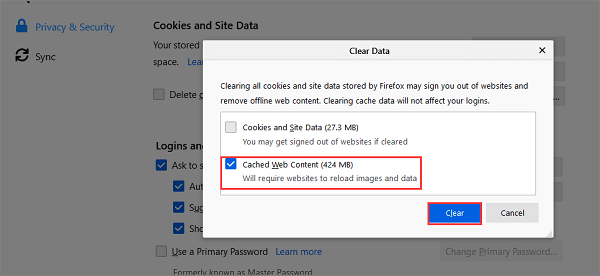
Step 4. Click the "Clear" button.
3. Clear Temp Files of Settings
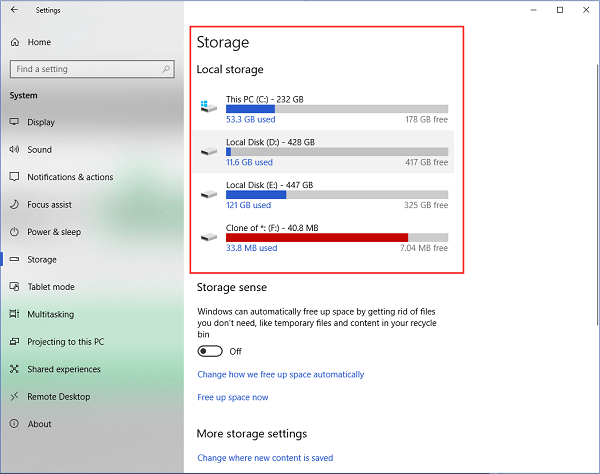
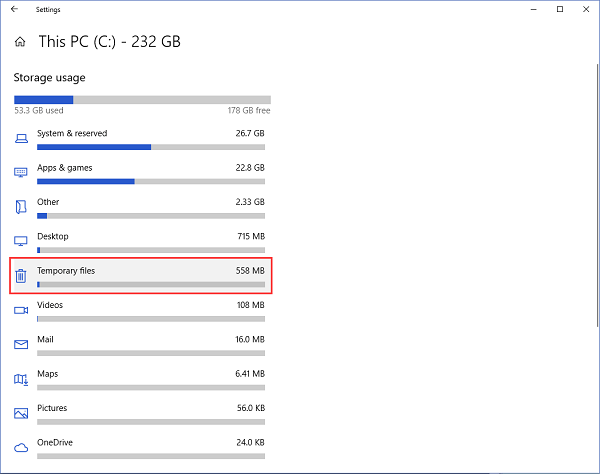
Step 1. To clear cache files on your device, go to Settings, then select System, followed by Storage, and choose the drive where you want to clear the cache files.
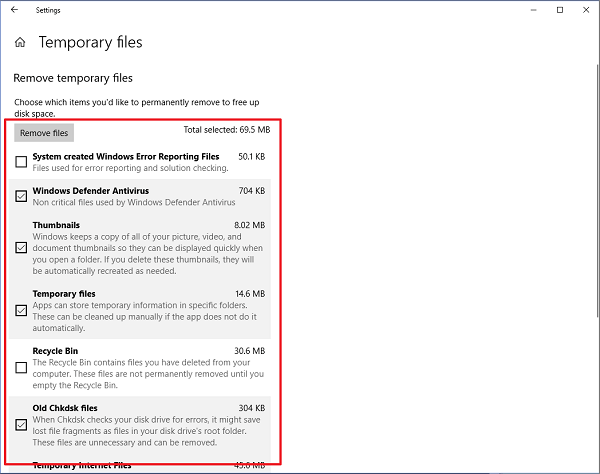
Step 2. To avoid deleting necessary data, go to the "Temporary files" section and check the types of files you want to delete, carefully reading the description of each file type to ensure you don't delete important files.
Step 3. Click "Remove Files" button.
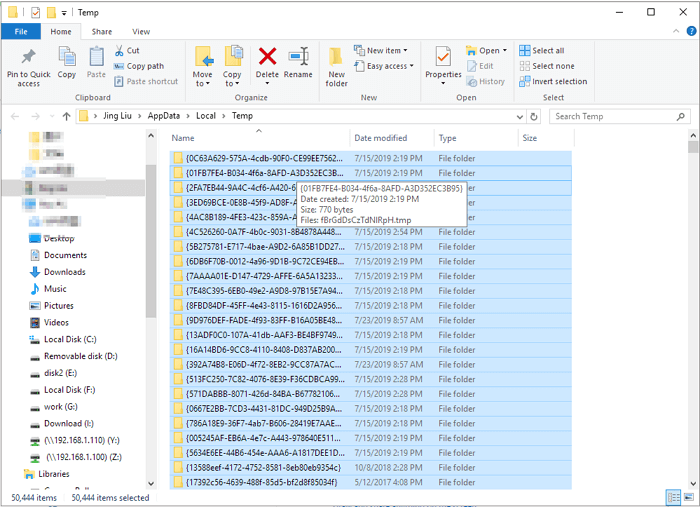
To delete temp files, go to C:\Users\Admin\AppData\Local\Temp, press "Ctrl + A" to select all files, and then delete them. This will clear the default file path of temp files.
4. How to Clear DNS Cache in Windows 11/10 via CMD
Step 1. To run Command Prompt as an administrator, type "cmd" in the search box, right-click on the "Command Prompt" result, and select "Run as administrator" from the context menu. This will open a new Command Prompt window with elevated privileges.
Step 2. Type command line: ipconfig / flushdns
Step 3. Press Enter and the message "Successfully flushed the DNS Resolver Cache" will appear.
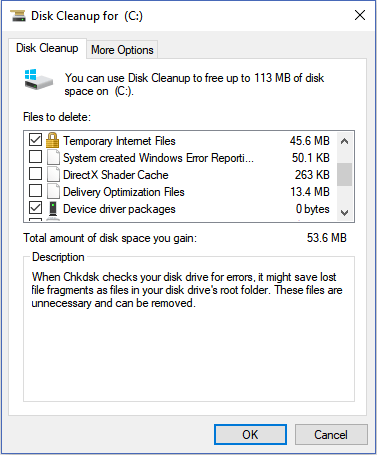
5. Run Disk Cleanup to Clear Cache
Step 1. Type Disk Cleanup on the search box and click to start it. (Or you can press Windows + R to input "cleabmgr.exe" and click OK.)
Step 2. Choose the drive you want to clear cache files from, then click "Clean up system files".
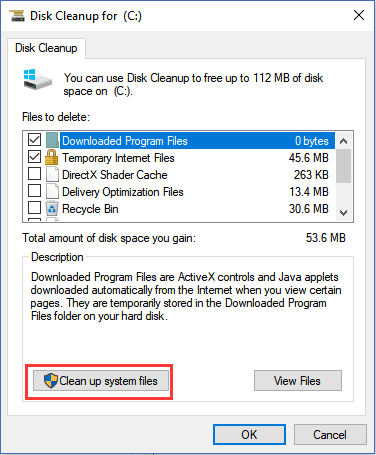
Step 3. Check "File to delete" and click OK.
6. Clear Cache in Microsoft Store
To clear cache files in Microsoft Store, you can perform a reset.
To reset the Microsoft Store, go to Settings, then click on System, followed by Apps & Features, then select the Store, and finally click on Advanced options and choose Reset.
Extra Tip: Optimize Your SSD Performance With 4K Alignment Software
After deleting cache files, we recommend using Qiling Partition Master to maximize SSD performance and speed up your PC. This software features 4K Alignment, which allows SSDs to read and write data at the fastest speed.
Step 1. To align a SSD disk, select it, click it, and choose "4K Alignment" from the options.
Step 2. 4K alignment is a process that ensures the sectors on a solid-state drive (SSD) are properly aligned to improve performance and reliability. When a user clicks "OK" on the SSD drive partitions, the partitions are set to be 4K aligned, which means all sectors on the drive are properly aligned to the 4K boundary, resulting in optimal performance and reliability.
Read also:
Related Articles
- What Is NTFS File System and Do I Need It? [Check The Answer Here]
- How to Fix Windows 11 Antimalware Service Executable High CPU Usage
- Top 5 Reliable Software to Check Hard Disk Health for Free
- Fix the Selected GPT Formatted Disk Partition Not of Type
- Why My SD Card Shows Empty But is Full
It is a common issue that an SD card is full, but no files show up. If you are wondering 'Why my SD card shows empty but is full', this page explains the answer and guide you to resolve the problem. - Why Pen Drive Is Write-Protected and How to Fix?
Sometimes the USB flash drive will change into write-protected, so why USB flash drive is write-protected and how to fix? This page briefly introduces the reasons and offers some practical methods to remove write protection.