How to Reformat Windows 11/10 PC/Laptop | In-depth tutorial
"Hi there, I'd like to completely reformat my PC and then install Windows 11/10 on it. This is the first time I've done something like this. Below are the steps I plan to follow. Can anyhow point out something which I have missed? Any advice/comments would be much appreciated."
You might want to reformat your Windows 11/10 PC for various reasons, such as a virus or malware infection, a crashed system, or simply to start fresh with a clean installation. In some cases, you may need to reformat your PC due to a corrupted registry, a failed system update, or a hardware issue. To reformat your Windows 11/10 PC, you can use the built-in Disk Cleanup tool, the System Restore feature, or a third-party disk wiping tool like DBAN.
- To reset your PC for reuse and better performance, go to Windows Settings and use a USB recovery drive.
- Sell or donate your computer - Data wipe software.
Read on to get how to reformat Windows 11/10 easily reinstall Windows 11/10.
Main Content:
Preparation before Reformat
How to Reformat Your Windows 11/10 from Settings
How to reformat windows 11/10 with USB Recovery Drive
How to Reformat Your Windows 11/10 with Automatic Software
Preparation before Reformat
If you're trying to reset your PC for reuse, or selling or donating it, you can follow these steps. First, take note of step 1, and if you're selling or donating the computer, also apply step 2 before reformatting.
1. Back up your precious data.
The reformat will completely erase your data, making it impossible for data recovery software to recover anything. It's essential to back up your data using a USB flash drive or another external hard drive before proceeding with the reformat. This will ensure that your data is safe and can be recovered if needed.
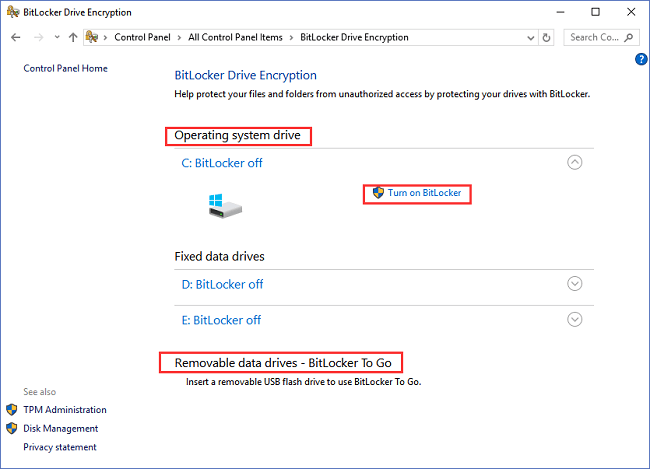
2. Encrypt SSD (Optional)
To protect your private photos and files from being accessed by others, you can encrypt your SSD, making it difficult for them to be recovered using data recovery software. This way, your sensitive information remains secure and private.
Steps: To enable BitLocker, go to the Control Panel, then click on BitLocker Drive Encryption, and finally select the option to Turn on BitLocker.
How to Reformat Your Windows 11/10 from Settings
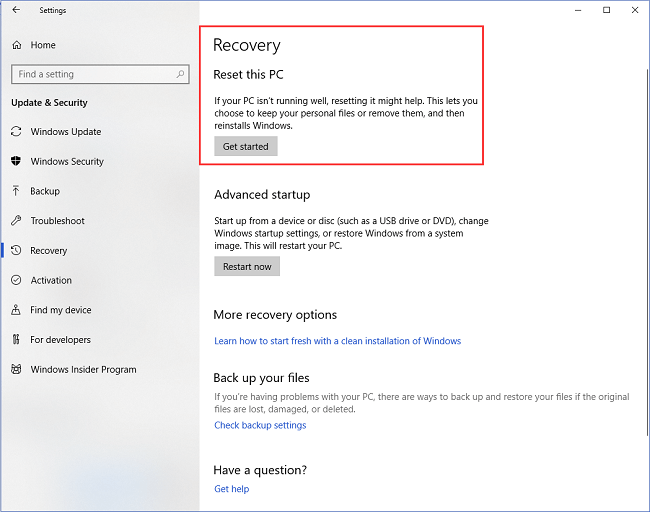
Step 1. To access the Settings menu on Windows, click on the Windows icon located in the left corner of the screen.
Step 2. Choose "Update & Security".
Step 3. Select "Recovery" on the left panel.
Step 4. Under the "Reset this PC" section, click "Get started".
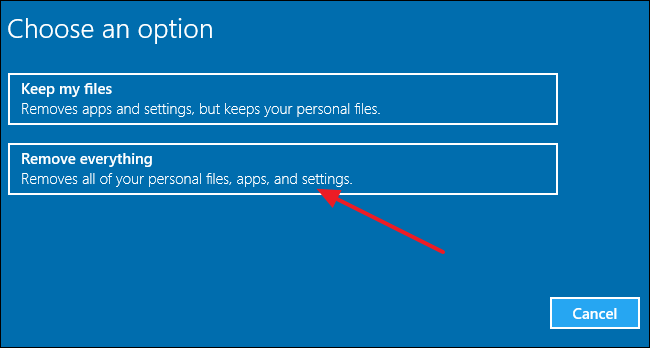
Step 5. The "Reset this PC" window displays two options: "Keep my files" and "Remove everything".
If you're planning to reformat Windows 11/10 without losing files, you can try "Keep my files", but if you're selling your computer, choose "Remove everything".
Step 6. You can see the "Get things ready" screen.
Step 7. Click "Next".
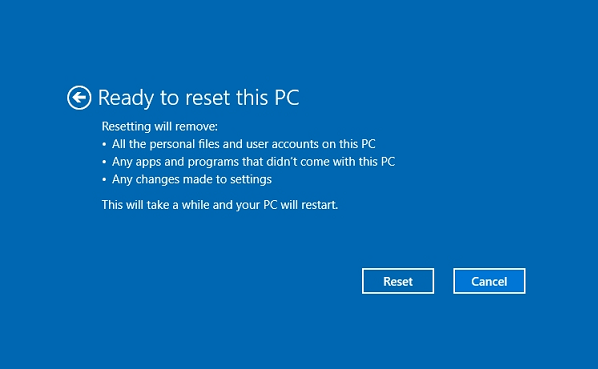
When your PC is ready to reset, it will show you the list of applications to be removed, which will be saved to the Desktop for your reference after the reset process.
Step 8. On the "Ready to reset this PC", click "Reset".
Step 9. Restart your PC.
How to reformat Windows 11/10 with USB Recovery Drive
If your PC has a boot issue, you can use a USB recovery drive to reset the computer.
Step 1. To prepare a USB drive for use with a health PC, you simply need to connect it to a healthy PC and format it to the exFAT file system. This will make the USB drive compatible with the health PC.
Open "This PC" > Right-To change the file system of your external hard drive to exFAT, follow these steps: click on the "Format..." option and then select the "exFAT" file system from the available options. This will reformat the drive and change its file system to exFAT.
Step 2. Create Recovery Drive and boot from USB.
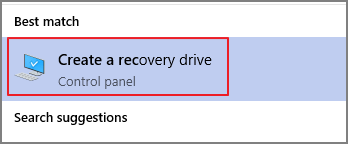
- Type "Create a recovery drive" in the search box.
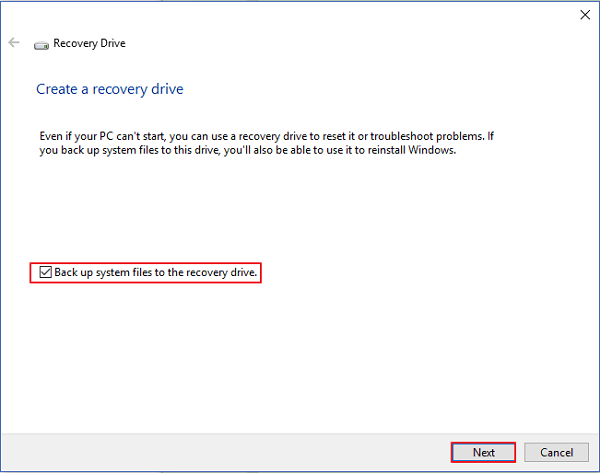
- To create a recovery drive, go to the "Create a recovery drive" section, check the box that says "Back up system files to the recovery drive", and then click "Next".
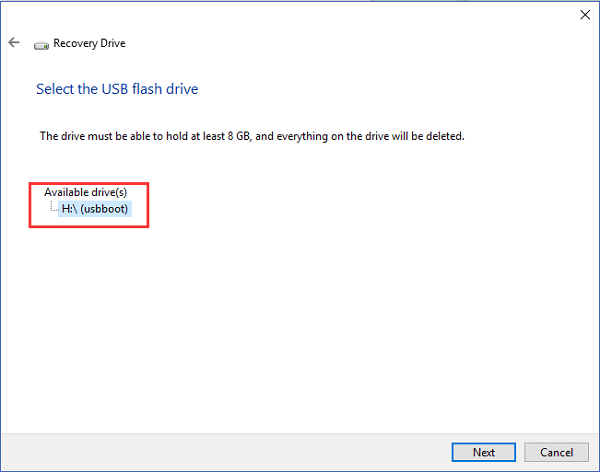
- Select your USB hard drive under "Available drive(s)" > Choose "Create".
- Your USB hard drive will be renamed "RECOVERY".
Step 3. Reset your PC with a USB.
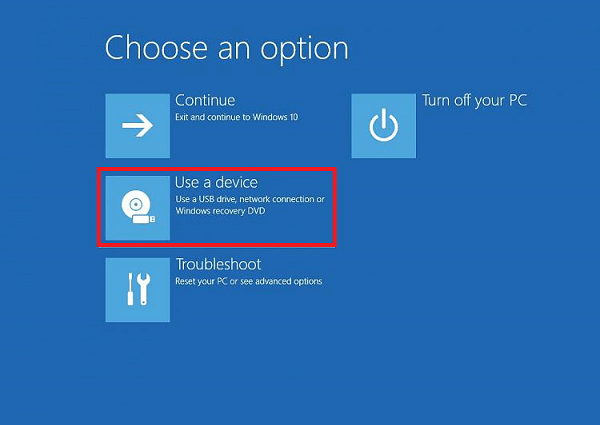
- Restart your PC and press the "Shift" button.
- On the "Choose an option" screen, click "Use a device".
- Select your USB hard drive.
- Your Windows will reboot from USB. After that, choose your keyboard layout and then click on "Troubleshoot" from the menu.
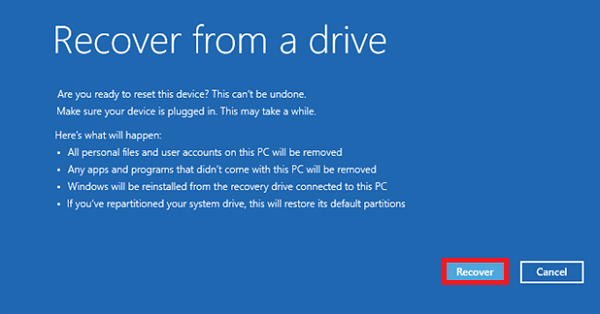
- Choose the "Recover from a drive" option.
How to Reformat Your Windows 11/10 with Automatic Software
Before selling or donating your PC, you may want to wipe all your data. Unlike the other two methods of resetting your computer, erasing the system disk requires operating under a WinPE environment, which can be easily set up with robust software.
Qiling Partition Master can reset in 2 steps: create a bootable disk and then apply the "Wipe Data" feature.
1 - Create WinPE bootable disk
Step 1. To create a bootable disk of Qiling Partition Master, prepare a storage media such as a USB drive or CD/DVD disc and connect it to your computer.
Step 2. Launch Qiling Partition Master and navigate to the tools page, where you will find the "Create bootable media" feature. Click on it.
Step 3. You can choose to save the ISO file to a USB, CD/DVD drive, or local drive. If you don't have a storage device, you can save it to your local drive and burn it later. Once you've made your choice, click "Proceed" to start.
After creating a Qiling Partition Master WinPE bootable disk, the process is complete. This bootable drive can now be used to manage hard disks and partitions whenever a computer fails to boot normally.
To add a RAID driver under the WinPE environment, start by clicking on the "Add Driver" option from the menu bar. This action allows you to add the specific driver for your device, which is crucial for recognizing devices like RAID or certain hard disks that may not be recognizable under the WinPE environment without their respective drivers installed.
2 - Wipe all data from PC
We've set two options for you to wipe data. Choose the one you need.
Option 1. Wipe Partition
- To erase data from a specific partition, select "Wipe Data" in the tools menu. Then, navigate to the partition from which you want to erase data and click on it.
- Set the time for which you want to wipe your partition, then click "Proceed".
- Check the message. Then click "OK".
Option 2. Wipe Disk
- Choose "Wipe Data" in the tools page, selecting the HDD/SSD in the new window.
- Set the number of times to wipe data, which can be set to 10 at most, and then click "Proceed".
- Check the message. Then click "OK".
Get Three Ways to Reformat Windows 11/10 PC
Can you reformat or reset your computer in the above three ways?
If you're ready to reset your PC for reuse, you can try using Windows settings and a USB recovery drive.
If you want to sell your computer, I recommend using the data wipe tool in Part 3 for a straightforward process.
Related Articles
- How to Find Hidden Partition or Hide Partition in Windows 10/8/7
- How to Wipe All Data from PC (Windows 7/8/10/Vista/XP)
- 3TB Hard Drive Only Shows 2TB - How to Break 2TB Limit and Format 3TB HDD Windows 11/10
- How to Fix SD Card Saying Full When Empty in Windows 11/10/8/7
- Check This Guide to Learn How to Check RAM Speed Windows 10
RAM speed can reflect your computer status. However, some users might don't know how to check RAM speed. In this article, we will introduce two ways for you to check RAM speed in Windows 10. - How to Combine Multiple Hard Drives into One Volume [Two Tricks for You]
Here you can learn two ways to combine multiple hard drives into one volume or partition in Windows 10/9/8. The two ways are Qiling Partition Master and Windows Disk Management.