How to Fix (GPT) Hard Disk Partition Not Recognized in Windows 11/10
If your hard disk partition is not recognized or showing up on Windows 11/10, We've collected three major disk partition issues, listed their causes, and offered solutions to help you make the hard drive partition show up and work normally again.
Check out which issue that you are having on your computer and follow the respective solutions to make everything work normally again:
| Workable Solutions | Step-by-step Troubleshooting |
|---|---|
| The Selected Partition Was Not Created by Windows | Convert Disk to GPT...Full steps |
| GPT Partition Not Recognized Windows 10 | Method 1. Set GPT as Boot Drive in BIOS Method 2. Enable UEFI Boot Mode Method 3. Convert GPT to MBR...Full steps |
| Disk Partition Not Showing in Windows | Method 1. Perform Partition Recovery in Unallocated Space Method 2. Show Hidden Partition Method 3. Format Partition to Recognized NTFS Method 4. Partition Recovery Service...Full steps |
Error: Disk Partitions Not Showing up in Windows 11/10
You have a 3 TB hard drive divided into two partitions, E: and F:, on a Windows 7 computer, used for personal data, files, and entertainment programs.
After upgrading from Windows 7 to Windows 10, partition F: may have disappeared and shown as "unallocated" in disk management, making its contents inaccessible. This error can occur due to various reasons, including changes in disk configuration, corruption of disk metadata, or incorrect disk partitioning. To fix the issue, you can try running the built-in Check Disk (chkdsk) utility, checking the disk for errors, and then running the built-in Disk Management tool to recreate the partition. Alternatively, you can use third-party disk management software, such as Qiling Partition Master, to scan and fix the partition. It's also recommended to create a backup of your data before attempting any repairs.
The issue of a "Disk partition not recognized by Windows 10" is a complex problem that requires further investigation. For the average user, recovering a lost partition without professional tools appears to be impossible.
If you're experiencing issues on your computer, ! Identify the specific problems you're facing, and then check out this text to learn about the possible causes and solutions. By doing so, you should be able to resolve the issue on your computer quickly.
Part 1. Fix "The Selected Partition Was Created by Windows and Might Contain Data" Error
Windows sometimes doesn't recognize a created partition after rebooting, and only the "Delete Volume" option is available in Disk Management, prompting a message about deleting a partition created by another OS.
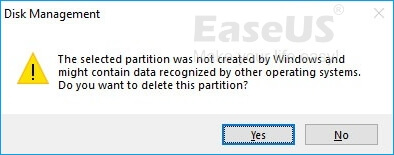
The 'selected partition as not created by Windows and might contain data recognized by other operating systems' error can be caused by various reasons. To resolve this issue, we'll explore the possible causes and provide reliable solutions to help you fix the problem.
Causes of This Error:
- The current disk was GPT disk with 2+ TB capacity.
- The disk was converted into a Master Boot Record (MBR) format and is now functioning as an MBR disk on a Windows PC.
- The MBR disk has reached its capacity limit.
- The over 2TB sized partition on the MBR disk is not recognized by Windows 10, showing as unallocated in Disk Management due to the limitations of the MBR disk.
Solution: Convert MBR to GPT
To fix the "The Selected Partition Was Not Created By Windows" error, you can convert the MBR disk to GPT on your computer. This process will make the partition visible and accessible on Windows PCs, allowing you to retrieve the saved data.
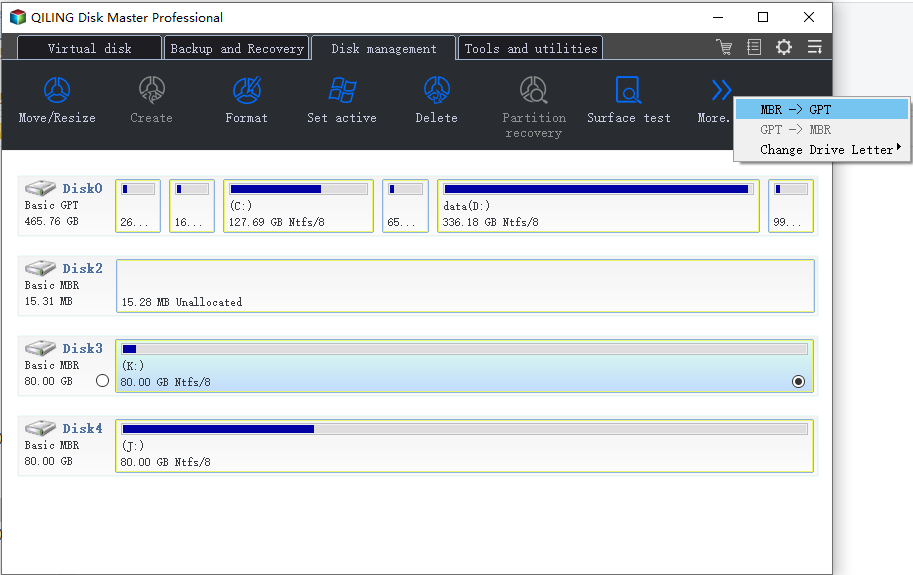
To delete partitions for disk conversion, consider using Qiling Partition Master, a professional partition manager software that can assist with the process.
The "Convert to GPT" feature in disk conversion allows you to change the partition style of your disk to GPT without deleting any volumes or data, making it possible to convert an OS disk to GPT or MBR without issues. To fix the error, follow the steps to convert your disk to GPT.
Step 1. Download and launch Qiling Partition Master on your Windows computer.
Step 2. To convert a MBR disk to GPT, select the disk you want to convert, click the "More" option, and then choose "Convert to GPT" from the menu. This will initiate the conversion process.
Part 2. Fix GPT Partition Not Recognized in Windows 11/10
The "GPT partition not recognized" issue typically occurs on a system disk with a GPT partition style, causing the computer to fail to recognize and boot from it after a restart.
When switching from a legacy BIOS to UEFI, the computer's boot process changes, and the GPT boot drive may no longer be recognized. To fix this issue, you can try booting from a UEFI-compatible OS installation media, such as a USB drive or CD/DVD, and then reinstall the OS or update the BIOS to UEFI mode. Alternatively, you can also try converting the GPT partition table to MBR, but this may not be compatible with all OSes. It's also worth noting that some older hardware may not support UEFI, so you may need to check your computer's specifications before attempting to switch.
Causes of GPT Disk Partition Not Recognized
- You failed to set the GPT disk as the boot drive, which prevents Windows from detecting it as a boot disk in BIOS and ultimately fails to boot from it.
- You failed to enable UEFI boot mode in BIOS
- Your computer or motherboard in your PC doesn't support UEFI boot mode, only Legacy boot is available.
To resolve the issue of your computer not recognizing a GPT partition, try restarting your PC and entering the BIOS settings to identify the root cause. Then, follow the specific methods outlined below to resolve the problem.
Method 1. Set GPT as Boot Drive in BIOS
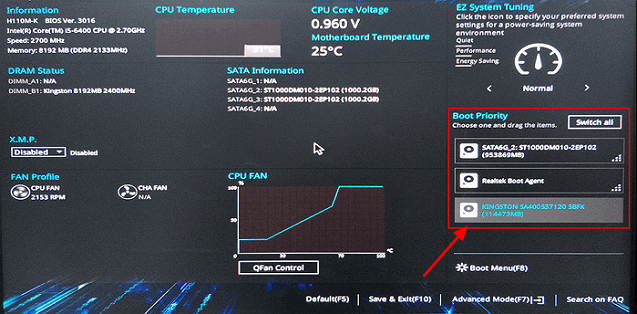
Step 1. Restart your PC and press F2/F8/Del to enter BIOS.
Step 2. The Boot Menu, or Boot Priority section, is where you can change the order in which your computer boots from different storage devices, such as your hard drive, solid-state drive, or USB drive. To access it, you'll typically need to press a specific key during the boot process, such as F2, F12, or Del, depending on your computer's manufacturer.
Step 3. To resolve this issue, switch the boot drive order by setting the GPT disk drive as the first boot drive. This should resolve the problem and allow the system to boot normally.
Step 4. Save the changes and exit BIOS, restart PC.
After this, your computer will automatically detect and boot from the GPT disk, and your GPT partitions will be visible on your computer.
Method 2. Enable UEFI Boot Mode on Your PC
If your computer supports both UEFI and Legacy boot modes, but is currently set to Legacy mode, the GPT system partition won't be recognized, causing the issue.
To resolve the issue, switch the boot mode from Legacy to UEFI in the BIOS settings. This can be done by following these steps:
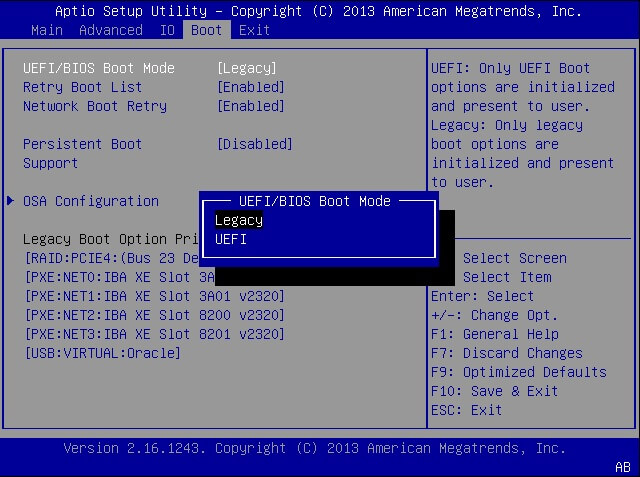
Step 1. Restart PC and press F2/F8/Del key to enter BIOS.
Step 2. To access the Boot menu, restart the computer and enter the Boot menu. The Boot menu is usually accessed by pressing a key such as F2, F12, or Del, depending on the computer manufacturer.
Step 3. If your computer still shows as Legacy, use the down arrow to select "UEFI" from the boot mode menu. This will update your computer's boot mode to UEFI.
Step 4. Save all the changes and exit BIOS.
To make use of the GPT partitions on Windows 10/8/7, simply restart your computer and boot into your system. The GPT partitions will be automatically recognized and utilized by the operating system.
Method 3. Convert GPT to MBR
Due to hardware limitations, some computers only support Legacy boot mode, which prevents GPT drives from being detected and booted from.
To resolve the issue, convert the GPT disk to MBR, set it as the boot drive, and use Qiling Partition Master's disk conversion feature to avoid file loss.
For a step-by-step guide, you may revert to Change GPT Disk to MBR Disk or follow the guide in Part 1 for help.Part 3. Fix Disk Partition Not Showing, Visible in Windows 11/10
Disk partition not showing, invisible, or not recognized is a common issue for many Windows users. The causes of this problem are varied, and therefore, the fixes are also different.
If your disk partition isn't showing up, - this guide can help. Check out the exact causes of this issue and follow the methods outlined here to resolve it. If you're not sure what's causing the problem, just follow the solutions step by step, from simple to complex, and you'll be able to get your hard drive partition showing up and working normally again.
What Cause Your Hard Drive Partition Not Showing in Windows 10:
- Partition gets lost or deleted.
- Partition is hidden on PC.
- Partition contains Windows unsupported file system, like Linux EXT2/3/4.
- The partition contains an invalid file system or corrupted file system, similar to a RAW partition.
To fix the disk partition not recognized by Windows 10 and recover the lost partition, follow this guide. First, stop using the affected drive to prevent further data loss.
Method 1. Restore Lost Partition via Qiling Partition Master
If you accidentally deleted a hard drive partition, it won't appear in File Explorer, but it will show up in Disk Management as "Unallocated".
To recover a lost partition and its saved data, you can use reliable partition recovery software. Qiling Partition Master is a helpful tool for this purpose, making the process easier.
The partition recovery feature directly scans the unallocated space on your drive, finding all missing partitions and data for you. This allows you to recover lost partitions and access your important files again.
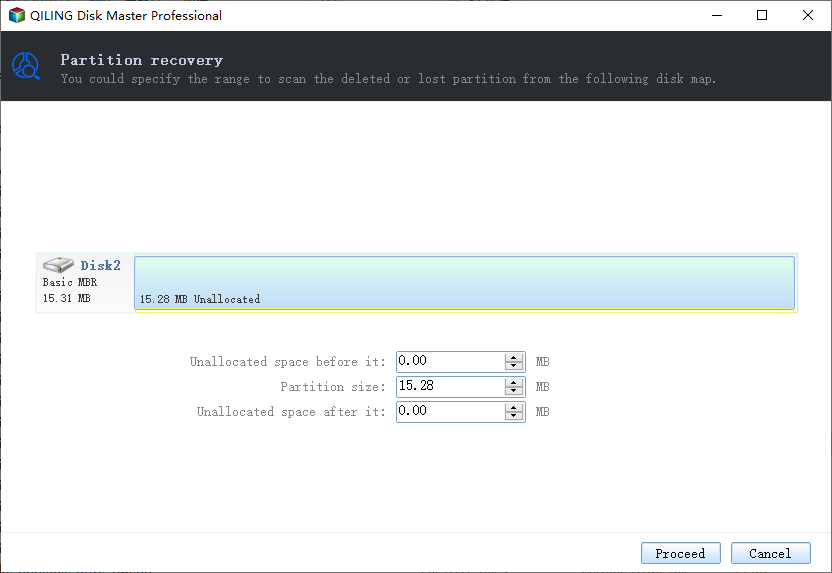
Step 1. Open Qiling Partition Master and click "Partition Recovery" on the top menu. A new window will appear asking you to select a disk to start searching for lost partition(s), so choose the desired disk and click "Scan".
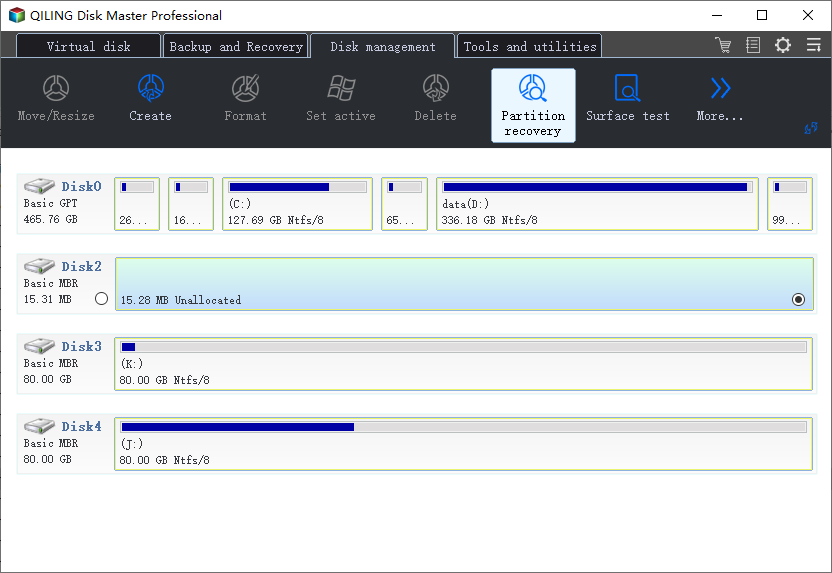
Step 2. A quick scan will immediately start, allowing you to pause the scanning process at any time by clicking "Proceed" when the lost partition appears, and then you can start your data recovery.
You can double click on the partition you're looking for to preview its content.
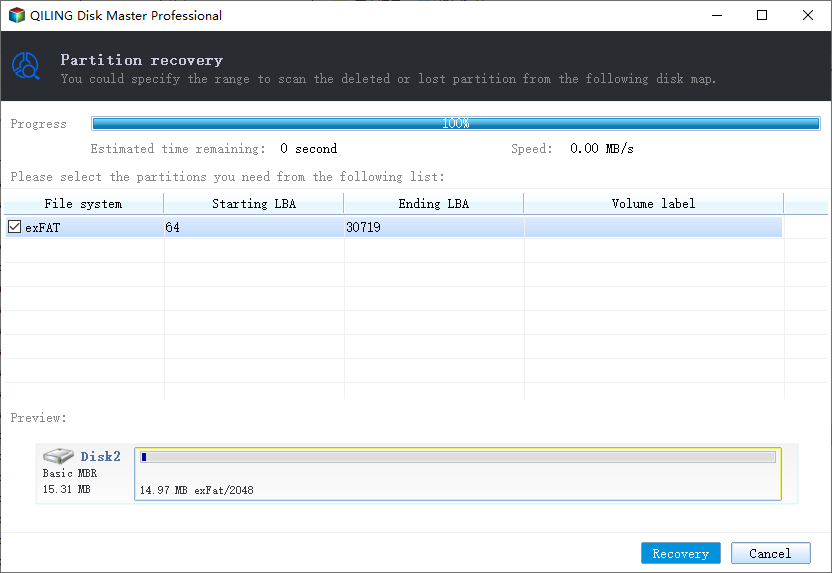
Step 3. Once the lost partition and data have been found, click "Recover" to restore the lost partition, and it should reappear in your drive.
Method 2. Set to Show Hidden Partition
If you manually hide a partition in Windows, it won't appear in File Explorer, but it will still be visible in Disk Management as a volume without a drive letter.
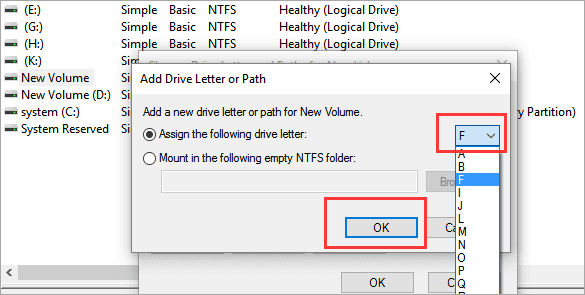
To show a hidden partition, you can simply set a new drive letter to the hidden partition in Disk Management, making it easily accessible. This process is straightforward and can be completed by following a few simple steps.
Option 1 - Hide Partition
- Right-To hide a partition, click on the partition you want to hide and select "Hide partition" from the drop-down menu.
- You will see a window showing the notification. Read the instructions and click "OK" to continue.
Option 2 - Unhide Partition
- Right-To view and access a partition, click on the partition you want to view and select "Show partition" from the drop-down menu.
- Read the instructions and click "OK" to continue.
Step 4.Assign the drive letter for the hidden partition, such as F, and click "OK".
To access your hidden partition, you can use the following steps: First, restart your PC and press F2, F12, or Del to enter the BIOS settings. Then, navigate to the "Boot" tab and enable the "Legacy Boot" or "CSM" option.
Method 3. Format to Make Partition Recognizable Again
If your partition contains a file system not supported by Windows or is corrupted and appears as RAW, you'll need to format it to make it usable again.
All-Qiling Partition Master's Format feature allows for the effective execution of partition operations, enabling the reset of a partition recognized by Windows in just a few clicks.
This software supports various file systems on Windows PC, including NTFS, FAT32/16, exFAT, EXT2/3/4, and others. To make your partition usable again, you can format it, and for Windows partitions, NTFS is the recommended file system.
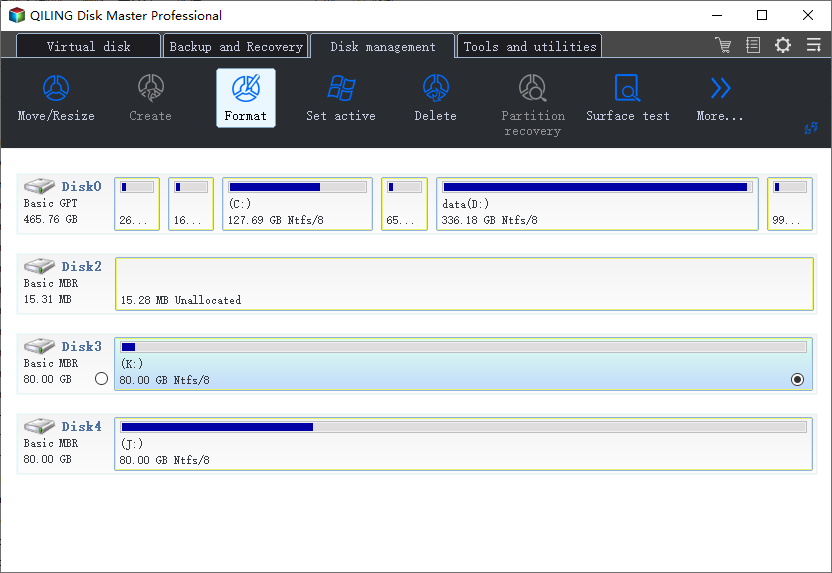
Step 1. Run Qiling Partition Master, right-click the hard drive partition you intend to format and select "Format" from the menu.
Step 2. Set the partition label, file system, and cluster size in the new window, then click "Proceed" to format the partition.
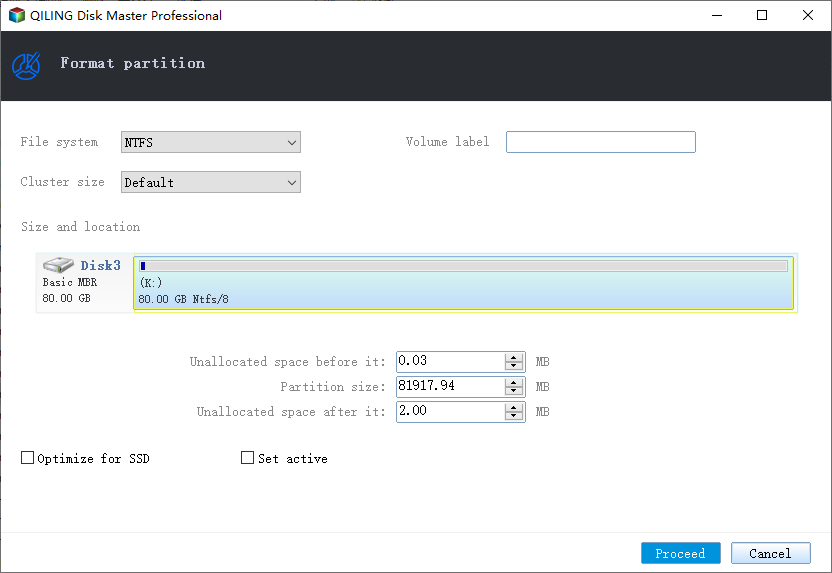
Step 3. Then you will see a warning window, click "Yes" in it to start formatting the partition on your hard drive.
After this, your partition should be available for saving files again.
Method 4. Manual Partition Recovery Service
If the above solutions still cannot make your partitions work normally on Windows 10, you can try turning to a manual partition recovery service for help.
- 1. Unformat the drive
- 2. Repair the RAID, RAW disk or operating system
- 3. Recovering a lost partition that cannot be recovered by software typically involves using specialized hardware tools or techniques that can access and recover data from the lost partition. One such method is using a data recovery company or a professional data recovery service that utilizes specialized hardware and expertise to recover data from the lost partition.
Tips to Prevent Hard Disk Partition Not Showing Error in Windows 11/10/8/7
After making hard drive partitions visible on your computer, here are some additional tips to prevent further issues: ensure the partition is formatted and assigned a drive letter, check for BIOS settings that may be hiding the partition, and verify that the partition is not corrupted or damaged. Regularly check for disk errors and update your operating system and drivers to prevent compatibility issues.
- Set a Windows supported file system (NTFS) to your partition.
- Don't hide partition.
- Be careful while using Disk Management.
- Enable UEFI boot mode if your system disk is GPT.
- If your computer doesn't support UEFI boot, you'll need to convert the GPT partition table to MBR and change the boot mode to Legacy. This involves rewriting the partition table to use the older Master Boot Record (MBR) format, which is compatible with Legacy boot.
- If your computer supports UEFI boot, you can convert the Master Boot Record (MBR) to a GUID Partition Table (GPT) to make partitions larger than 2TB visible.
- Run antivirus software regularly.
- Create a regular backup of partition data.
To Sum Up
On this page, we listed three top symptoms that Windows 11/10/8/7 users may encounter when a hard disk partition is not recognized by their computer.
If Windows disk management warns you that the selected partition was not created by Windows, you can try converting the disk to GPT to make it detectable by Windows. Qiling partition manager software can assist with this process.
If the GPT system partition is not recognized in Windows 10, you can try setting it as a boot drive in the BIOS or enabling UEFI mode. However, if your computer doesn't support UEFI boot, you'll need to convert the GPT to MBR to make the partition detectable.
You can easily recover, unhide, and format partitions to NTFS using reliable Qiling Partition Master, which can resolve issues with normal disk partitions not showing up.
Related Articles
- [Fixed] Can't Save Files to USB Flash Drive
- Format EXT4 on Windows 10,8,7 with Best EXT4 Format Freeware
- How to Delete OEM Partition in Windows 11/10/8/7 [2022 Updated]
- How to Format Hard Drive Using DiskPart - Quick Format Command 2022
- Is 8GB RAM Enough? Get the Answers Here!
With memory prices dropping, you might be tempted to get a high-capacity upgrade, but how much RAM do you need for your laptop or desktop computer? Is 8GB RAM enough, or do you need more? You'll find the answers here. - Lenovo VS Dell: Which Is Better Laptop in Terms of Price, Performance, and Much More?
If you're in the market for a new laptop but can't decide between Lenovo and Dell, this guide is for you. We'll compare the two brands and provide a recommendation to help you make an informed decision.