How to Install Windows 11 in Virtual Machine (Step-by-step Guide)
For Windows enthusiasts, the upcoming Windows 11 is likely to be a thrilling experience, but some users may still have doubts about its performance. To alleviate these concerns, it's a good idea to test Windows 11 on a virtual machine, providing a safe and controlled environment to assess its capabilities.
An overview of installing Windows 11 on a Virtual machine
How to Install Windows 11 in VMWare?
How to Install Windows 11 on Hyper-V?
Bonus Tip: Manager Disk for Windows 11
An Overview of Installing Windows 11 on a Virtual Machine
You may want to install Windows 11 on a virtual machine for various reasons. A virtual machine is a great way to install and test something on your computer without risking any damage. This can be especially useful for trying out new software or operating systems without affecting your actual computer.
A virtual machine would be beneficial in creating an isolated environment that doesn't interfere with the computer's normal functioning. If issues arise with the test software or operating system, it can be easily uninstalled without affecting the computer's system files or overall performance, allowing it to continue working as usual.
How to Install Windows 11 in VMWare?
To install Windows 11 on VMWare, follow these steps: first, download the Windows 11 ISO file from Microsoft's official website, then create a new virtual machine in VMWare and allocate sufficient RAM and CPU resources to it. Next, add the ISO file to the virtual machine's CD/DVD drive and start the installation process by booting from the virtual CD/DVD drive.
- Download and install VMWare Workstation Player, a free software that can be easily installed on any device.
- To create a Windows 11 ISO file, you can use the Windows Media Creation tool, which is a free tool provided by Microsoft. This tool allows you to download the Windows 11 installation files and create a bootable USB drive or ISO file. Alternatively, you can also use other tools such as Windows to Go, which is a feature in Windows 11 that allows you to create a portable version of Windows that can be run from a USB drive. These tools provide a convenient way to create a Windows 11 ISO file for installation or other purposes.
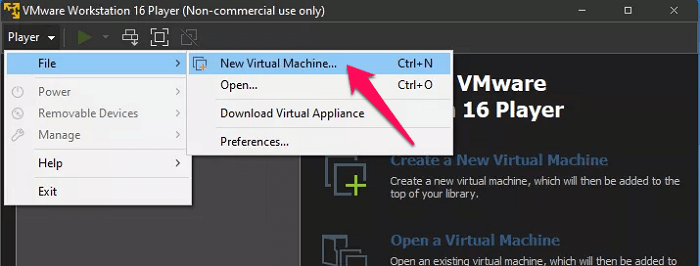
- To create a new virtual machine, navigate to the VMWare Player menu and select "File" to access the virtual machine creation options.
- Pick the ISO file that has been saved on the hard drive or even from the removable drives.
- Click Next.
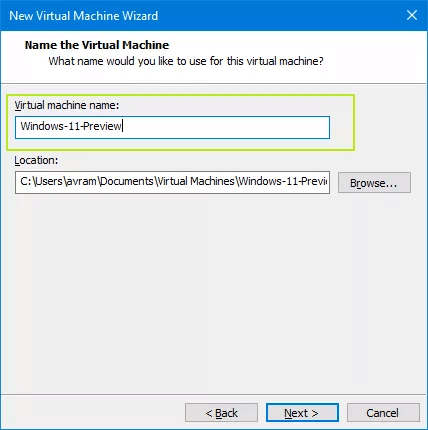
- Give a name for this virtual machine. Simply give any name as per your preferences.
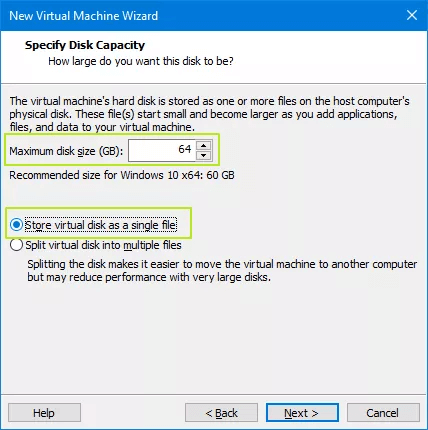
- Configure the virtual machine with a minimum of 64 GB disk size, selecting the option to store the virtual disk as one file.
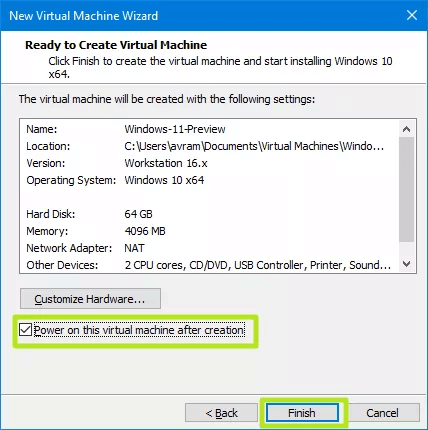
- Click on Customise hardware.
- Increase the RAM to at least 4 GB.
- After creating the VM, power it on.
To install Windows 11 on a virtual machine, follow the instructions provided, and when prompted, reboot the PC. Once done, the virtual machine with Windows 11 is ready for use.
How to Install Windows 11 on Hyper-V?
Hyper V is a powerful virtualization platform that allows users to install programs and operating systems on a virtual machine, supporting almost all operating systems. It's a prominent choice for various needs, making it a versatile option for most users.
To enable Hyper-V on the target system, follow these steps:
- To check if the system supports Hyper V, launch PowerShell as admin and enter the command `Enable-WindowsOptionalFeature -Online -FeatureName Microsoft-Hyper-V -All`.
- To enable Hyper-V installation through the Control Panel, follow these steps:
To create a virtual machine and install Windows 11 on it, ensure that Hyper-V is supported on your preferred device. Once confirmed, follow the instructions to set up the virtual machine and install Windows 11 on it.
- To download the Windows 11 ISO file, you can use the Windows Media creation tool, which is one of the best methods for this purpose.
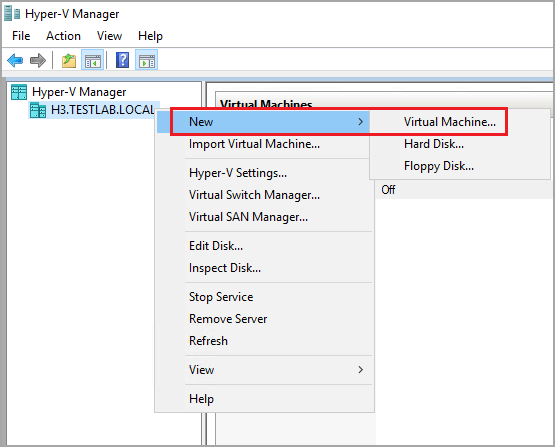
- Once enabled, type "Hyper V" in the Windows Search and launch it.
- To create a new virtual machine in Hyper-V, click on the "Action" menu in the Hyper-V Manager and select "New > Virtual Machine" from the dropdown menu.
- Give a description of your virtual machine. Click Next.
- You're considering moving the virtual machine to a different location. That's a reasonable decision. What's the reason behind it?
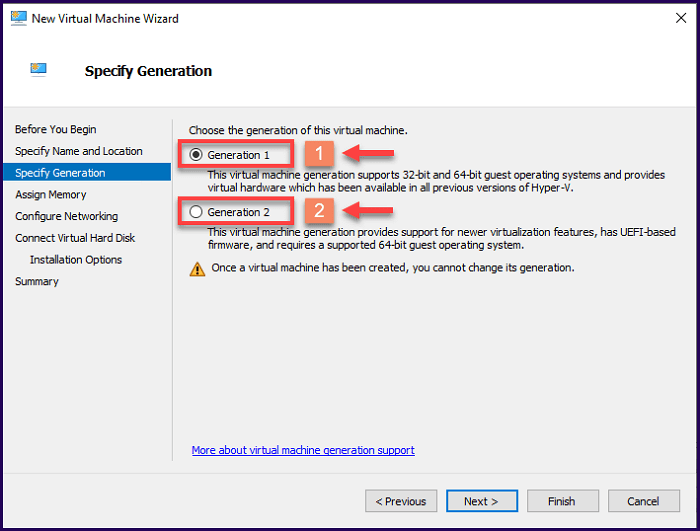
- Select Generation 2.
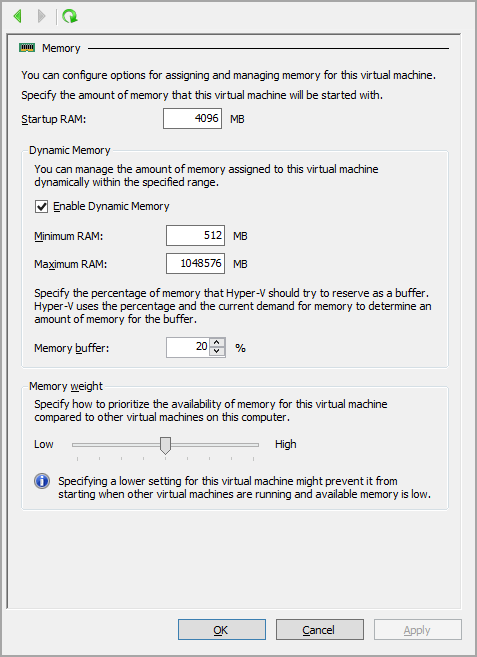
- In the next screen, configure the startup memory to at least 4 GB. Also, check Enable Dynamic Memory for this virtual machine.
- The next step is to select the default switch from the drop-down menu in the "Connection" section.
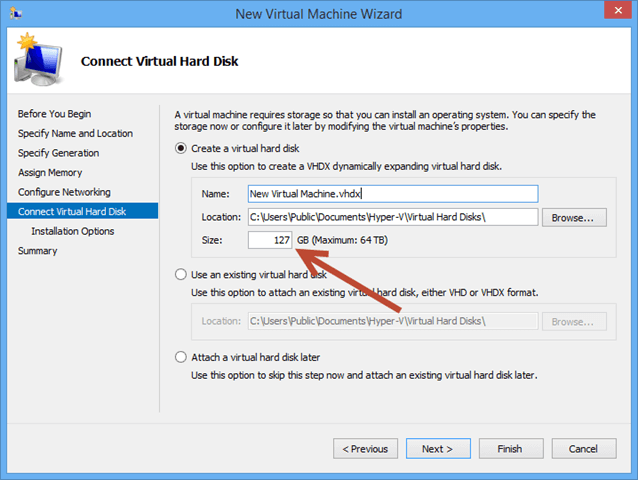
- In the "Connect to the Virtual Hard disk" screen, use all the default settings except for the size, which should be a minimum of 64 GB.
- The next screen will provide options for installing the ISO file, where you can browse for the downloaded ISO file and click Open.
- Click Finish on the next screen.
Follow the on-screen instructions for installing Windows 11 on the virtual machine.
Bonus Tip: Manager Disk for Windows 11
After installing Windows 11 on a virtual machine, it's essential to manage the disk space more practically. To do this effectively, consider using a good tool for disk management, such as Qiling Partition Master, which can help you manage your virtual disk more efficiently.
This tool is an excellent choice for managing and improving PC performance, and it can be particularly helpful for Windows 11 users who need to convert their MBR system disk to GPT partition without losing any data.
The Qiling Partition Master offers several benefits, including the ability to resize, merge, and split partitions without data loss, as well as the ability to convert between FAT, NTFS, and other file systems. Additionally, it can migrate operating systems to a new hard drive, making it a useful tool for upgrading or replacing old hardware.
- It supports split partitions directly.
- It can be helpful in tasks such as resizing, moving, merging, migrating, and copying disks or partitions.
- Several file conversion options are available, including the ability to convert a Master Boot Record (MBR) to a GUID Partition Table (GPT) or vice versa, as well as the conversion of dynamic disks to basic disks or vice versa.
- The software offers advanced features, including the ability to recover lost partitions and create a bootable WinPE disk, allowing for a range of troubleshooting and repair tasks to be performed on a Windows system.
- Support for an effective alignment of SSDs.
The partition master and disk management tool is an enhanced way to meet most of a home user's needs.
The Concluding Thoughts
Installing Windows 11 on a virtual machine is a great way for Windows fans to try out the new operating system, and virtual machines offer a simple and easy way to test new software and operating systems, which can be a great choice in the long run. The tutorials provided can help achieve positive results.
Effective risk management is key to achieving a full-fledged virtual machine experience. Once the operating system is installed, disk management tools like Qiling Partition Master can help manage and organize the disk more effectively, leading to a better virtual machine experience.
Related Articles
- Partition Wizard Software (Full Version) Free Download for Windows Servers in 2022
- Solutions for Windows 10/8/7 Stuck on Startup, Boot, or Loading Screen
- How to Format iXpand Flash Drive [SanDisk] in Windows 10/8/7
- Windows 11 KB5011563 Update: Unsupported Devices Display Desktop Watermark
- How to Unpartition a Hard Drive on Windows 11/10/8.1/8/7
You can unpartition a hard drive on Windows 11/10/8.1/8/7 using one of three methods: Disk Management, DiskPart, or Qiling Partition Master. This guide will walk you through the process of removing partitions from a hard drive using these tools. - Fix USB Device Not Recognized in Windows 10
Receive USB device not recognized error message while connecting your USB drive with Windows PC? Windows 10 cannot recognize or read your USB drive? Relax! This article will provides 3 effective methods to help you fix USB device not recognized error in Windows 10 now.