How to Remove Write Protection from an External Hard Drive
“Write-protected” can mean a physical switch, Windows permissions, an encrypted volume, a read-only disk attribute, or a drive that has started failing. Identify the cause before erasing anything. If the drive still reads, copy important data to another device now.
Check the connection and device state
If an external SSD became read-only immediately after an unsafe unplug, start with the unsafe-removal read-only checks and preserve accessible files before changing disk attributes.
Step 1. Look for a lock switch on the external enclosure or adapter. Set it to the unlocked position, disconnect the drive safely, and reconnect it. Try a different cable and direct USB port, not an unpowered hub.
Step 2. Open Disk Management and note the external drive's capacity, disk number, and volume letter. If Windows asks you to initialize or format a drive containing files, cancel. Such prompts are not evidence that formatting is safe.
Step 3. If BitLocker is enabled, unlock the volume using the correct password or recovery key. A locked encrypted volume cannot be made writable by changing a disk attribute.
Check file and folder permissions
If you can modify one folder but not another, the issue is probably permissions rather than whole-disk protection. Right-click an affected folder, open Properties > Security, and inspect your account's write permission. For a drive previously used on another PC, an administrator may need to correct ownership or permissions. Do this only on data you own or administer; avoid taking ownership of an organization's managed drive.
Clear a software read-only flag with DiskPart
Step 1. Open Terminal or Command Prompt as administrator and enter diskpart, then list disk. Match the external disk's capacity against Disk Management. Disconnect other removable disks to reduce the chance of selecting the wrong target.
Step 2. Enter select disk N, using the verified number, then detail disk. Recheck the model and volumes before making any change.
Step 3. Enter attributes disk. If the disk has a software read-only attribute, run attributes disk clear readonly, then attributes disk again. Type exit, reconnect the drive, and test by creating and deleting a small file. Do not run clean; it removes the partition map and is unnecessary for this check.
If the current read-only state remains or immediately returns, the device may be enforcing it at the hardware or controller level. A partition formatter cannot override that safely.
Remove Disk or Volume Readonly with Qiling Disk Master Pro
Qiling Disk Master Pro provides two separate controls in Disk management. Remove Disk Readonly is for a read-only setting on the entire physical disk; Remove volume readonly is for the selected volume. Neither control unlocks BitLocker, changes file permissions, repairs a failing drive, or overrides a physical lock switch. Back up readable files before changing disk attributes.
Remove Disk Readonly for the whole external drive
Step 1. Connect the external drive, open Qiling Disk Master Pro, and select Disk management. Compare its disk number and capacity with Windows Disk Management so you do not change the internal system disk.
Step 2. Right-click the external disk label on the left side of the disk map, not one of its volume rectangles. Choose Advanced > Remove disk readonly. This disk-level action is the appropriate choice when every volume on that external drive is read-only.
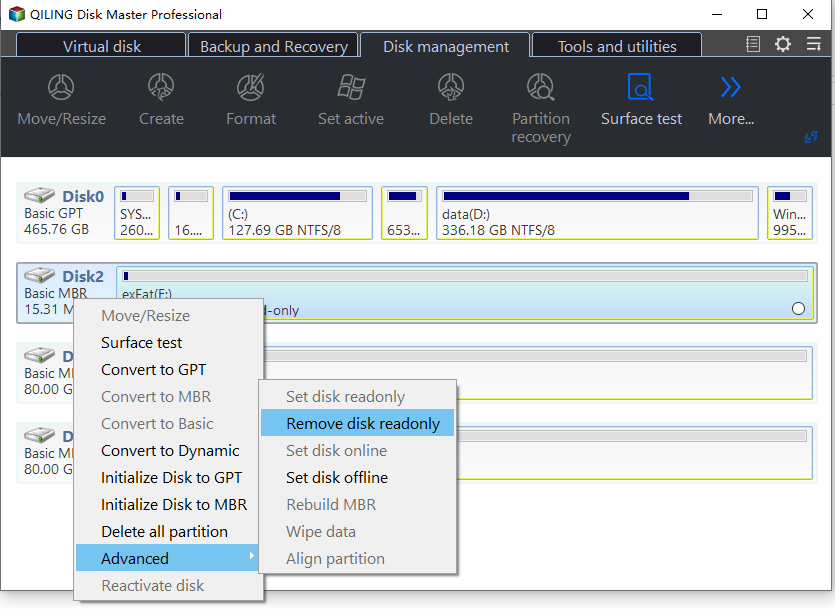
The screenshot uses a sample removable disk. Select your own external hard drive by disk number and capacity.
Step 3. Reconnect the drive if needed, then create and delete a small test file on the external disk. Check its other volumes too before returning to normal use.
Remove volume readonly for one affected volume
Step 1. In Disk management, identify the affected volume by its drive letter, label, and size. Select its partition rectangle rather than the physical disk label.
Step 2. Right-click that volume and choose Remove volume readonly from its menu; in versions that group this command, look under Advanced. Do not select a different volume simply because it has a similar drive letter.
Step 3. Test writing a small file to the affected volume. On some basic MBR disks, Windows may treat a volume read-only attribute as disk-wide, so also confirm that other volumes have the expected write access.
If either command is unavailable, fails, or the drive becomes read-only again, return to the earlier checks for a lock switch, BitLocker, permissions, or hardware failure. Do not format the drive merely to test whether this setting can be cleared.
When should you stop troubleshooting?
Stop write attempts if the drive repeatedly disconnects, clicks, reports I/O errors, or changes capacity. Preserve what is readable and seek professional help for valuable data. Once the data is safe, you may test another enclosure or replace the drive. Formatting is a last step for a reusable, verified-writable device; it is not a cure for failed hardware.
Conclusion
Check physical locks, encryption, permissions, and the exact disk or volume attribute in that order. Disk Master Pro can clear a software read-only setting, but back up first and do not mistake a failing drive's protective read-only mode for an ordinary setting.
Related Articles
- How to Remove Write Protection
Compare write-protection causes on removable storage. - Windows Disk Backup and Restore Tutorials
Protect files before attempting repairs on a problem drive.
Products
Articles & Tutorials
- Data Recovery
- Data Backup
- File Recovery
- File Backup
- System Backup and Restore
- Disk and Partition Clone
- Technical articles
- Mobile articles
- Disk Master Help
- Windows Data Recovery Tutorials
- Windows Secure Delete Tutorials
- Windows Partition Management Tutorials
- Windows File Backup and Restore Tutorials
- Windows System Backup and Restore Tutorials
- Windows Disk Backup and Restore Tutorials
- Windows Clone Tutorials