How to Transfer Files from PC to PC Using OneDrive
PAGE CONTENT:
How To Transfer Files from Laptop to Laptop Using OneDrive
You can transfer files from one laptop to another using a PC data transfer tool. First, download and install a file transfer software on both laptops, such as Shareit, Xender, or AnyTrans.
Microsoft's OneDrive allows users to store and access files and photos from anywhere, keeping them safe and easily accessible on any device. This provides the flexibility to make changes, edits, and share files directly with others through a secure network, making life easier by giving users the freedom to access and share their digital files quickly and securely.
OneDrive offers a free basic plan with 5GB of storage, as well as paid plans with larger storage and additional services like Skype and Office, which can be beneficial for businesses with easy Office integration and extra support.
To transfer files from an old PC to a new PC using OneDrive, sign in to your OneDrive account on both computers, then sync your files on the old PC and wait for them to sync to the cloud. On the new PC, sign in to the same OneDrive account and wait for the files to sync from the cloud.
How To Transfer Files from Laptop to Laptop Using OneDrive
Losing files and photos can be frustrating, but there's a simple way to prevent that from happening. To transfer files from an old PC to a new PC using OneDrive for Windows 10, follow these steps: follow the steps below.
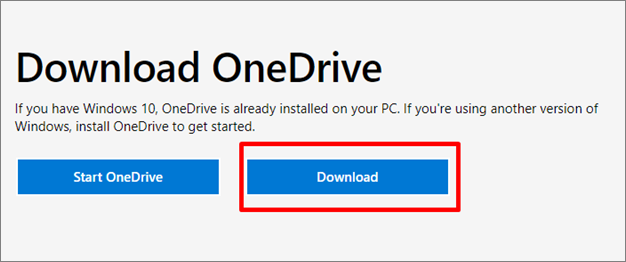
Step 1. Install and set up OneDrive on your current PC. You can do this by going to the OneDrive webpage and downloading the version for your Windows operating system, or if you're using Windows 10, you can skip this step as OneDrive is already installed on your PC.
Step 2. To allow the app to make changes to your device, click "Yes" on the security pop-up that appears, then sign in to your Microsoft account. If you don't have an account, create one.
Step 3. Once Microsoft's OneDrive is installed, you can start transferring files from your computer to the cloud by selecting the OneDrive location in your File Explorer to save your files.
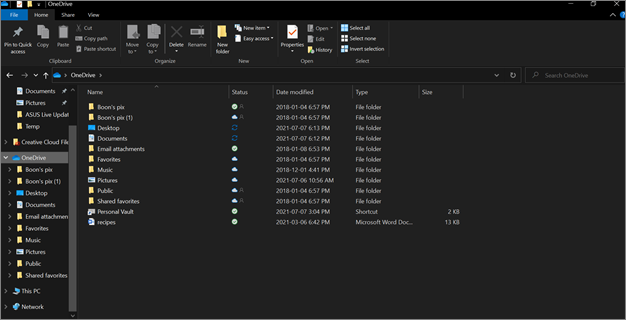
Step 4. Drag the files that you want to transfer to the designated folder.
Step 5. Install OneDrive on the other PC, using the same installation steps, and log in with the same Microsoft account.
Step 6. Once logged into OneDrive, you can access your files and photos by opening the stored folders, and then copy them to your new computer's hard drive.
Extra Tip: How to fix OneDrive not Syncing on Windows 10
If your OneDrive is not syncing on your Windows 10 PC, try restarting the OneDrive service, checking the OneDrive settings, and ensuring that the OneDrive folder is not in use by another program. Additionally, you can try reinstalling OneDrive, checking for updates, or running the System File Checker tool to resolve any corrupted system files.
Fix 1. Reset OneDrive in Windows 10
Step 1. The Run dialog box can be opened by pressing the Windows key and the R key on your keyboard, which will open a small window where you can type the name of a program, file, or folder you want to access, and then press Enter to open it.
Step 2. To reset OneDrive, copy and paste the following line into the dialog box and select OK: %localappdata%\Microsoft\OneDrive\onedrive.exe /reset.
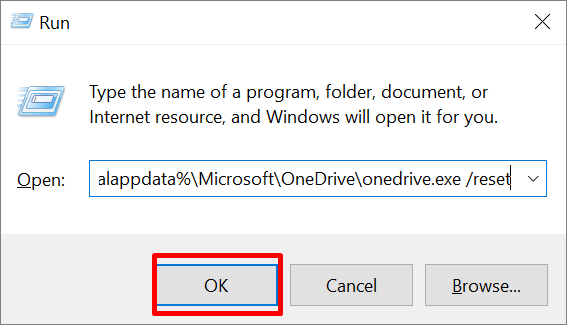
If you get a message that says 'Windows cannot find…', you can try copying and pasting the line "C:\Program Files (x86)\Microsoft OneDrive\onedrive.exe /reset" and selecting OK instead.
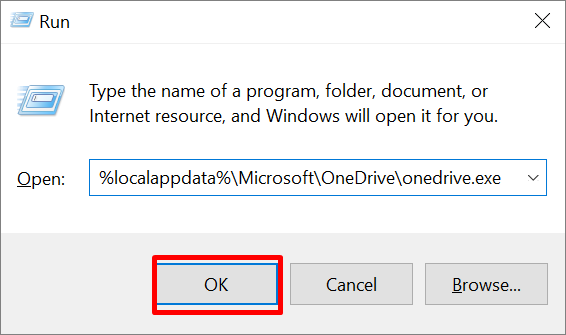
Step 3. The Run dialog box can be opened by pressing the Windows key and the R key simultaneously. This will open a new window that allows you to enter a command or location to open.
Step 4. You can copy and paste the following message into the dialog box: %localappdata%\Microsoft\OneDrive\onedrive.exe.
Fix 2. Check and Update OneDrive to the Latest Version
If neither of these works, try to update OneDrive.
Make sure that you have the most recent version of OneDrive downloaded. If not, follow these steps:
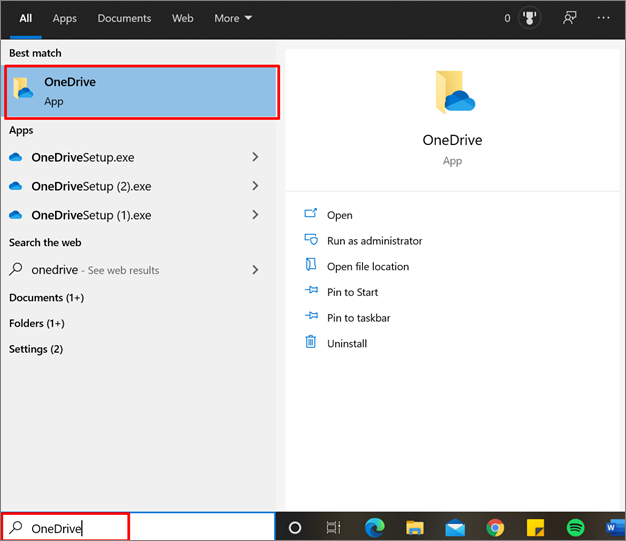
Step 1. To access OneDrive on your PC, simply type "OneDrive" in your home search bar and open the application.
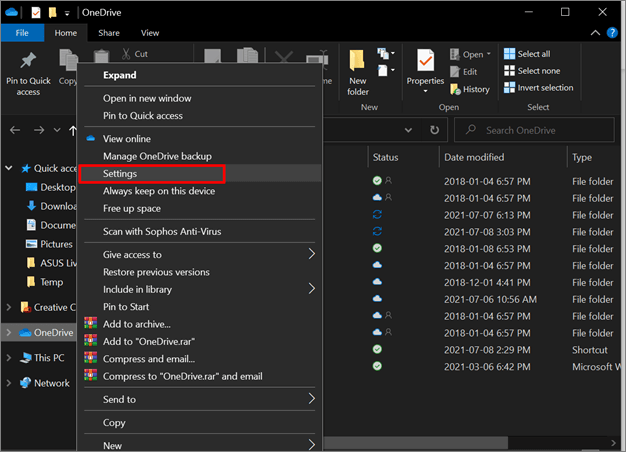
Step 2. Once open, right-click on the OneDrive folder and select "Settings".
Step 3. To find the version of OneDrive that you have installed, select the "About" tab.
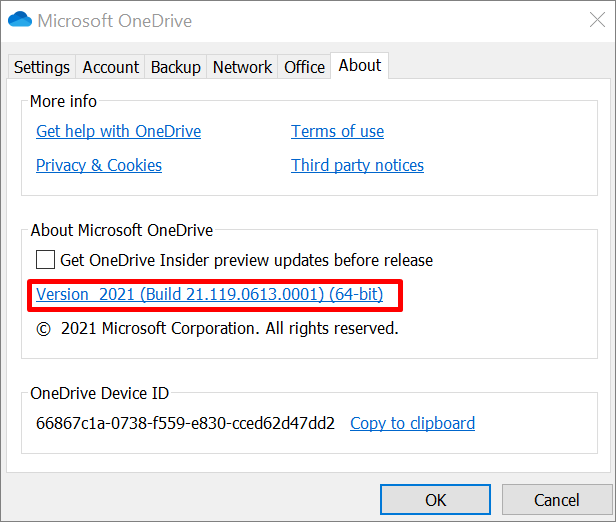
Step 4. To check if you have the latest version of OneDrive, click on the OneDrive version you have, which will direct you to the OneDrive support page. There, you can compare your version to others and download the latest one if needed.
Fix 3. Uninstall and Reinstall OneDrive
If OneDrive is not syncing properly, you can try uninstalling and reinstalling it without affecting your saved files. To do this, follow the troubleshooting steps, which will guide you through the process of uninstalling OneDrive and then reinstalling it. This should resolve the syncing issue and get OneDrive working properly again.
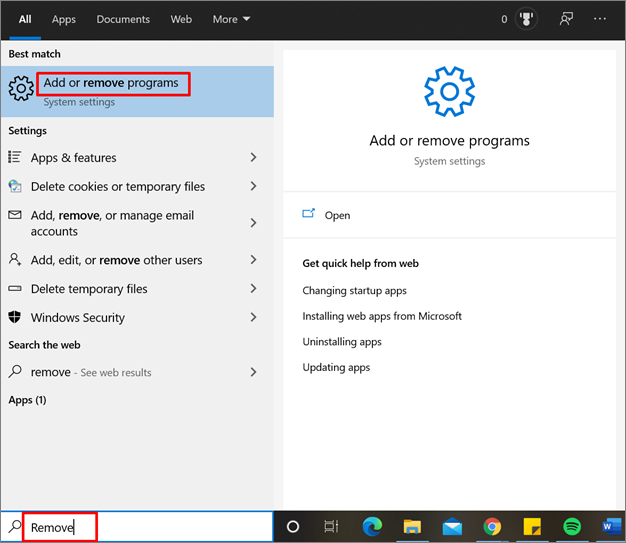
Step 1. To remove the Windows Search bar, type "Remove" in the Windows search bar and select the "Remove" option from the search results.
Step 2. To uninstall Microsoft OneDrive, scroll through the list of installed programs and select it, then click on "Uninstall".
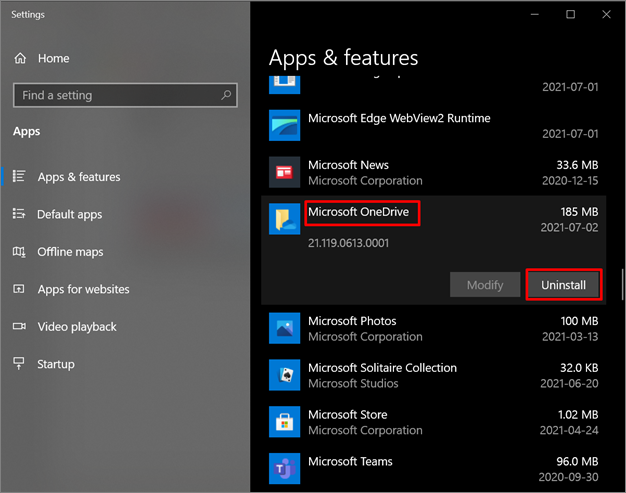
Step 3. Once OneDrive has been uninstalled, you can download the program again from the OneDrive webpage, start the installation, and follow the steps to set up the most recent version.
Fix 4. Upgrade OneDrive Account Storage
To upgrade your OneDrive account storage, head to Microsoft's OneDrive webpage, where you can follow the prompts to increase your storage capacity directly from the site.
Step 1. To upgrade your Microsoft account online, log into your account and navigate to the settings tab, where you can select the "Upgrade" option.
Step 2. You will be taken to Microsoft's Plans and upgrades page to see how much space is left on your current plan and view paid options to increase your storage space. Select the desired plan and follow the instructions to upgrade.

How to Transfer Files from Laptop to Laptop via Free PC Data Transfer Software
While OneDrive is a useful tool, other third-party PC data transfer software can be more user-friendly and efficient for transferring data.
Qiling Disk Master is a PC transfer tool that allows you to transfer files, installed applications, user accounts, and settings between PCs or laptops with just a few clicks.
Users of Qiling Disk Master Free have the option to transfer unlimited data from multiple programs, rescue and recover data from dead computers, scan and export program keys, and access free technical support, making it the easiest program to transfer.
Step 1.Launch Qiling Disk Master on both old and new computers. Then, click the "File sync" button on the main screen to proceed.
Step 2. Choose the right transfer direction.
"New": Transfer data from old PC to current new PC.
"Old": Transfer data from current old PC to remote PC.
Step 3. Connect the two PCs on the same LAN by entering the target PC's password or verification code. Choose the transmission direction and click "Connect" to proceed.
The verification code is located on the top right of the main "PC to PC" screen on the target computer, and a turn on button is available behind the Connection Verification.
Step 4. Go to the "Files" section, select the individual files you need to move.
Step 5. To transfer data from your old device to your new one, click the "Transfer" button and wait for the process to complete, which may take some time depending on the size of the files.
Conclusion
If you need to transfer files from one PC to another, Microsoft's OneDrive is a viable option, but Qiling Disk Master is a more efficient solution for data transfer.
Related Articles
- How to Quickly Transfer Large Files Over Network
- Is Dell Migrate Worth It in Data Migration Between PCs? How to Use It [2022 New]
- How to Transfer Opera with Bookmarks to a New PC
- You Must Know! Transfer Files from Google Drive to Mega
- Best Gptgen Alternative for Windows OS
Qiling Disk Master is a tool that can convert a disk from MBR to GPT or vice versa without losing any data, making it a good alternative to Gptgen in Windows. - Easily Fixed: Hard Drive Only Showing Half Capacity in Windows 10/8/7
If your hard drive only shows half capacity in Windows 11, 10, 8, 7, read this article and you will know why it occurs. Besides, you can learn how to restore the hard drive to its full capacity.