Free Download Windows 11 Check Tool for Windows 11 Compatibility Check
Microsoft officially released Windows 11 on October 5th, 2021, allowing Windows enthusiasts, Insiders, and Pro users to download and experience the improved features on their computers.
To prepare for the upgrade to Windows 11, you can start by checking your computer's compatibility with the new operating system. This involves verifying that your device meets the minimum system requirements, such as processor, memory, and storage capacity, to ensure a smooth and successful upgrade. By doing so, you'll be able to identify any potential issues and take necessary steps to resolve them before the actual upgrade takes place. This proactive approach will help minimize any disruption and ensure a seamless transition to Windows 11.
Windows 11 Upgrade Minimum System Requirements
Windows 11 has specific hardware and system requirements, which are the minimum specifications for a computer to upgrade to Windows 11. If a computer doesn't meet these requirements, it will display a 'This PC cannot run Windows 11' issue.
- Processor: 1 gigahertz (GHz) or faster with 2 or more cores on a compatible 64-bit processor or System on a Chip (SoC).
- Memory:4 GB RAM
- Storage:64 GB or larger storage device
- System firmware:UEFI, Secure Boot capable
- TPM:Trusted Platform Module (TPM) version 2.0
- Graphics card:DirectX 12 compatible graphics / WDDM 2.x
- Display:>9'' with HD Resolution (720p)
- Internet connection: Windows 11 Home requires a Microsoft account and internet connectivity for setup.
Resource page: https://www.microsoft.com/en-gb/windows/windows-11
Microsoft Windows 11 PC Health Check
Microsoft plans to release an app called PC Health Checker to help users check if their current laptop or PC meets the system requirements to install Windows 11, but the app is not yet available.

To check if your Windows 10 PC is compatible with Windows 11, you can use the PC Health Check app. This app will scan your computer and tell you if it meets the minimum system requirements for Windows 11. If your PC is compatible, you can also use the app to reserve your copy of Windows 11 and schedule the update for when it's convenient for you.
Download Qiling Windows 11 Checker App for Free
Qiling offers a free Windows 11 upgrade checker that allows users to quickly determine their device's compatibility with Windows 11, providing a simple and one-click assessment of their computer's configuration and compatibility.
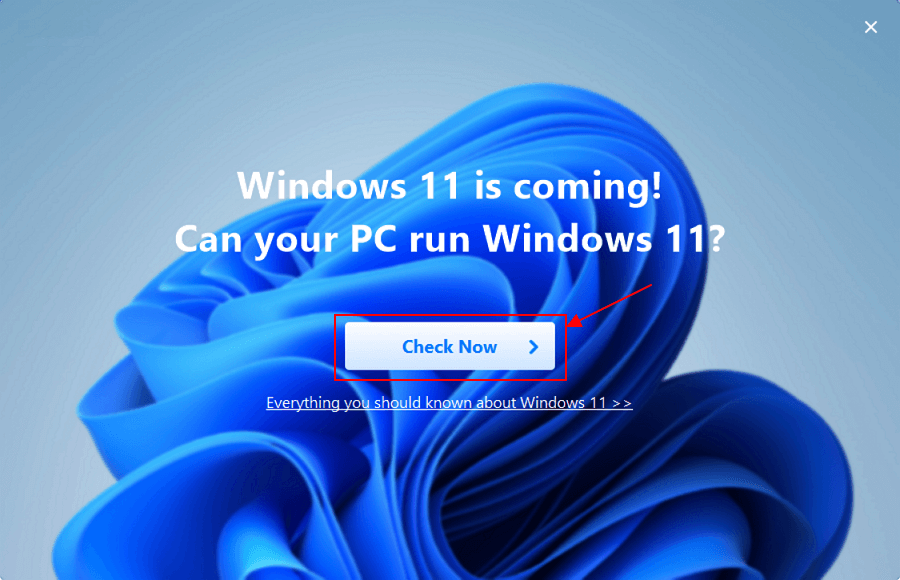
Step 1.Download Windows 11 Upgrade Checker.
Step 2.Click the Check Nowbutton to start.
Step 3. The Windows 11 compatibility result window will soon appear, listing all incompatible and compatible configuration items.
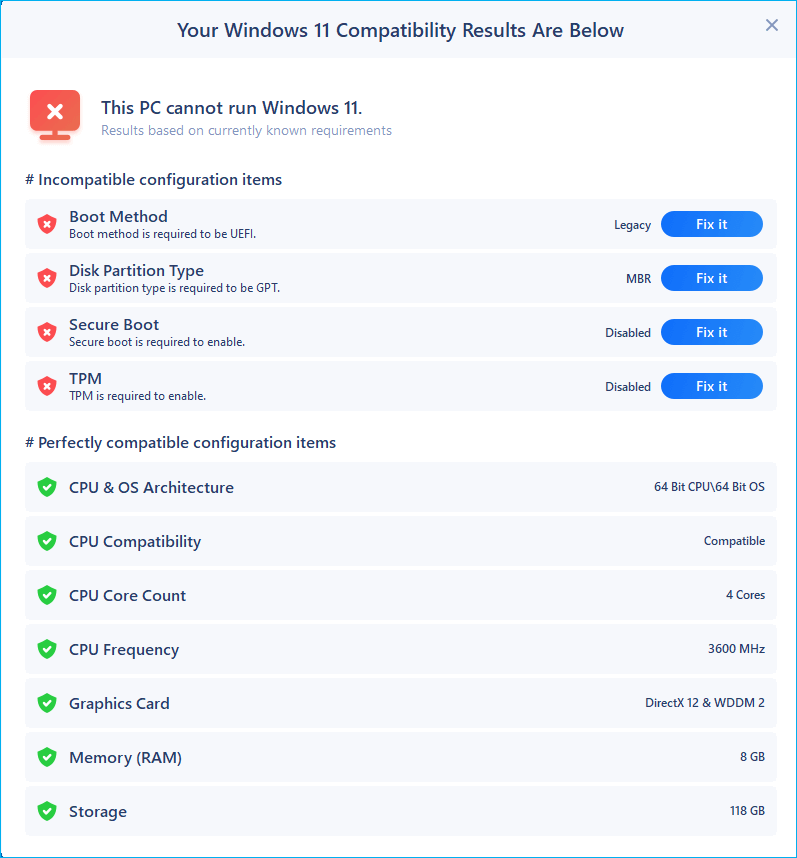
The most common incompatible configuration items are:
- Boot Method: Windows 11 requires UEFI boot mode, which is a PC system specification that defines the software interface between the operating system and the system's firmware, and should be set correctly if the CPU supports it.
- Disk Partition Type:Windows 11 requires the disk partition type of system disk to be GPT. If your system is in MBR, learn how to convert MBR to GPT without data loss with the way below.
- TPM:Windows 11 requires TPM 2.0 and it should be enabled. Learn TPM for Windows 11 and how to enable it.
- Secure Boot: Windows 11 requires Secure Boot to be enabled. To enable Secure Boot, follow the steps in the provided link.
How to Convert MBR to GPT Without Data Loss for Windows 11 Upgrade
Yes, you can convert MBR to GPT. You can use the built-in Windows feature called MBR2GPT or a third-party tool like Qiling Partition Master to convert the disk partition type from MBR to GPT. The MBR2GPT feature is available in Windows 11 and can be accessed by running the command "MBR2GPT /convert" in the Command Prompt as an administrator. This will convert the disk partition type to GPT without affecting the existing data on the disk.
With a professional partition manager like Qiling Partition Master, you can convert a MBR disk to GPT without losing any data, without formatting or deleting anything.
Qiling Partition Master is an ultimate partition management tool that provides full-around solutions for both beginners and experts. It allows you to create, resize/move, merge, wipe, and format partitions, catering to both basic and advanced needs. In addition to these features, it also offers advanced functions like disk cloning, disk wiping, and system migration, making it a comprehensive solution for partition management.
- Clone disk: You can clone an entire disk to another in the same disk layout without any data loss, even if the target disk is smaller, by using a cloning software that can resize the target disk to match the source disk's layout, ensuring all data is preserved and nothing is lost during the process.
- Disk/Partition Convert: You can convert a logical partition to a primary partition or vice versa, change a partition from FAT to NTFS, or switch a disk from MBR (Master Boot Record) to GPT (GUID Partition Table) or vice versa using the `convert` command in the Windows Command Prompt. The syntax for this command is `convert [volume] /fs:ntfs` or `convert [volume] /fs:fat32` to change the file system, and `convert [volume] /fs:ntfs /yes` or `convert [volume] /fs:fat32 /yes` to force the conversion.
- Migrate OS: Transfer OS from HDD to SSD without reinstalling Windows
To ensure a smooth Windows 11 upgrade, it's recommended to convert the existing MBR (Master Boot Record) partition table to GPT (GUID Partition Table) using a reliable partition management tool. This process is crucial for larger disk sizes and can be done by downloading a partition management program, such as MiniTool Partition Wizard, and following the step-by-step guides provided by the software.
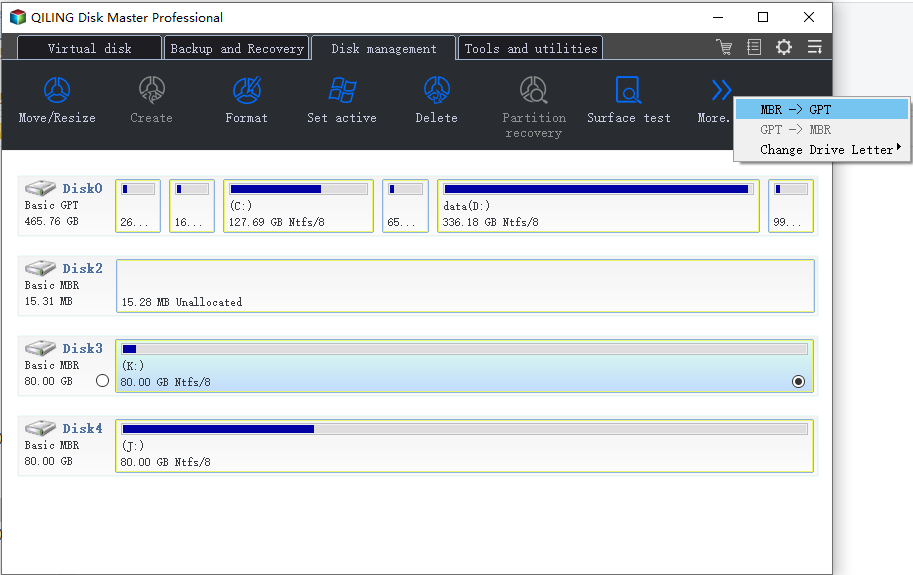
Step 1.Download and launch Qiling Partition Master on your Windows computer.
Step 2.To convert an MBR disk to a GPT disk, select the MBR disk you want to convert, click "More..." and then choose "MBR -> GPT" from the dropdown menu. This will initiate the conversion process.
Further Reading: How to Upgrade After Windows 11 Check
For users who'd like to upgrade from Windows 10 to Windows 11 through Windows Insider Program, take the following steps for reference.
Step 1.To open the Windows Insider Program, press Windows + I to open Settings, then click "Update & Security > Windows Insider Program > Get Started".
Step 2. To link your Microsoft account, follow the on-screen instructions and click "Link an account". Then, select your Microsoft account and click "Continue".
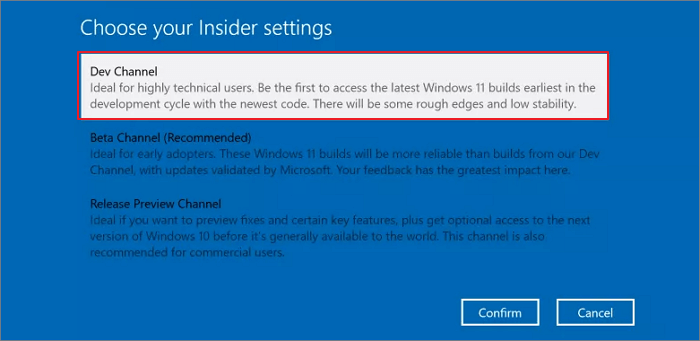
Step 3.To proceed, select the "Dev Channel" from the Windows 11 Insider build options and click "Confirm" to proceed with the highly technical user experience.
Step 4.Restart your PC to join Windows Insider Program.

Step 5. After restarting your PC, go to Settings, click on Update & Security, and then click on Windows Update.
Step 6.To install Windows 11, go to Settings, then Update & Security, then Windows Update, then Check for Updates. Once the update is available, you can download and install Windows 11.
The Bottom Line
After upgrading to Windows 11, we recommend using a partition manager like Qiling to maximize and optimize your disk usage, taking full advantage of the OS and your computer's hardware.
Related Articles
- 8 Fixes for There Is Not Enough Memory Or Disk Space to Run Word Error
- How to Wipe Hard Drive in Windows 11 (Get Your Answer)
- Windows 11 Shrink Partition: 3 Ways to Shrink Windows Partition
- How to Create and Format exFAT Partitions in Windows 11/10/8/7 (Free Methods)
- How to Securely Delete Multiple Recovery Partitions in Windows 10?
This article will introduce you why there are multiple recovery partitions in Windows 10 and how to remove these partitions. - Recovery Partition After Upgrading to Windows 10 from Windows 7/8
After upgrading Windows 7 or 8 to Windows 10, you find an extra recovery partition in Disk Management. What's it for? Can you delete it? This article will tell you all about recovery partition.