How to Fix Can't Shrink Volume in Windows 11/10/8/7
When encountering the "can't shrink volume Windows 10" issue, you can try using a free tool like Qiling disk manager or other solutions to resolve the problem.
Error: Can't Shrink Volume Windows 11/10
"Hi guys, do you know why Windows 10 cannot shrink volume? It doesn't allow me to shrink C: drive on my laptop? I want to shrink the C drive, but the Shrink button is greyed out.
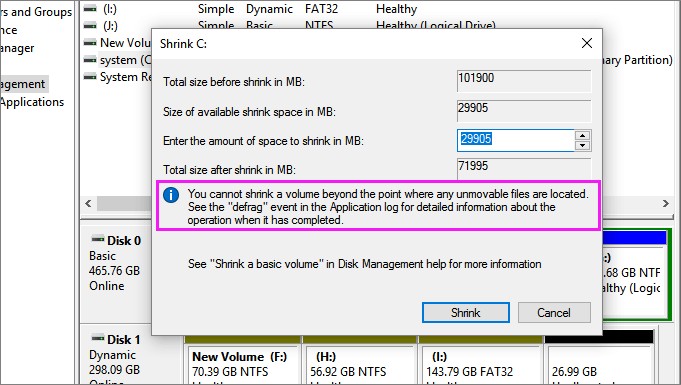
Disk Management won't allow me to shrink or decrease C drive with an error message, saying that 'You cannot shrink a volume beyond the point where any unmovable files are located. See the 'defrag' event in the Application log for detailed information about the operation where it has completed.' Can you help me to fix the cannot shrink volume in Windows 10 issue? Thank you."
Why Can't Shrink Volume in Disk Management on Windows 11/10
The "unable to shrink C drive" error can be caused by several factors. To effectively fix this issue, it's crucial to understand the underlying reasons, which include disk fragmentation, disk errors, and disk space issues. Additionally, the presence of system files, registry entries, and other system components can also hinder the shrinking process.
- There are unmovable files at the end of a volume, such as the hibernation file, page files, and system volume information folder used by System Restore, that cannot be moved.
- The error "There is not enough space available on the disk(s) to complete this operation" typically occurs when the system is running low on free disk space, preventing it from performing a requested operation. This can happen due to various reasons, such as a full disk, a large number of files or programs consuming space, or insufficient disk space to install new software or updates. To resolve this issue, users can try freeing up disk space by deleting unnecessary files, uninstalling unused programs, or upgrading their storage capacity by adding more disks or upgrading to a larger storage device.
- Existing fragments separate files saved on the device.
- File system error causes volume, partition inaccessible, or invisible.
- You have a FAT32 partition, which cannot be shrunk or extended using the Shrink or Extend Volume feature, as these options only support NTFS partitions.
The "cannot shrink volume" problem on Windows 10 can be caused by any of the factors. To resolve this issue, you can use a professional partition management tool to shrink volumes when Disk Management is not available. Alternatively, you can try using effective methods to make the Shrink Volume option work again. This article will provide you with solutions to both scenarios.
How to Shrink Volume with Qiling Partition Management Free Tool
If you're unable to shrink a volume due to unmovable files or file system issues, You can use third-party free software like Qiling Partition Master Free, a powerful Disk Management alternative, to overcome the limitation of Microsoft technology and easily shrink your C drive in Windows 10/8/7 in a few simple steps.
Download this user-Get introduced to a user-friendly free disk management tool that makes it easy to manage your computer's storage space. With this tool, you can learn how to shrink partitions in simple steps. By shrinking a partition, you can free up space on your hard drive and make room for new files, programs, or an operating system upgrade.
Step 1: Locate and select target partition to shrink
On the main window, right-To resize a partition, click on the partition you want to shrink and select "Resize/Move" from the context menu.
Step 2: Adjust to shrink partition
Use your mouse to drag one of its ends to shrink the partition space.
To resize your target partition, you can adjust the partition size box to shrink the target partition. Once you're done, click "Proceed" to keep all changes.
1. Qiling Partition Master Free makes it easy to partition hard drives in Windows 10. 2. It allows users to resize the C drive, allocate space from one drive to another, delete a partition, and more.
How to Fix Can't Shrink Volume Error So That You Can Shrink C Drive
Before shrinking partitions, it's essential to check the available space on your disk to avoid running out of space. If there's enough space, but you're still unable to shrink, consider the following solutions based on the specific issue you're facing.
1. Convert FAT32 to NTFS to Solve FAT32 Partitions Can't Shrink Problem
Converting FAT32 to NTFS using Qiling Partition Master Free is a quick and easy process that can be completed with just one click. This conversion resolves the "cannot shrink volume" issue, allowing you to shrink your partitions in Disk Management.
Step 1. Install and launch Qiling Partition Master on your computer.
Step 2.To convert a FAT32 partition to NTFS, select the partition, right-click on it, and choose "Convert to NTFS". This process can be applied to internal partitions or external storage devices like SD cards or USB drives, which should be inserted into the PC before conversion.
Step 3. Click "OK" on the pop-up dialog box to continue.
Step 4.1. The conversion process will start automatically.
2. Defragment and Check Disk Error to Fix Windows Unable to Shrink Volume
Another method to fix the can't shrink volume issue in Windows 10, 8, or 7 is to defragment and check disk for errors. This can help resolve the problem by freeing up space and ensuring the volume is in a healthy state, allowing it to be shrunk successfully.
Note:To resolve the issue, sign in to Windows 10/8/7 with your administrator account.
Defragment hard drive partition
Step 1. Click "Start" > Select "File Explorer".
Step 2. To access the Disk Management console, expand the "This PC" tree on the left pane, then right-click on the partition that cannot be shrunk, such as "Local Disk (C:)" or other partitions.
Step 3. To optimize your drive, go to the "Properties" of your drive, click on the "Tools" tab, and then click on "Optimize" under the "Optimize and defragment drive" section. This will allow you to optimize your drive, which can help improve its performance.
Step 4. To optimize the drives, select the system drive (C) box on the Optimize Drives box and click "Analyze".
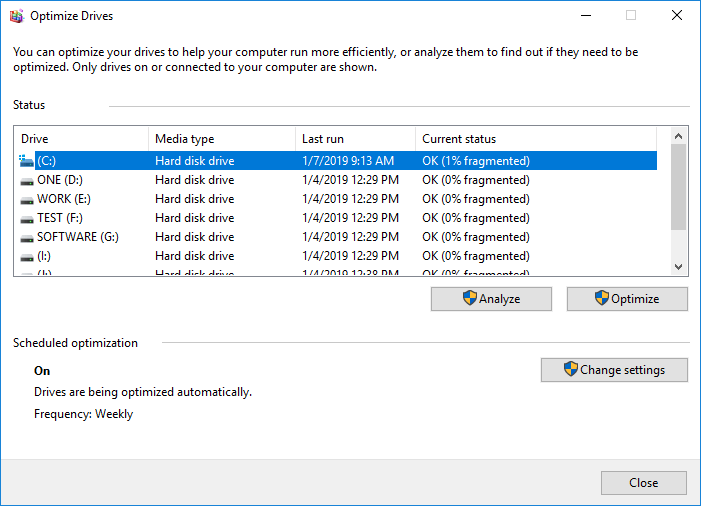
Wait until Windows completes the analysis and displays the percentage of the fragmented files in the selected drive. Then, click on the "Optimize" button to start the disk defragmentation process.
Check and fix disk file system errors
If the dynamic bad-cluster remapping detects too many bad clusters, you won't be able to shrink the partition. To resolve this, run a disk check to repair any file system errors. This will help ensure the partition can be shrunk successfully.
Step 1. Right-click on the drive or partition that can't be shrunk in Windows PC, and select "Properties".
Step 2. To check for errors, go to the Tools tab and click the "Check" button under "Error checking".
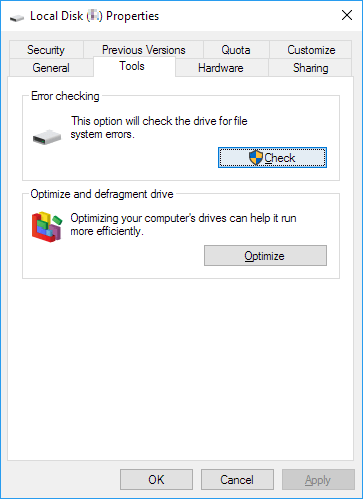
Let the process complete and fix the drive for file system error. Wait patiently for the process to complete and then try to fix the drive.
3. Disable the Unmovable Files to Fix Cannot Shrink a Volume Beyond the Point
Windows won't let you shrink the volume because there are immovable system files at the end of the volume.
To resolve the issue, temporarily disable hibernation, the paging file, and System Restore, then restart Windows and use Disk Management to resize the volume.
Disable System Restore
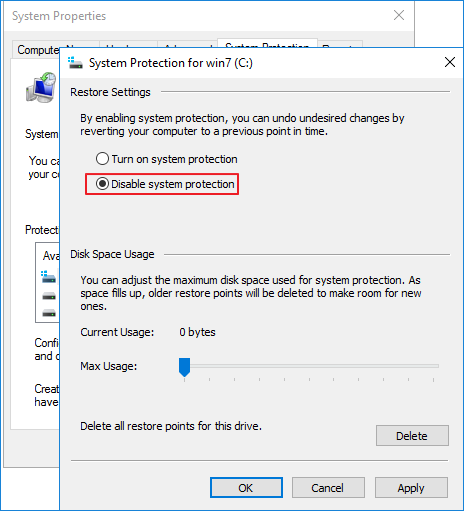
Step 1. Launch systempropertiesprotection.exe from the Run dialog.
Step 2. Select the system drive and click "Configure".
Step 3. Click "Disable system protection" and then click OK.
Disable hibernation file
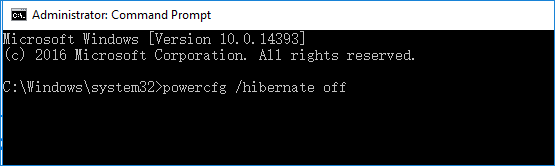
Step 1. To open Command Prompt as an administrator, click on the Start button, type "cmd" in the search bar, and then right-click on the Command Prompt icon that appears in the search results. From the context menu that appears, select "Run as administrator".
Step 2. To disable the hibernate feature and clear the hiberfil.sys file, run the command "powercfg /hibernate off" in the Command Prompt. This will turn off hibernation and remove the hiberfil.sys file from the system drive.
Disable paging file
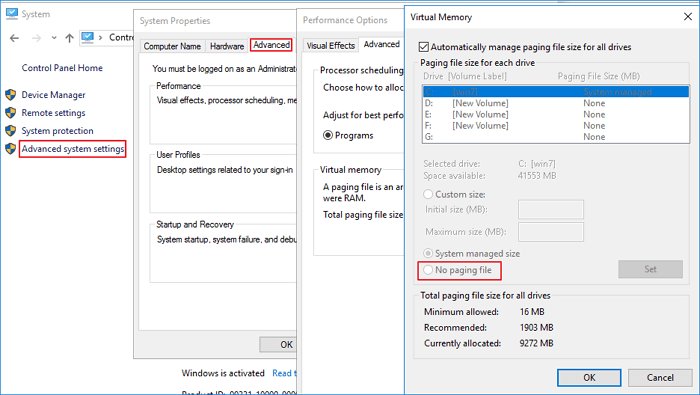
Step 1. Launch systempropertiesadvanced.exe from the Run dialog.
Step 2.Under the "Performance" section, click the "Settings" button, then click the "Advanced" tab and finally click the "Change" button.
Step 3. Select "No paging file", and click "Set".
Or you can also disable kernel memory dump.
To disable the kernel memory dump, go to Advanced Settings > Startup and Recovery > Settings and change the Write debugging information drop-down to None.
Sum Up
To resolve the can't shrink volume issue on Windows 11/10, follow the methods provided on this page. We highly recommend using Qiling Partition Master Free to manage and optimize your disk partitions, which can help extend your computer's life and capability.
Can't Shrink Volume Windows 11/10 FAQs
Here are more relevant topics about cannot shrink volume Windows 11/10. Find solutions if you also have these questions.
Why can't I shrink volume more?
There are several possible reasons why you may not be able to shrink your partition. These include: the partition is already at its minimum size, the disk is full, or there are file system errors that need to be resolved before shrinking is possible. Additionally, if the partition is in use by an operating system or other program, it may not be possible to shrink it.
- FAT32 partitions can't be shrank.
- Not enough free space
- File system or other error
- Unmovable files are located
How do you fix cannot shrink a volume beyond the point?
When using Windows 10's Disk Management to shrink a volume, you may encounter an error message stating that you cannot shrink the volume beyond the point where unmovable files are located, with a reference to a "defrag" event in the Application log for more details.
The pagefile.sys, hiberfil.sys, and System Volume Information folder, used by System Restore, are typically the culprits that prevent shrinking a drive beyond a certain point.
To resolve the issue of "You cannot shrink a volume beyond the point" when shrinking a partition, you can try using the built-in Windows 10 feature called "Shrink Volume" in Disk Management. This feature allows you to shrink the volume by a specified amount, which can help you free up space on your drive.
- Disabling System Restore.
- Disabling the hibernation feature.
- Disabling the Paging file.
How do I shrink a volume in Windows 11/10?
To shrink a volume in Windows 10, you can use Qiling partition management software, which allows for easy shrinking of the C drive or any other partition by simply dragging and dropping to adjust the size.
Step 1. Open Qiling Partition Master, right-click on the partition that you want to shrink and select "Resize/Move".
Step 2. To resize a partition, you can either use your mouse to drag one of its ends to shrink the partition space, or adjust the partition size box to achieve the desired reduction in partition size.
Step 3. Click the "Proceed" button to keep all changes.
How long does it take to shrink a volume Windows 11/10?
The time it takes to shrink a partition is relatively short, and the duration also depends on the amount of data stored in the partition.
Related Articles
- Top 5 Reliable Software to Check Hard Disk Health for Free
- How to Create and Format exFAT Partitions in Windows 11/10/8/7 (Free Methods)
- [SD Card Unavailable] Fix SD Card Wont Mount on Android & PC
- How to Extend C Drive in Windows 10 Without Formatting
- How Do I Recover a Pen Drive from Write-Protected?
Have you ever got into write protection trouble? Then how do I recover a pen drive from write-protected? This page will provide the tested and worked ways to help you remove the write protection. - How Do I Write Protect My USB Flash Drive, Help
This article will help you learn how to write-protect your USB drive, preventing your data from being changed or written. Two solutions were provided.