Clicked Initialize Disk by Mistake: Recover the Partitions
Quick Navigation:
- What Initialize Disk Actually Writes
- MBR or GPT: Which Table You Lost
- Three Rules Before Any Scan
- Recover the Partitions
- Frequently Asked Questions
Initialize Disk is one confirmation away from a very bad afternoon. A single click writes a new partition table, Windows reports the disk as Online and empty, and every volume that existed a moment earlier has vanished from Explorer. The files are usually still in place, because initialization replaces the map rather than the land. What decides how many come back is how little you write to that disk before the scan.
This page covers what the operation changes on MBR and GPT disks, why creating a new partition ruins your chances, and how a full-disk scan rebuilds the original volumes.
What Initialize Disk Actually Writes
Windows initializes a disk by writing the structures that describe it as empty. On a disk that was in use, those sectors held the table pointing at your partitions, so the new table overwrites the old one while the data area stays untouched.
On MBR the write lands in the first sector: a master boot record with four entries and a disk signature. On GPT, Windows writes a protective MBR, a primary header and entry array, a Microsoft Reserved partition, and a backup copy of the table at the very end of the disk. That last detail explains why a GPT disk can lose a little data at the tail.
Everything above that metadata survives. Folders and documents keep their clusters, which is why technicians say initialization does not erase data. The damage is to the index, not the content, and an index can be rebuilt from the file records still on the platters. The capacity looks normal because Windows is reporting a valid, empty disk.
MBR or GPT: Which Table You Lost
Open Disk Management, right-click the disk, choose Properties, and open the Volumes tab. The partition style line reads Master Boot Record (MBR) or GUID Partition Table (GPT). That line tells you how much metadata was overwritten.
On MBR the only table is the one in sector zero. If it was replaced, the old entries exist nowhere else and the volumes must be found by scanning for their boot sectors. On GPT a complete copy of the entry array sits at the end of the disk, so if only the primary copy was damaged, that backup can rebuild the layout exactly, with the original offsets and sizes.
If both copies are gone, the scan works from the boot sector of each former volume. Read the disk's state before touching anything: a disk labeled Not Initialized has no valid table, while one showing Online with a single unallocated block has already been initialized and needs a scan, not a repair.
Three Rules Before Any Scan
Stop writing to that disk. Do not create a partition in the unallocated space, do not format, do not run a repair pass, and do not let backups, indexing, or temporary files land there. Every write can cover a boot sector the scan needs. If the disk is internal, disconnect it or remove its drive letter.
Send whatever you recover to a different physical disk. Saving files back onto the same disk overwrites the space you are trying to read, and each pass finds less than the one before. Use an external drive or a second internal disk with enough free space.
Never initialize or format the disk again to make it usable. A quick format builds a fresh file system over the old records and turns a simple table problem into a hard recovery. These three rules cost nothing and decide whether the job is routine or expensive.
Recover the Partitions with Qiling Data Recovery
Disk-level partition recovery is built into Qiling Disk Master, and the standalone scan below runs on the same engine. It reads below the file system, so it can list volumes whose entries no longer exist and preview their files before anything is written.
The tool stays read-only until you press the save button. Related ground is covered in a volume that turns unallocated after an update, although an accidental initialize is the cleaner case: the data area was never rewritten.
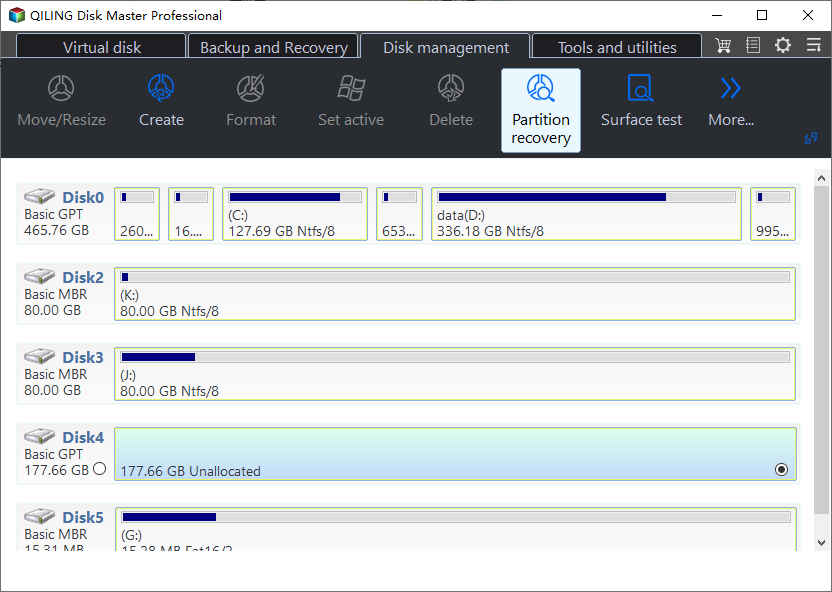
Step 1. Select the Physical Disk
Pick the disk by model and capacity, not by letter, because the letters you remember no longer exist. The map shows the unallocated block where your volumes used to be.
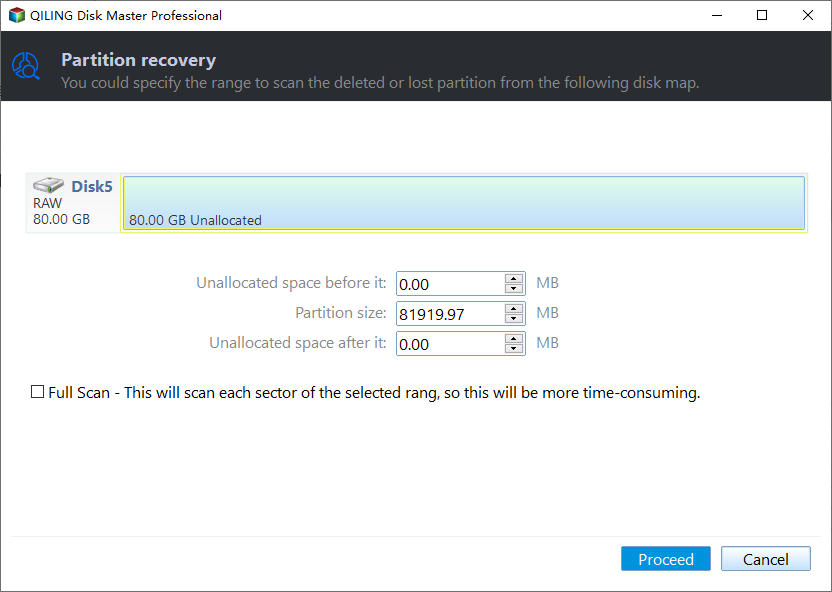
Step 2. Scan the Whole Unallocated Range
Scan from the start of the unallocated space to its end, and enable the full scan option when the quick pass finds nothing. A full scan reads every sector for boot records, which is slower but finds volumes nothing references.
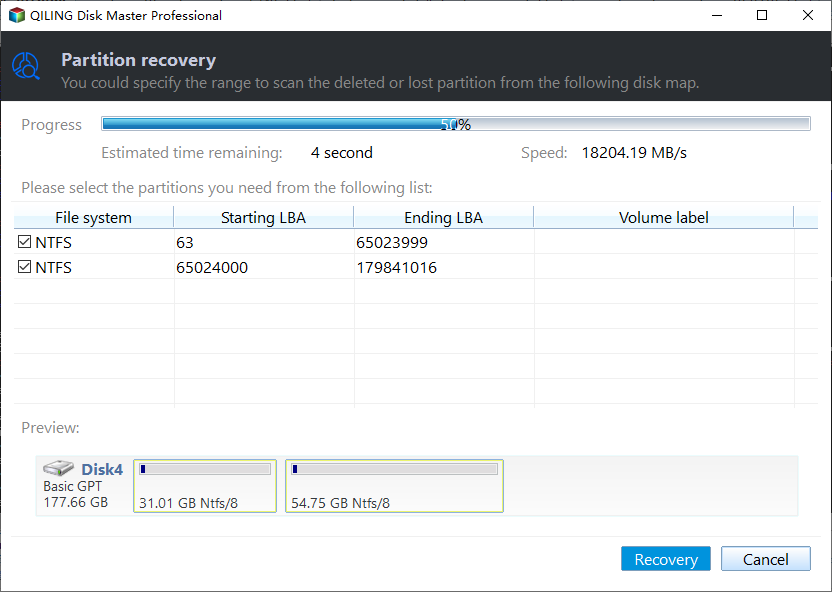
Step 3. Review the Partitions Found
The list shows each candidate by file system, start and end position, and label. Compare sizes with what you remember and ignore candidates that are too small or sit in the wrong area of the disk.
With the files saved elsewhere, decide whether to keep the disk unallocated or create a fresh volume and copy the data back. Data first, layout second. If a rebuilt table later refuses to mount, see recovering a RAW partition back to NTFS.
Frequently Asked Questions
Initializing supposedly erases nothing, so why are my files gone?
The files are not gone; their addresses are. Initialization replaced the table that recorded where each volume started and ended, so Windows sees unused space. A scan reads each volume's own boot sector and file records to rebuild those addresses.
Can I undo Initialize Disk in Disk Management?
No. Disk Management offers no undo, and the wizard that appears afterwards only helps you create a new volume, which is the one thing you should refuse. Recovery comes from a scan, not from the console that caused the problem.
Is it safe to convert the disk to dynamic first?
Not before the data is out. Conversion rewrites disk metadata and can overwrite the remnants a scan depends on. Save the files first, then change the layout as often as you like.
Related Articles
- Recover Files After a Partition Table Rebuild
- How to Undelete a Partition in Windows
- Recover a Deleted Partition in Windows 10
- Recover a Deleted Partition in Windows 7
- How to Recover a Partition on a USB Drive
Products
Articles & Tutorials
- Data Recovery
- Data Backup
- File Recovery
- File Backup
- System Backup and Restore
- Disk and Partition Clone
- Technical articles
- Mobile articles
- Disk Master Help
- Windows Data Recovery Tutorials
- Windows Secure Delete Tutorials
- Windows Partition Management Tutorials
- Windows File Backup and Restore Tutorials
- Windows System Backup and Restore Tutorials
- Windows Disk Backup and Restore Tutorials
- Windows Clone Tutorials