Recover Files After KB5079473 Removed the C: Drive
Quick Navigation:
- Why the Files Are Still There
- Attach the Disk Without Booting
- Scan the Volume
- Save the Files Elsewhere
- Frequently Asked Questions
An update that leaves the machine without a C: drive has usually removed the drive letter, not the volume. The partition is still on the disk with its files in place, but Windows no longer mounts it, so Explorer shows no system drive and the desktop can come back empty. The data becomes readable again as soon as the volume is mounted, or scanned from another system.
Why the Files Are Still There
The letter lives in the configuration Windows keeps for mounted volumes, not inside the partition. An update that resets the storage stack, reinstalls a controller driver, or rewrites that configuration can drop the assignment while the partition table stays intact.
The same update can also change the disk signature. A volume that still answers to the old identifier is then left unmounted, and the system partition it belongs to no longer appears under the letter it had before.
The files themselves remain in their clusters. An update does not delete user data unless the reset option with file removal was chosen, and even then the old records survive until the space is reused by new writes.
A partition that lost its entry in the table is a different case: the disk then shows unallocated space instead of a volume. Recovery still begins with a read-only scan, never with a new partition on that space.
Attach the Disk Without Booting
Stop using the machine for anything else. Every download, log file, and temporary folder written to that disk can overwrite the records a scan needs, and the system volume receives writes constantly while Windows runs.
The safest route is to remove the drive and connect it to a working computer through a USB enclosure or a SATA adapter. The goal is read-only access: no installation on the affected disk, and no repair that writes to it.
If the drive cannot be removed, start the affected machine from external boot media and run the recovery tool from there. The internal disk then stays untouched while the tool reads it.
Do not accept a prompt to initialize the disk. Initializing writes a new partition table and hides the volumes that are still recorded on it.
Scan the Volume
Scan the volume that held the files rather than the whole physical disk, whenever that volume is still visible. The scan reads the file records and lists what it finds under the original folder paths.
When the volume has no letter but still appears in the device list, identify it by capacity and model. When the disk reports only unallocated space, scan the physical disk so the tool can rebuild the old partition boundaries from the records it finds.
Preview before you select. A text file, a photo, and a document from the same folder tell you quickly whether the record is intact and whether deeper scanning is worth the time.
Keep the scan source and the recovery destination separate. Writing recovered files back to the same disk is the fastest way to lose the ones that have not been copied yet.
Save the Files Elsewhere
Qiling Deep Data Recovery reads the volume without writing to it, lists the results by original path, and saves them to a disk you choose. Work from a working computer with the affected drive attached, so nothing writes to the volume during the scan.
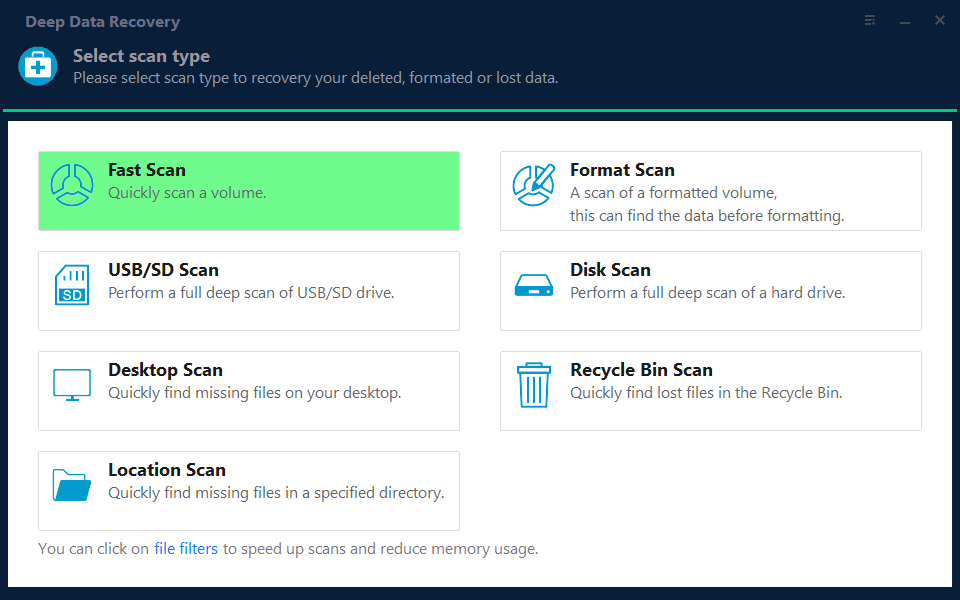
Step 1. Choose the Recovery Mode
Fast Scan suits a volume that lost its letter but is otherwise healthy. Format Scan fits a partition that the update reformatted, and USB/SD Scan covers a drive attached through an enclosure or a card reader.
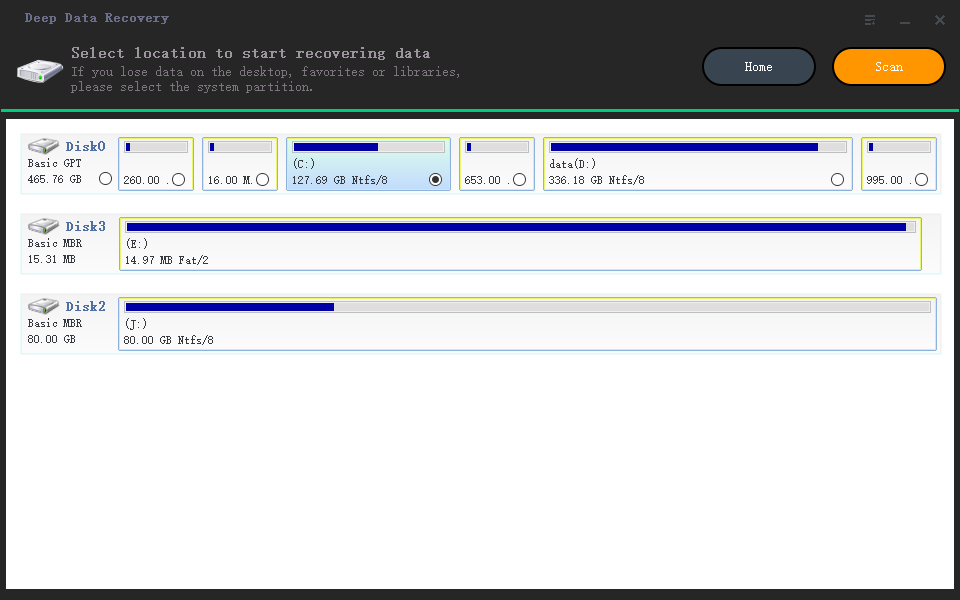
Step 2. Select the Volume
The location page lists the physical disks with their volumes, capacities, and file systems. Select the partition that held the files; when its letter is missing, match it by size and by its position on the disk.
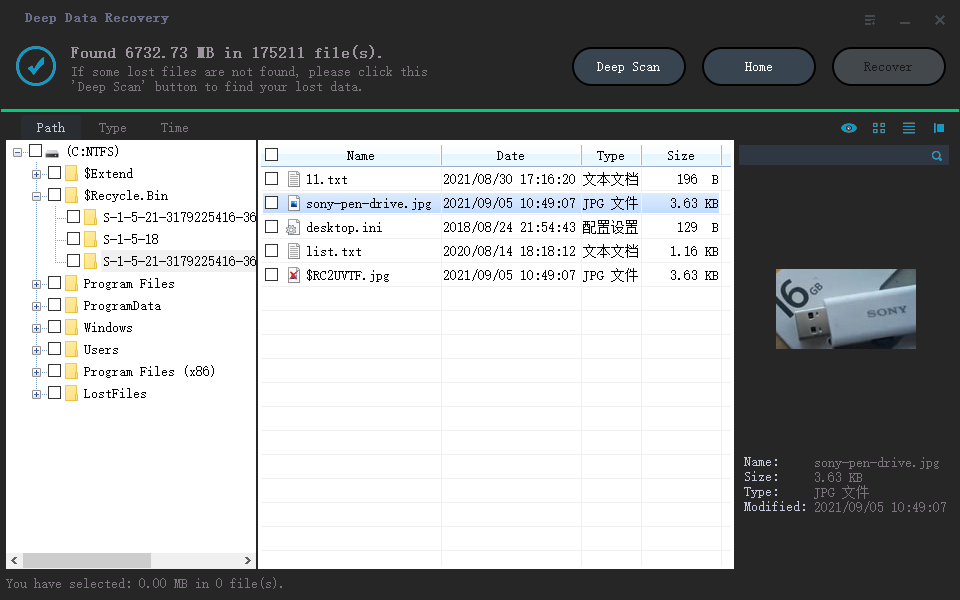
Step 3. Review and Save to Another Disk
Results open in a folder tree with a preview for documents and images. Check the folders you need, click Recover, and choose a folder on a different disk in the dialog that appears; confirm with OK and let the copy finish.
Keep the recovered files on the external disk until Windows runs normally again, then copy back only what you still need.
Frequently Asked Questions
Does the update delete the files on C:?
No. It removes the mount point, not the data. The files stay in place until something writes over their clusters.
Will restoring the drive letter bring C: back?
It can, when the volume is intact. Copy the files out first, because any repair writes to the disk.
Can I scan the drive while it is still inside the laptop?
Yes, if the volume is stable and the tool is installed on another disk. Removing the drive or booting from external media keeps the source cleaner.
Related Articles
- Recover Files Missing After CHKDSK on Windows 11
- How to Recover RAW Partition to NTFS without Losing Data
- Recover Files From a RAW External SSD on Windows
- Windows 11 25H2 Update: Disk Shows Unallocated
- Recover Files After a KB5127936 Boot Failure
Products
Articles & Tutorials
- Data Recovery
- Data Backup
- File Recovery
- File Backup
- System Backup and Restore
- Disk and Partition Clone
- Technical articles
- Mobile articles
- Disk Master Help
- Windows Data Recovery Tutorials
- Windows Secure Delete Tutorials
- Windows Partition Management Tutorials
- Windows File Backup and Restore Tutorials
- Windows System Backup and Restore Tutorials
- Windows Disk Backup and Restore Tutorials
- Windows Clone Tutorials