Recover Files From a Disk That Shows Offline
Quick Navigation:
- Why the Disk Is Offline
- Bring It Online Safely
- Scan the Volume
- Save the Files Elsewhere
- Frequently Asked Questions
An offline disk is mounted by nothing, so Explorer shows no letters for it and every folder on it looks empty. In most cases the drive is healthy and Windows has blocked it on purpose, because its identifier duplicates another disk or because a policy takes new disks offline. Bringing it back online usually restores access without any data recovery at all.
Why the Disk Is Offline
A disk goes offline for one of four reasons: its signature collides with another disk, a storage policy marks newly seen disks as offline, the link drops under load, or the volume belongs to a system that is not running, as with a disk moved from another machine.
The collision case follows a clone. Two disks carry the same identifier, so Windows keeps one of them offline to prevent writes from landing on the wrong device.
The offline state is a flag, not damage. The partition table and the files stay untouched while the disk is blocked, which is why recovery from this state is usually a matter of mounting the disk again rather than rebuilding anything.
A disk that goes offline repeatedly under load is a different matter. If it drops during a copy, image it to another drive before you attempt anything else, because the next drop may not come back.
Bring It Online Safely
Bring the disk online from the disk map first. Right-click the disk and choose Online; this clears the flag and does not write to the volumes.
In Windows Disk Management the same action sits on the right-click menu of the disk row, and the row label changes from Offline to Online. A disk that needs a new signature gets a prompt, which is safe for the data but changes the identifier the old configuration recorded.
If the disk returns to offline after a reboot, the policy is the cause rather than the hardware. Correct that setting first, otherwise the disk will keep dropping and every scan will be interrupted.
Do not initialize a disk that reports itself as not initialized. Initializing writes a new partition table, and the volumes the old table described become unreachable until a scan rebuilds them.
Scan the Volume
After the disk is online, check whether its volumes have letters and file systems. A volume with a normal letter can be opened directly and copied; a volume marked RAW or shown without a letter needs a scan before anything is written to it.
Scan the volume rather than the whole disk when the volume is visible, and match it by capacity and model when several disks of the same size are attached. The scan reads the file records and rebuilds the folder tree they describe.
Do not format the volume to make it usable. Formatting writes new metadata over the structures that a scan would otherwise use, and it removes the easiest path to the files.
If the disk drops offline during the scan, stop and create an image of the disk first, then scan the image instead of the failing drive.
Save the Files Elsewhere
Qiling Deep Data Recovery reads an offline or RAW volume without writing to it, shows the results by original folder, and saves the selection to a disk you choose. Keep the affected disk attached read-only for the whole session.
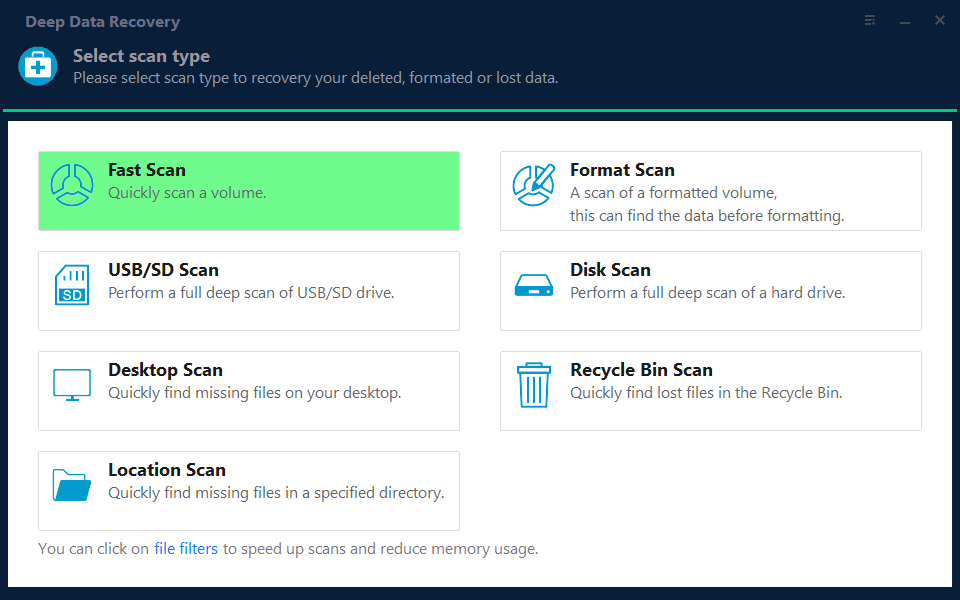
Step 1. Choose the Recovery Mode
Fast Scan is enough for a volume that is intact but not mounting. Format Scan covers a volume that was formatted by mistake, and USB/SD Scan is the choice when the disk sits in an enclosure or a dock.
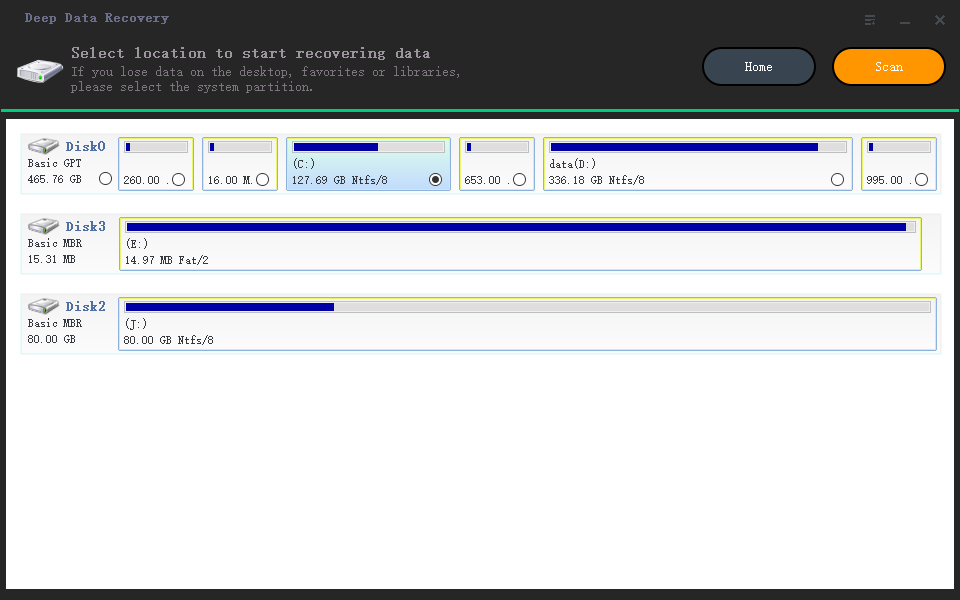
Step 2. Select the Volume
The location page lists each physical disk with its volumes, capacities, and file systems. Pick the volume on the affected disk, or the disk itself when no volume is listed, and start the scan.
Step 3. Recover to Another Disk
Inspect the results by folder, preview the files you care about, and select them. Click Recover, choose a folder on a different disk in the destination dialog, and confirm with OK; wait for the copy to finish before you disconnect the offline disk.
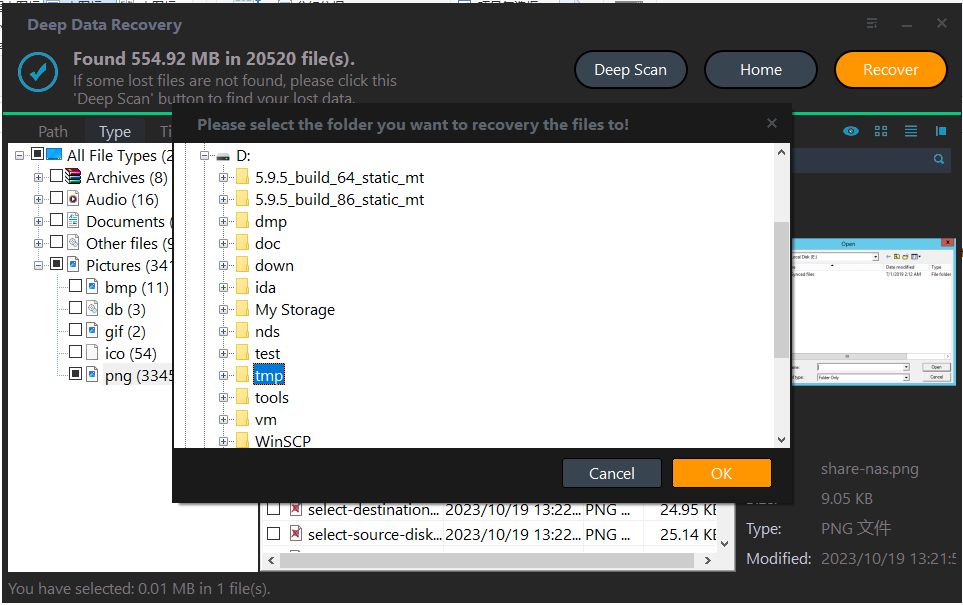
Leave the recovered copies on the second disk until the original is either repaired or replaced.
Frequently Asked Questions
Does bringing a disk online change anything on it?
No. It clears the flag that blocks mounting. The partition table and the files are read as they already are.
Why is the disk offline again after a reboot?
A storage policy takes new disks offline, or the connection drops. Fix the policy or the cable before you start a scan.
Is it safe to scan a disk that keeps dropping offline?
A scan only reads, but a failing drive can drop in the middle of one. If that happens, image the disk first and scan the image.
Related Articles
- Recover Files From a RAW External SSD on Windows
- How to Recover RAW Partition to NTFS without Losing Data
- Recover a Deleted VHDX Virtual Disk on Windows
- Windows 11 25H2 Update: Disk Shows Unallocated
- Recover Files After a KB5127936 Boot Failure
Products
Articles & Tutorials
- Data Recovery
- Data Backup
- File Recovery
- File Backup
- System Backup and Restore
- Disk and Partition Clone
- Technical articles
- Mobile articles
- Disk Master Help
- Windows Data Recovery Tutorials
- Windows Secure Delete Tutorials
- Windows Partition Management Tutorials
- Windows File Backup and Restore Tutorials
- Windows System Backup and Restore Tutorials
- Windows Disk Backup and Restore Tutorials
- Windows Clone Tutorials