A GUI Alternative to Windows File Recovery
Quick Navigation:
- Compare the Two Workflows
- Before You Scan
- Use a Visual Recovery Workflow
- When to Prefer the Command Line
- Frequently Asked Questions
Microsoft Windows File Recovery is a command-line tool. It can help when a backup is unavailable, but its syntax and mode choices can be intimidating. A visual interface offers another way to select a source, inspect results, and choose an output drive.
Compare the Two Workflows
Windows File Recovery uses source and destination drive arguments and Regular or Extensive mode. Microsoft requires the destination to differ from the source. It is useful when you are comfortable with a command prompt and know the drive letters.
Qiling Deep Data Recovery shows scan modes and candidate files in a graphical interface. A preview can help you decide which files to save. Neither approach guarantees recovery after overwriting or SSD TRIM.
Before You Scan
Check Recycle Bin, File History, and cloud backups first. If the file is truly gone, stop writing to the source and connect a separate output disk.
Choose the tool that fits the scenario, not merely the interface. An unstable or physically damaged disk needs careful hardware handling rather than repeated scans with different programs.
Use a Visual Recovery Workflow
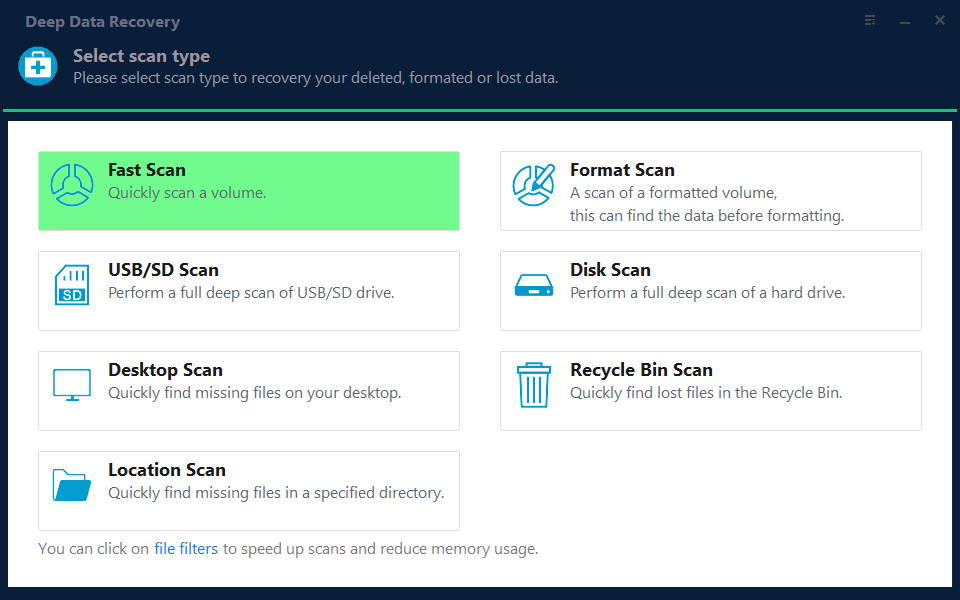
Qiling Deep Data Recovery provides the scan modes shown below. The mode in Step 2 is chosen for this specific loss scenario; it does not change the need for a separate recovery destination.
Step 1. Prepare a Separate Destination
Connect a healthy output disk and install Deep Data Recovery away from the source that lost the data.
Step 2. Choose a Relevant Scan Mode
Select Fast Scan for a recent local deletion, Format Scan after formatting, or USB/SD Scan for removable media. This replaces command-line mode arguments with visible choices.
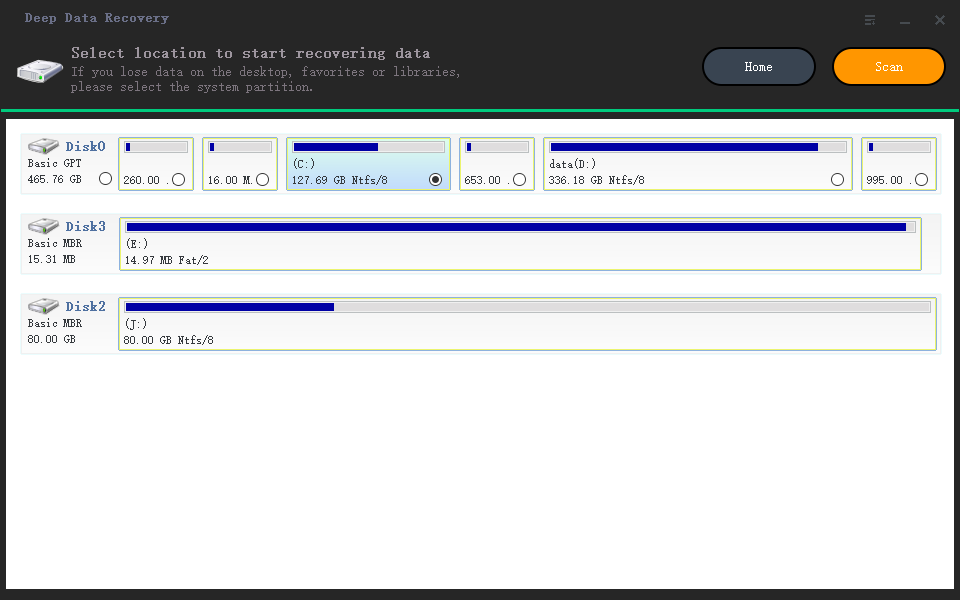
Step 3. Select Source by Capacity
Choose the device that originally held the file, checking capacity as well as drive letter. Click Scan; do not select the output disk as source.
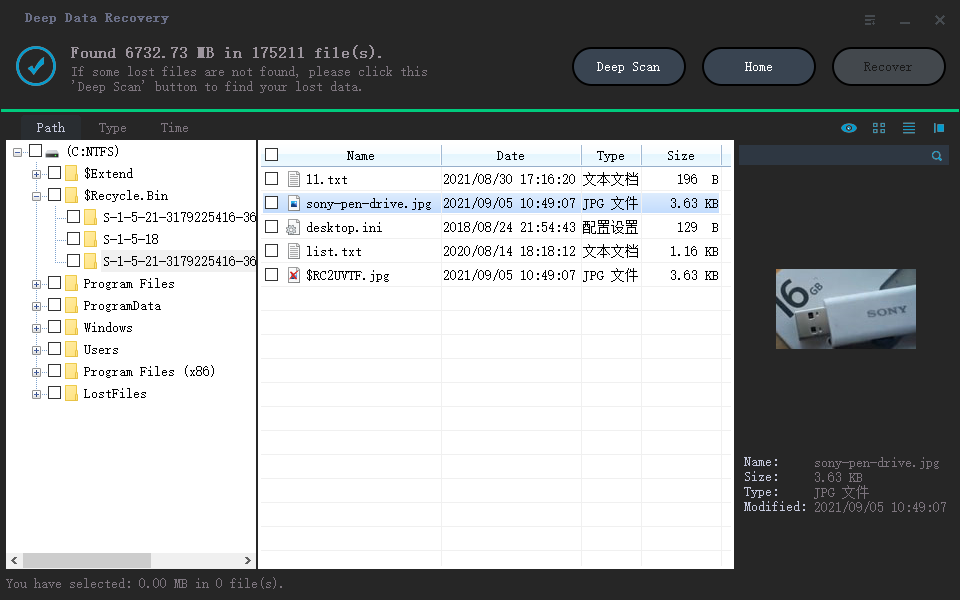
Step 4. Preview the Candidates
Use the file list and preview panel to inspect likely matches. If the first pass misses files, try Deep Scan while the device remains stable.
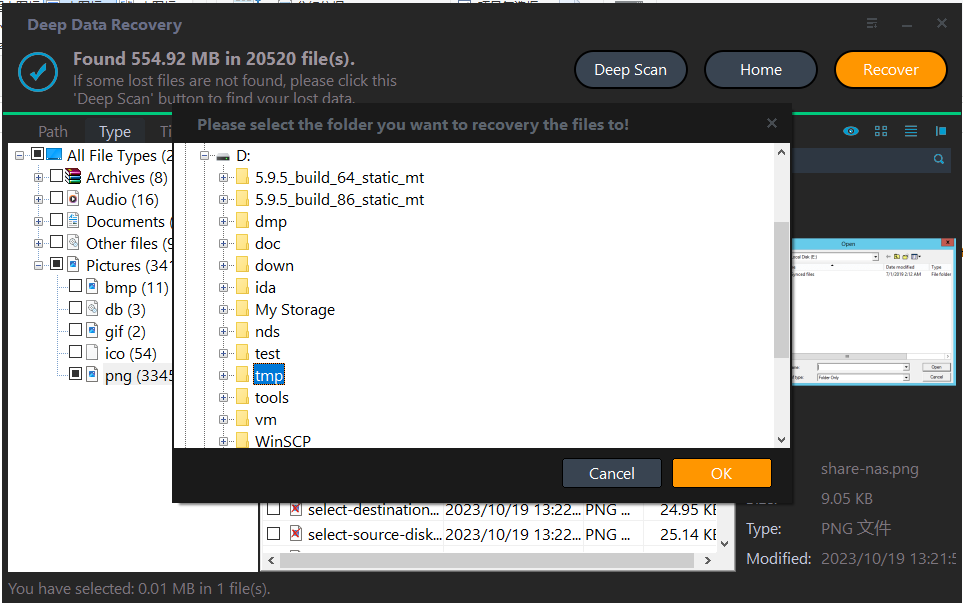
Step 5. Recover to Another Drive
Click Recover for verified files and browse to the separate destination, following the same source/destination separation required by Microsoft's tool.
When to Prefer the Command Line
If you already know the exact file path and are comfortable with Microsoft's syntax, Windows File Recovery may be sufficient. Review Microsoft's current documentation before using switches or modes.
A GUI is most useful when you need to browse many candidates and inspect previews. It does not improve recoverability merely by looking simpler.
Frequently Asked Questions
Is Microsoft Windows File Recovery a backup tool?
No. It searches for lost files; File History or another backup is more dependable for routine protection.
Can both tools save to the source drive?
No. Use another destination to avoid overwriting recoverable data.
Related Articles
- Recover Deleted Files With Command Prompt
- Windows 11 Data Recovery Software
- Recover Deleted Files
Check backups first, then compare command-line and visual scans on the same source.
Products
Articles & Tutorials
- Data Recovery
- Data Backup
- File Recovery
- File Backup
- System Backup and Restore
- Disk and Partition Clone
- Technical articles
- Mobile articles
- Disk Master Help
- Windows Data Recovery Tutorials
- Windows Secure Delete Tutorials
- Windows Partition Management Tutorials
- Windows File Backup and Restore Tutorials
- Windows System Backup and Restore Tutorials
- Windows Disk Backup and Restore Tutorials
- Windows Clone Tutorials