How to Fix Buffalo External Hard Drive Not Working/Recognized
"I have had this Buffalo 2TB of external storage, unplugged from my computer several months. The last time I used it everything seemed fine. Today I decided to upload more documents from my computer to free up space on my hard drive, I am stuck with a non-functioning external hard drive...... I have so much important documents stored on it, shrugs!!! I am so furious please help......"
If your Buffalo external hard drive is not showing up, there is a solution. It's not uncommon for external hard drives to be recognized by the computer as a normal image, but if it's not, this page provides reliable ways to fix the issue. To get your Buffalo external hard drive working again, check out the Fixes listed below.
| Workable Solutions | Step-by-step Troubleshooting |
|---|---|
| 1. Update Driver | Press Windows + X, and click Device Manager from the menu...Full steps |
| 2. Create New Volume | Right-click the unallocated space on the external hard drive, and choose...Full steps |
| 3. Format Buffalo Hard Drive | Plug the external hard drive and open the Disk Management...Full steps |
| 4. Change Drive Letter | Press Windows + X and click Disk Management to start...Full steps |
Why My Buffalo External Hard Drive Not Showing Up
Check the following reasons for a recognized Buffalo hard disk:
- Damaged USB port or cable.
- Application conflict.
- Outdated driver.
- The computer may not be able to recognize the format of the external device because the device is not properly connected, the device driver is not installed, or the device is not compatible with the computer's operating system. To resolve this issue, try reconnecting the device, installing the device driver, or checking the device's compatibility with the computer's operating system.
- Drive letter conflict.
- ...
If your device's USB port or cable is damaged, try using a different port or cable to see if the hard drive is detectable. If it is, recover your data first and then try other possible solutions.
Recover Data Before Advanced Troubleshooting
Before attempting to fix an undetectable hard drive, it's recommended to recover any important data stored on it first. This is because advanced repair methods, such as formatting the hard disk, can potentially lead to data loss. Therefore, taking the step to recover data should be taken before attempting to fix the issue.
Deep Data Recovery can recover files from any corrupted storage devices, including internal/external hard drives, USB flash drives, memory cards, and more, in just three steps.
To recover lost data, click the download button to install Deep Data Recovery on your Windows or Mac, and follow the step-by-step guide provided.
Step 1. Select file types and click "Next" to start
- Download and install Qiling Data Recovery on your PC or laptop.
- Connect the external hard drive to your computer.
- Launch Deep Data Recovery. Select file types and click "Next" to begin the recovery process.

Step 2. Choose and scan the external hard drive
- Choose the external drive from the External drives list, then click Scan for lost data.

Step 3. Check the scan results
- Qiling data recovery software scans the selected drive for all data, including deleted, corrupted, and existing data.
- You can use the Filter feature to quickly locate files of a specific type, such as Pictures, Word, Excel, PDF, videos, or emails.

Step 4. Preview and recover data
- Double-clicking a file from the scanned results to preview.
- Choose the files you want and click "Recover".
- To avoid overwriting the original files, save the recovered files to a different drive, such as an external hard drive, USB drive, or a different partition on your computer. This will ensure that the recovered files are safely stored and can be accessed later.
Fix 1. Update Driver
If your operating system doesn't support the hard drive, update the driver to make it compatible.
Step 1. Press the Windows key + X, and click Device Manager from the menu.
Step 2. To expand disk drives, you can use the Disk Management utility in Windows. Press the Windows key + R to open the Run dialog box, type "diskmgmt.
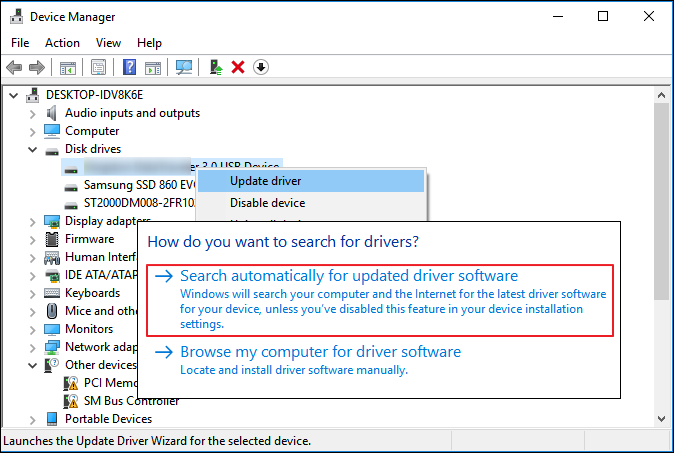
Step 3. Right-click the external hard drive icon, then choose Update Driver.
Step 4. Choose Select automatically for updated driver software.
Step 5. Wait for the process to finish and check your disk on the computer.
Fix 2. Create New Volume (Unallocated space in Disk Management)
To check if your device is not showing up or recognized, you can use the Disk Management tool in Windows. Press the Windows key + R to open the Run dialog, type "diskmgmt.msc" and press Enter, or simply click on Disk Management in the search results. This will open the Disk Management console, where you can check the status of your device and see if it's listed. If it's not showing up, you can try to troubleshoot the issue by checking the device's power cord, USB connection, and drivers.
If your disk is shown as unallocated space, follow these steps to resolve the issue:
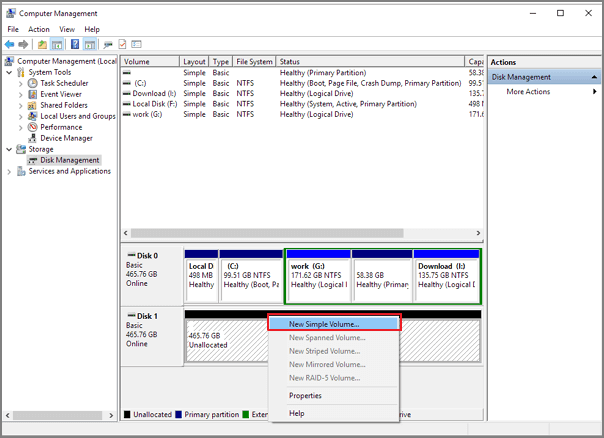
Step 1. Right-click the unallocated space on the external hard drive, and choose New Simple Volume.
Step 2. On the new simple volume wizard window, click Next.
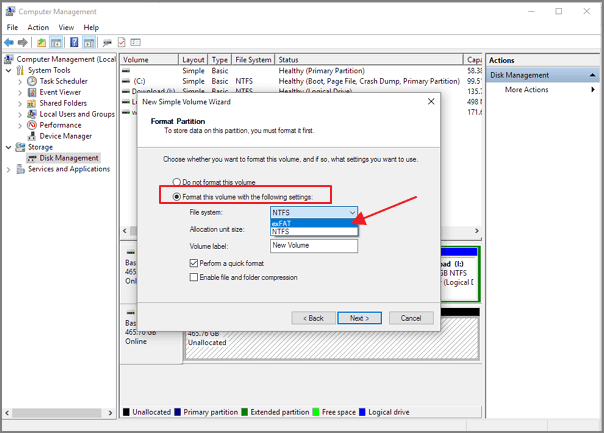
Step 3. Select the file system, allocation unit size, and volume label.
Choose a file system (NTFS or exFAT), select a volume size, and assign a drive letter to the new volume.
Step 4. Click Next. Review your configurations and click Finish.
If your external hard drive is shown as RAW in Disk Management, it's likely due to a disk error or corruption. In this case, you can try to fix the issue by running the built-in Check Disk utility (chkdsk) or using a third-party tool like Qiling Backup.
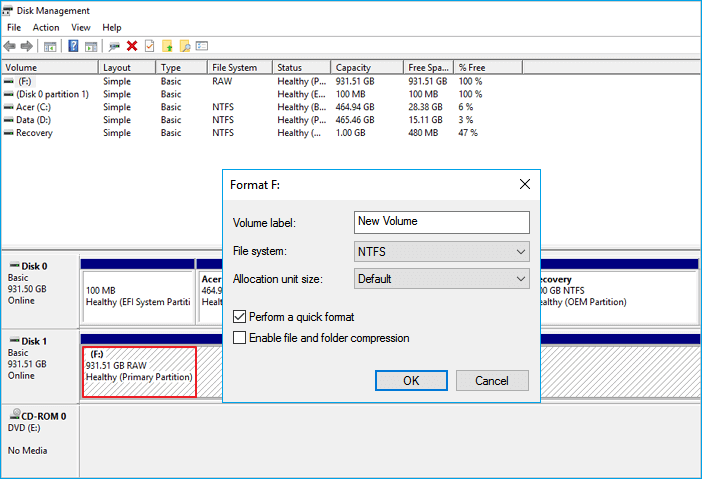
Fix 3. Format Buffalo External Hard Drive (RAW in Disk Management)
If the device's partition is shown as RAW in the Disk Management, it means the file system is damaged and can't be recognized, so formatting the external hard drive is the best option.
Note: Formatting a device will erase all data on it. Before doing so, ensure you have recovered any important data using a reliable data recovery software, such as Qiling.
Step 1. Plug the external hard drive and open the Disk Management.
Step 2. Right-click the external hard drive and choose Format from the drop-down menu.
Step 3. Select a file system and set a volume label, and check the box to quick format the drive.
Step 4. Click Start to format your drive.
Fix 4. Change Drive Letter
The issue may be caused by a conflict between the drive letter of the external hard drive and the hard drive.
Step 1. Press Windows + X and click Disk Management to start.
Step 2. To change the drive letter and paths, select the volume and choose the "Change Drive Letter and Paths" option.
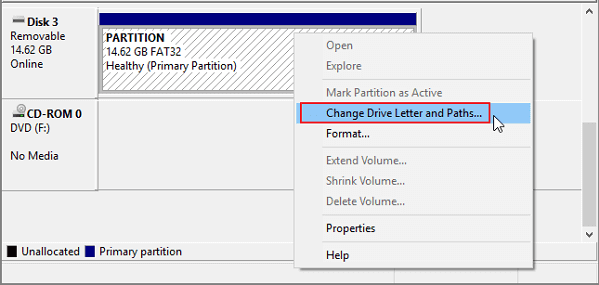
Step 3. Choose a new drive letter and click OK.
Fix 5. Other Complementary Methods (Optional)
Suspend or uninstall security software to prevent it from interfering with the hard drive detection process, then reconnect.
If the Buffalo external hard drive is not showing up on your computer, try connecting it to another computer to see if it appears. If it does, it means your original computer does not support the Buffalo external hard drive.
To Sum Up
If your Buffalo external hard drive is not working or recognized, you can try four fixes: checking the power cord and USB connection, restarting your computer, running the built-in Disk Utility, and checking for software updates. However, the best solution is to recover data at the earliest with Deep Data Recovery software, and then troubleshoot the issue. If you have any questions or need further assistance, you can contact us via support@idiskhome.com.
Related Articles
- Data Recovery Software Free Download Full Version with Crack (Version 13.5)
- Raw Drive Recovery: How to Recover Data from RAW Drive with Ease
- How to Recover Deleted Files from Laptop/PC on Windows 10/8/7
- Text Recovery Converter Word | Fix Corrupted Word and Recover Text
- How to Recover Deleted Files SSD in 2 Ways
If you've deleted files from your SSD and want to recover them, there are two effective methods to do so. You can use SSD file recovery software to recover deleted files in three steps, or recover deleted files from the recycle bin with ease. Both methods can help you undelete files from your SSD. - CMD File Recovery - Recover Deleted Files Using Command Prompt
Accidentally deleted files or lost data from a USB flash drive, hard drive, or SD card on Windows 10/8/7? Don't worry, you can recover deleted files using the Command Prompt or Qiling data recovery software.