How Fix Not Able to Launch Sticky Notes Error
How to Fix Sticky Notes Has Failed to Initialize Error/ Not Opening
To resolve the error "Not able to launch Sticky Notes with the accessing files (Quit)" and recover lost Sticky Notes in Windows 10, try restarting your computer, checking for updates, or reinstalling Sticky Notes. If the issue persists, you can also try running the System File Checker (SFC) tool to scan and replace any corrupted system files, or use the Windows built-in troubleshooter to identify and fix the problem. Additionally, you can also try resetting Sticky Notes to its default settings or creating a new user account to see if the issue is specific to your current user account. If none of these solutions work, you may want to consider seeking further assistance from Microsoft support or a professional computer technician.

If you're experiencing a Sticky Notes startup failure issue with the "Not able to launch Sticky Notes with the accessing files (Quit)" error message on your PC, or have accidentally deleted important Sticky Notes in Windows, don't worry. We've found solutions to help you fix the Sticky Notes failure error and restore lost Sticky Notes in Windows 10/8/7 with ease.
| Workable Solutions | Step-by-step Troubleshooting |
|---|---|
| Fix 1. Run CMD to Fix Sticky Notes | Type cmd in the search bar. Right-click Command Prompt and select...Full steps |
| Fix 2. Repair Sticky Notes | Press Windows key+I to open the Settings window. Click on "Apps"...Full steps |
| Fix 3. Reset Sticky Notes | In the Settings window, click on "Apps & features" on the left pane of Settings...Full steps |
Recover Lost Windows 10/11 Sticky Notes (First Step)
If you accidentally delete desktop Sticky Notes in Windows 10, you can retrieve them from the Sticky Notes folder, but make sure to back up your notes first.
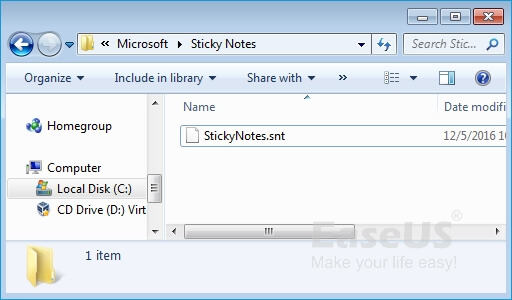
- Open File Explorer and type or paste the following path in the address bar: %AppData%\Microsoft\Sticky Notes\StickyNotes.snt
- To view the contents of a StickyNotes.snt file, you can open it with a text editor such as Notepad, Microsoft Word, or Wordpad. This will allow you to read and edit the contents of the file, which is typically a collection of notes and reminders saved in a plain text format.
- If you've lost notes from Sticky Notes, you can recover them by viewing and finding the lost notes in the .snt file. From there, you can copy the exact notes you lost and paste them into a new Sticky Notes window, effectively recovering the lost notes.
If you can't find the StickyNotes.snt file, you may use file recovery software to find and restore deleted or lost Sticky Notes in Windows 10, and this method can also be applied to other Windows systems.
Deep Data Recovery
- Recover lost or deleted files, documents, photos, audio, music, and emails with ease and effectiveness.
- You can recover deleted files from SD cards, emptied recycle bins, memory cards, flash drives, digital cameras, and camcorders using data recovery software. This software can scan the device for deleted files and recover them, even if they have been emptied from the recycle bin.
- Support data recovery for sudden deletion, formatting, hard drive corruption, virus attacks, and system crashes, providing assistance under various situations.
To recover lost Sticky Notes in Windows 10, download and install Deep Data Recovery, then follow the steps to restore all lost Sticky Notes.
Step 1. Select file types and click "Next" to start
Launch Qiling file recovery software on your Windows computer. Select the file types you want to recover and click "Next" to start the recovery process.

Step 2. Select a drive and start scanning
To recover lost data, hover over the partition where the data was lost and click "Scan" to initiate the scanning process.

Step 3. Check and preview scanned files
To narrow down the scan results, use the file format filter on the left or upper right corner. This will help you find the specific files you need. Once you've filtered the results, you can click the "Preview" button or double-click a file to view its content.

Step 4. Recover lost data to a secure location
To recover lost data, select the file, check the box next to it, and click "Recover". Store the recovered data in a secure location, avoiding the original disk where the data was lost. This will help prevent further data loss.
After recovering Sticky Notes from your computer, you can resolve the "Not able to launch Sticky Notes with the accessing files (Quit)" error by following the suggested solutions.
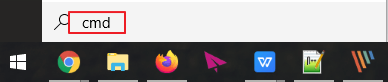
Fix 1. Run CMD to Fix Can't Open Sticky Notes in Windows 10
If Sticky Notes won't launch even after restarting your PC, try this method to fix the issue.
Step 1. Type cmd in the search.
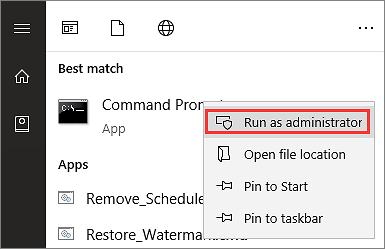
Step 2. Right-click Command Prompt and select "Run as Administrator".
Step 3. Type sfc /scannow and hit "Enter".
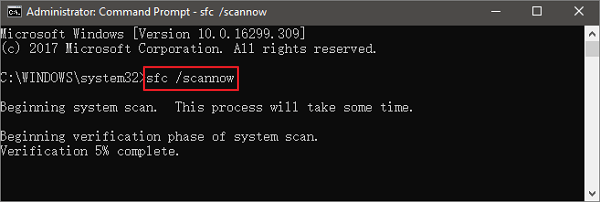
To resolve the Sticky Notes error in Windows 10, wait patiently for the system file check to complete. This process can take a few minutes, depending on your system configuration.
Fix 2. Repair Sticky Notes with Windows 10/11 Built-in Tool
Windows 10 has a If you're experiencing a Sticky Notes error, a tool that can repair application errors with simple steps might be helpful. You can try using this method to resolve the issue.
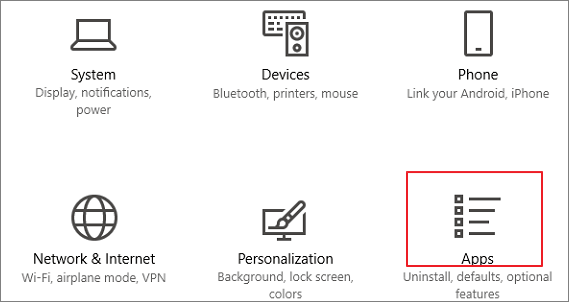
Step 1. To open the Settings window, press the Windows key + I, then click on "Apps".
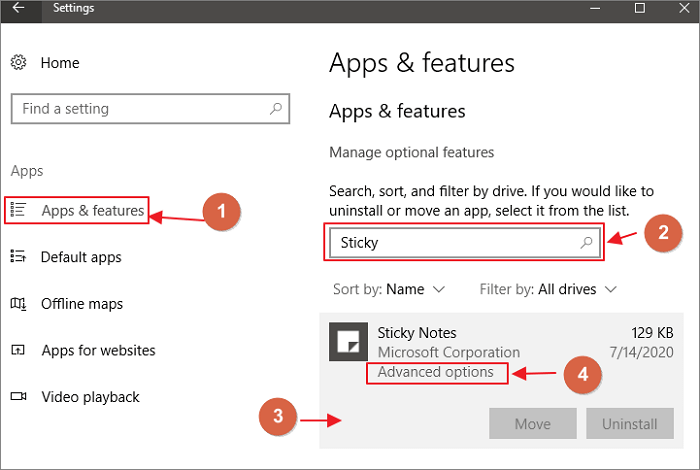
Step 2. In the Settings window, click on "Apps & features" on the left pane of Settings.
Step 3. To access Sticky Notes settings, navigate to the Settings window on your computer, and then scroll down through the right side of the window. In the search box at the top, type "Sticky Notes" to locate the relevant settings.
Sticky Notes will appear in the search result.
Step 4. To select the Sticky Notes app, click on it, and then click on "Advanced options".
Step 5. To repair Sticky Notes, open the Settings app, navigate to Apps, find Sticky Notes, click on it, and then click on the "Advanced options" link. Scroll down and click on the "Repair" button.

Fix 3. Reset Sticky Notes to Fix Sticky Notes Error
If Method 2 doesn't work, you can reset Sticky Notes to get help. This will remove all data from Sticky Notes, so be sure to back up any important information before doing so.
Step 1. To open the Settings window, press the Windows key+I, then click on the "Apps" option.
Step 2. In the Settings window, click on "Apps & features" on the left pane of Settings.
Step 3. Scroll down through the right side of the Settings window, and type "Sticky Notes" in the search box.
Step 4. To access the advanced options for Sticky Notes, select the app by clicking on it and then click on the "Advanced options" button.
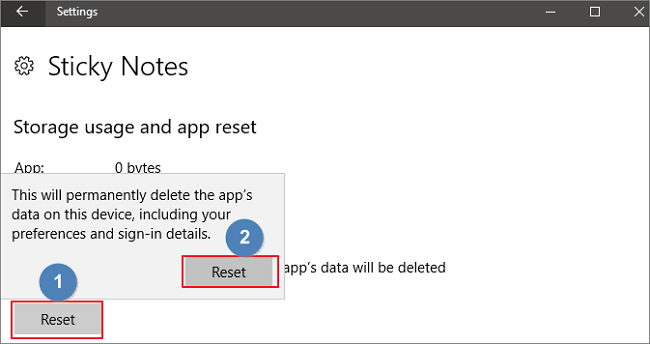
Step 5. To reset Sticky Notes on your computer, navigate to the Sticky Notes settings window, scroll down, and then click the "Reset" button. This will restore the app to its default settings.
Extra Tips: Back Up and Restore Sticky Notes
To avoid losing your Sticky Notes data, you can make a backup using a Qiling backup and recovery software. This allows you to browse and locate your Sticky Notes, then select them to back up.
Step 1. Click the "File backup" button in the "Backup and recovery" page to initiate the backup process.

Step 2. On the left, you'll see a list of both local and network files, which can be expanded to select the desired files for backup.

Step 3. Select the destination where you want to save the backup, following the on-screen guide.

Step 4. Click "Options" to encrypt the backup with a password in "Backup Options". This allows you to customize the backup task according to your needs, and also explore other available options.

To set the backup schedule, go to "Backup Scheme" and choose the start backup at option. This allows you to select a specific event, such as daily, weekly, or monthly, to start the backup process.

Step 5. You can store backups on a local drive, Qiling's cloud service, or a NAS.

Step 6. Click "Proceed" to start the backup task. Once it's completed, the task will be displayed as a card on the left side of the panel. You can right-click on the task to further manage it.

Conclusion
Whenever you face a Sticky Notes error, try the suggested solutions and remember to recover your data before taking action. You can use Deep Data Recovery to not only recover lost Sticky Notes but also restore deleted photos, videos, Word documents, and more.
Related Articles
- Downloads Not Showing up in Download Folder/Desktop
- Fixed: Windows 10 Freezes While Copying Files, No Data Loss
- How to Fix Runtime Error 1004 in Excel
- GIF Repair | How to Repair Corrupted GIF Files
- Sony Camcorder Recovery | How to Recover Deleted Videos from Sony Camcorder
You can easily recover deleted videos from your Sony camcorder to a Windows or Mac computer using a data recovery software specifically designed for Sony camcorders. - How to Recover Files from RAW Partition/Disk for Free
If your hard drive is inaccessible and shows up as RAW in the file system, don't worry - you can recover data from it for free.