TRIM SSD Data Recovery
With the Trim SSD data recovery process, you can easily recover your data. It involves just two simple steps: checking the trim status and then performing the SSD recovery. By following these straightforward steps, you can get your SSD data back in no time.
| Workable Solutions | Step-by-step Troubleshooting |
|---|---|
| Phrase 1. Check TRIM Status | On Windows: open Command Prompt and enter fsutil behavior query disable deletenotify On a Mac, go to About This Mac, then System Report, followed by Hardware, then SATA/SATA Express, and finally TRIM Support to check if TRIM is enabled.Full steps |
| Phrase 2. SSD Data Recovery | Step 1. If Trim is disabled, run Qiling file recovery software; Step 2. Scan SSD drive; Step 3. Preview and restore SSD drive data...Full steps |
Can You Recover Data from an SSD with TRIM Enabled
"Hi, just now I inadvertently deleted the wrong folder on my 2014 MacBook Pro running Yosemite, and then emptied the trash bin. I don't have a backup of this folder, so I'm feeling quite helpless. The worst part is that my SSD drive is TRIM-enabled by default. Is there any way for me to recover these files?"
The TRIM command, also known as TRIM, is a feature that allows an operating system to inform a Solid State Drive (SSD) which blocks of data are no longer in use, enabling the SSD to wipe them and make room for new data.
When data is deleted from a hard drive, it's not immediately wiped, but rather remains on the physical drive until the space is needed for new information. However, with TRIM enabled, the data block is erased immediately upon deletion, allowing the system to write new data to that space without delay, resulting in improved performance.
The improvement in speed that TRIM enables comes with a cost: deleted files can no longer be recovered once the Windows Recycle Bin or Mac Trash Bin is emptied, as the files are permanently deleted.
Check TRIM Status
To see if TRIM is enabled on your SSD, check your computer's BIOS or UEFI settings. The process varies depending on your device, but you can usually find the setting by looking for "AHCI" or "TRIM" in the BIOS or UEFI menu.
To check if the "DisableDeleteNotify" feature is enabled on your PC, open Command Prompt and enter the command "fsutil behavior query disabledeletenotify". This will display the current setting for this feature.
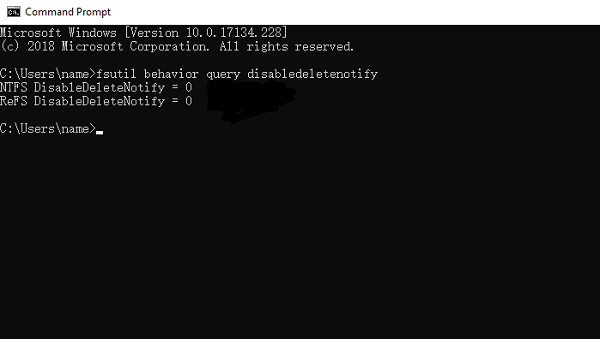
If DisableDeleteNotify = 0, trim is enabled.
If DisableDeleteNotify = 1, trim is disabled.
On Mac:
To view the About This Mac information, click the Apple logo in the top-left of the screen and select About This Mac from the dropdown menu.
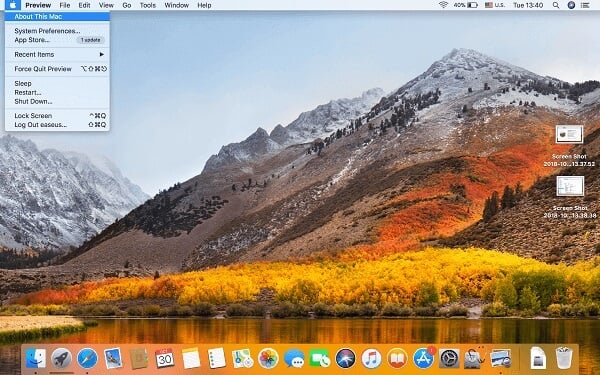
Click System Report…

To check if TRIM support is available, go to Hardware, then SATA/SATA Express, and look for TRIM Support.
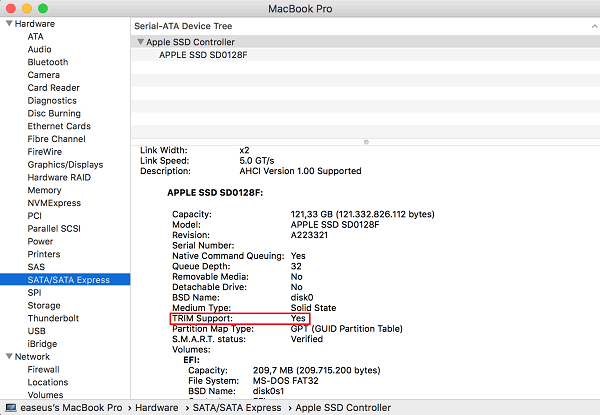
TRIM Support: Yes = TRIM is enabled.
SSD TRIM Data Recovery
Although it's impossible to recover data from a TRIM-enabled SSD, you can try using Deep Data Recovery Free to see if any files can be recovered, even if their content is not recoverable. The software may show file names in scan results, and the free version allows you to try recovering a few files to determine if your data has been wiped.
Regularly backing up your files is the ultimate way to safeguard them, especially with TRIM enabled. Qiling Backup is a data backup utility that allows you to restore lost or deleted files, and can automate backup tasks to run on a set schedule or when specific events occur, such as backing up to an external hard drive when it's plugged in. Maintaining data backups is crucial, particularly for TRIM-enabled devices, making Qiling Backup, available for both PC and Mac, a fully functional and essential tool.
Related Articles
- How to Recover Deleted/ Corrupted DMG Files on Mac
- Mac Trash Recovery | Restore Trash Data on Mac
- How to Fix Mac Won't Shut Down Problem in 3 Minutes
- Mac Audio File Recovery: 3 Steps to Recover Deleted/Lost Audio Files
- Witcher 3 Missing Saves | How to Restore Witcher 3 Game Saves
Witcher 3 missing saves on PC? We are here to help you recover Witcher 3 missing saves; five methods will be mentioned in this guide. You'll know how to recover missing data on different devices. - The Legend of Zelda: Tears of the Kingdom File Size on PC/Nintendo Switch
The Legend of Zelda: Tears of the Kingdom has a specific file size, but we'll provide that information shortly. If you're running low on space to download the game, we can also offer tips on how to free up space.