How to Recover Permanently Deleted Files in Windows 11/10/8/7 Using CMD
Quick Navigation:
- Part 1. How to Recover Deleted Files Using Attrib Command from Recycle Bin
- Part 2. How to Recover Permanently Deleted Files Using CMD in Windows 11/10/8/7
- Part 3. Best Command Prompt Alternative to Recover Permanently Deleted Files
- How to use data recovery software to recover deleted files?
If you delete files by using Delete key or sending them to recycle bin, then you can restore the files from recycle bin by selecting them and clicking "Restore". However, if you use "Shift + Delete" keys to deleted files or emptied them in recycle bin, you can't do the restore with simple clicks. Instead, you need data recovery software or Windows undelete Command. Here in the following,you can learn how to recover deleted files using Command prompt in Windows 10/8/7/XP/Vista and recover permanently delete files with Deep Data Recovery. Download the software first.
There is no cancel option or Ctrl + Z shortcut to recover deleted files after you using Shift+Delete or emptying the recycle bin. To recover the deleted fiels on Windows PC, you can try the following 3 ways. Choose the right way for youself.
Part 1. How to Recover Deleted Files Using Attrib Command from Recycle Bin
Why need to recover deleted files using command prompt? Just think about it what you can do after you empty the recycle bin, then you see nothing you can restore. And while using the computer, it just quit, refuses to reboot. The CMD is a great way to restore deleted files from recycle bin or recover shift deleted files using Command prompt. Here are the steps for how to undelete Command from Windows 10/8/7/XP:
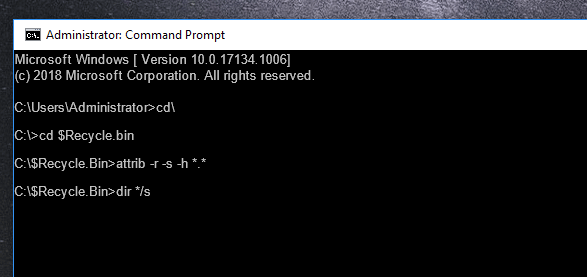
- Press the Windows key and R at the same time to open the dialogue window
- Type in cmd and press Enter
- At the prompt type in cd\ and press Enter
- Next, type in cd $Recycle.bin and press Enter. Different operating systems this command may also be "Recycled", or "Recycler".
- Then type in attrib -r -s -h *.* and press Enter
- At last type in dir */s and Enter, Then you will see all deleted files from recycle bin. In this way, you can easily recover deleted files using CMD.
After then, you can see there is a list of items like Dc25.url, Dc26.Ink, etc. Actually, the number represents the number of deleted files. "D" means the drive where the Windows operating system is installed. A hidden folder is creating on each volume that has the recycle bin enabled named Recycled. Any deleted files are moved to this folder and renamed to $I
Use the COPY command to recover the files you need. For example: COPY *.DOC C:\Temp to copy all DOC files to C:\Temp. Now you can open these data and find the one(s) that you wanted to CMD recover deleted files.
Part 2. How to Recover Permanently Deleted Files Using CMD in Windows 11/10/8/7
As we all know that while connected an extra device, like a flash drive, or USB drive with a computer, when you delete a file from the device, the deleted files are not put into recycle bin, right? That's where this Attrib command way is used for. You can use it to recover any file in the flash drive/USB drive. Here are the simple steps for how to recover deleted files from USB using CMD or how to use command prompt to recover deleted files from the built-in drive:
- 1.Click the start button of your Windows PC at the bottom left and type "cmd" in the dialogue box. End it by pressing Enter.
- 2. Type in chkdsk F:/f and press Enter(the "F" is your drive letter). If the file for this volume is being used, close it or type Y to force it to be uninstalled.
- 3. Type in F and hit Enter again
- 4. Type in F: \>attrib -h -r -s /s /d *.* and press Enter. This command will help you recover deleted files in this drive.
Note: All the above mentioned "F" represents the drive letter of your USB drive where you want to recover lost files. After step 5, your lost files will be saved back to your external hard drive/device in a newly created folder. You just need to change the file extensions back to a normal format to make them reusable again.
Part 3. Best Command Prompt Alternative to Recover Permanently Deleted Files
Recover deleted files using Command prompt is a little complicated, right? To use CMD undelete, you're required to know the basic command line languages. If you prefer an easier way to recover deleted files without Command prompt, I'd like to recommend you using a professional deleted file recovery tool – Deep Data Recovery.
Deep Data Recovery is designed for people to recover deleted files from computer and external hard drives, like SD card, Flash drive, USB drive, phone internal memory and more. With its simple interface, people will know how to use it to recover deleted files in Windows 10, Windows 7, Windows 8, Windows XP, and Windows Vista. easily. Below are the step-by-step guide for how to use it.
Your Safe & Effective File Recovery Software
- It supported recover permanently deleted files after emptying recycle bin, formatting drive, 'Shift + Del' to deleting data, virus infection, accidentally deleting partition, etc.
- Two step file recovery modes that can ensure undelete and unformat any data. It only analyzing each sector without destroying your data.
- It supports more than 800 file types, like PDF, word document, excel, powerpoint, image, video, music, email, archive, and more files.
How to use data recovery software to recover deleted files?
Step 1. Download and install undelete tool
Click the download to get Deep data recovery software. After downloading it, double-click the .exe file to install on your computer. It is fully compatible with Windows 10/8/7/XP/Vista. Next, run it right away.
Please note that if you're going to retrieve deleted or lost files from an external hard drive, you need to connect it with your computer via a USB cable first.
Step 2. Select File Types to Finding Files
The supported file types are listed in the main window. Please check the file type you want to recover. By default, all supported file types are checked. Please uncheck the not unwanted ones and click "Next", letting the software scan for your lost or deleted files.

Step 3. Select a Location to Scanning
All the hard disk, partitions, external devices, lost partitions will be listed on the interface. please select a location where you delete data from and then click "Scan" button. if the deleted files or folder in Desktop, Libraries, or Documents please select C partition.

Step 4. Preview and Recovering Deleted Files
It only takes a few seconds for the tool to scan for deleted or lost files. After the scanning, all found files are displayed in the result window. From there, you can select files to preview them or click "Recover" to save them on your computer.

Deep Data Recovery has a greater feature name as "Deep Scan". You can see it in the result window. By default, the first scanning mode you're using is "Quick Scan". Compared with "Quick Scan", "Deep Scan" can find files for you. It covers all lost or deleted files with part of file properties lost.
Download Deep Data Recovery now to learn how to recover deleted files besides Command Prompt?
Related Articles
- How to Recover Permanently Deleted Files on Computer
- How to Recover Deleted Files from Recycle Bin after Empty
- How to Recover Permanently Deleted Files in Windows 10 Without Software (Mac Included)
- Recover Pictures Deleted from Years Ago
- How Can I Get Music from iPad to Computer without iTunes
It has bothered many iPad users that they couldn't get music from iPad to computer for backup or for music sharing. Here goes the solution. Now you can easily get music from iPad to computer with MobiMover Free. - How to AirDrop Between Mac and iPad
When you want to share files between your Mac and iPad, using AirDrop is a handy solution. Whether you want to AirDrop from Mac to iPad or from iPad to Mac, you will know how to do it in detail.