How to Record Video on Windows 10 (8 Easy Ways )
Want to save your favorite streaming videos on Windows 10 PC for offline viewing? The easiest way is to find some free video recording software to capture the video content. Here, on this page, you will learn some best free Windows 10 video recorder, and also the detailed tutorials to record video Windows 10 without hassle. Now, let's dig into it!
- How to Record Video on Windows 10 PC (No Watermark)
- How to Record Video in Windows 10 with Game Bar (Free)
- 6 Excellent Windows 10 Video Recorder (with How-to Guides)
How to Record Video on Windows 10 PC (No Watermark)
Qiling RecExperts is a full-featured but lightweight Windows 10 video recorder. It helps you record what's happening on full screen or a part of the screen. This Mac and Windows screen recorder offers you three levels of video quality to choose from, i.e., 720P, 1080P, and 4K. Whether you want to lower the video quality to save storage space or improve the image quality to make the video clearer, this tool can meet your needs.
If you need to record some things periodically, like online classes, you can set a schedule recording task, which can start/stop the recording automatically. RecExperts even provides you with a media player to preview the recording and a trimming tool to cut off unnecessary parts in the recordings.
Qiling RecExperts
- Simple and friendly user interface
- Export recordings in more than 10 formats, like MP4, MOV, AVI, etc.
- No watermark & time limit for recording
- An audio recording software to capture audio chats, streaming audio, etc.
Here's how to record a video on Windows 10:
Step 1. Run Qiling RecExperts on your device and you will see two recording modes. You can choose "Full Screen"to record the whole screen or choose "Region" to select the recording area manually before recording.
Step 2. After that, you can choose to record the webcam, system sound, microphone or record none of them as you like. You can also set auto split, auto recording with various functions on the interface.
Step 3. Then, you can click the red "REC" button to start recording. Here will be a menu bar on your screen. To pause the recording, click on the white double vertical bar; to end the recording, click on the red square sign.
Step 4. After recording, you will be led to the list interface. Here you can view or edit your recordings. To start a new recording, just click on the "REC" button on the top of the interface.
How to Record Video in Windows 10 with Game Bar (Free)
Recording videos on PC with Windows 10 OS is a straightforward task if you don't need to spend time finding video recording software. Does Windows 10 have a screen recorder installed beforehand on the PC? Of course, Windows 10 OS provides you with a built-in video recorder named Xbox Game Bar.
Game bar is a pre-installed tool for Xbox players to capture game screenshots, game videos, etc., for free. Although its name may indicate that this best game recorder is designed to capture gameplay clips, it can record nearly all screen activities. Now let's check how this free video recording software works for video recording in Windows 10.
How to record video on laptop in Windows 10 using Xbox Game Bar:
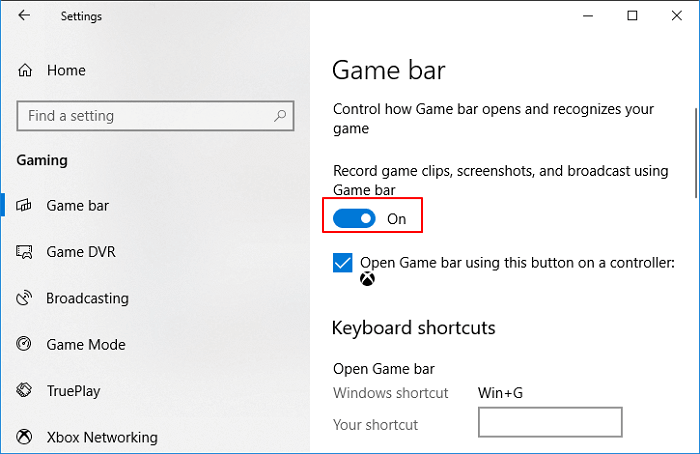
Step 1. Go to "Settings" > "Gaming" > "Game bar" to turn it. When you need to use it, press "Windows" + "G" to open the Game Bar. Click "Yes" if you see a prompt asking if the highlighted application on your screen is a game.
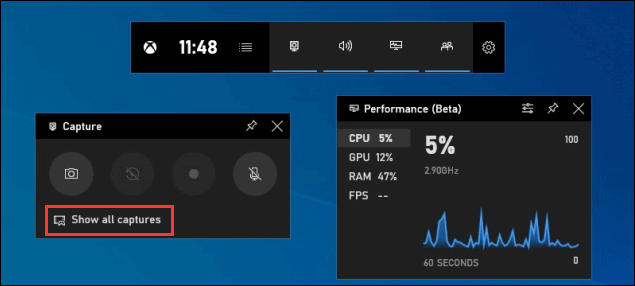
Step 2. Click the Start/Stop Recording button or press the "Windows" + "Alt" + "R" keys to start or stop the recording process. If you need to turn on the microphone, click the "Microphone On" button.

Step 3. When the recording is finished, on the "Show all captures" in the "Capture" widget. Then you will see a list of video clips you recorded, and you can click the video to play it.
- Notice:
- Game Bar is free for Windows 10 users, but it only offers basic screen recording features. If you want a more advanced recording toolkit or recordings editing tools, you can try some excellent third-party screen recorders.
6 Excellent Windows 10 Video Recorder (with How-to Guides)
Apart from Qiling RecExperts and Game Bar, there are many other video capture software for Windows 10. This part will share other Windows 10 video recorder software.
1. Record Video on PC Windows 10 using Icecream Screen Recorder
Icecream Screen Recorder is an innovative Windows 10 video capture software that supports users to record anything on a computer or MacBook. It helps you flexibly customize the window size and video resolution without much effort. Besides, it can also record a Skype call, games videos, video tutorials, live streams, and more for free.
Steps to capture video on Windows 10 PC:
Step 1. Install and run the Icecream Screen Recorder. Click the "Capture video" button and set the window size you want to record on your PC.
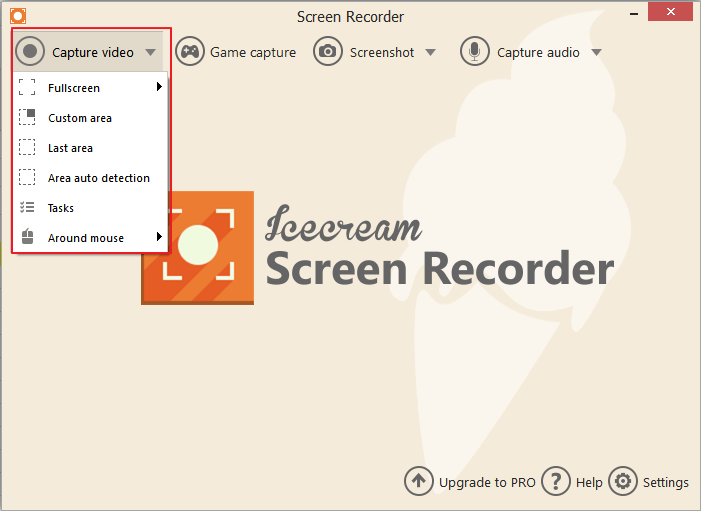
Step 2. Drag the center of the recording window to the desired region on your computer. Click "Rec" to start recording screen movements on your computer. You can also reset the recording frame to other sizes, such as full-screen 1920x1080, 1366x768, etc.
Step 3. When you finish the recording, press F8 or click on the "Stop" button to save the video clips.
2. Record Video in Windows 10 with Flashback Express
Flashback Express is designed to help users of Windows 10 record video easily. Even you don't know how to capture video on a PC, its intuitive interface will guide you to complete the recording task effortlessly. Moreover, this screen recorder for Windows 10 allows users to add webcam footage to the screen recording, and record videos with no watermark. The recorded video can also be easily shared on YouTube.
How to record video in Windows 10 with Flashback Express:
Step 1. Install and run Flashback Express Recorder on your PC. Select the Record mode - Fullscreen, Region, Window.
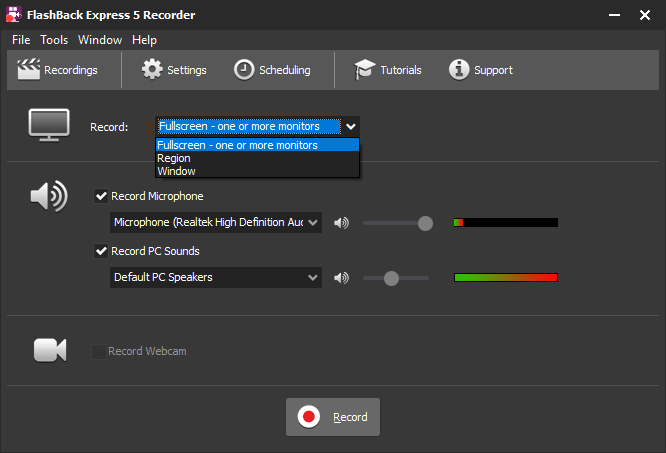
Step 2. Adjust the window size and location, and click "Record" to start.
Step 3. When you finish recording, click the red square button to stop. Click "Save" to save the recorded video. After this, you can play the recorded video on your computer with the Flashback Express Player.
3. Capture Video in Windows 10 using Movavi Screen Recorder
Movavi Screen Recorder is a wonderful Windows 10 video recorder capable of recording videos quickly in one click. Because of its powerful functions, you can use this recording tool to record Webex meeting, webinars, and online classes. Various other events on your screen can also be captured so that you can use these materials to create videos freely.
Since this software supports many audio and video formats, so it's convenient for you to upload videos to many platforms like YouTube and Google Drive and then share them with others easily. How to clip on a PC with this tool? Here is a tutorial for you.
Steps to start video recording in Windows 10:
Step 1. Launch the Movavi Screen Recorder, and there will be a "Record region" button on the main interface. Then, choose the window that is playing the video you want to record as the recording area.
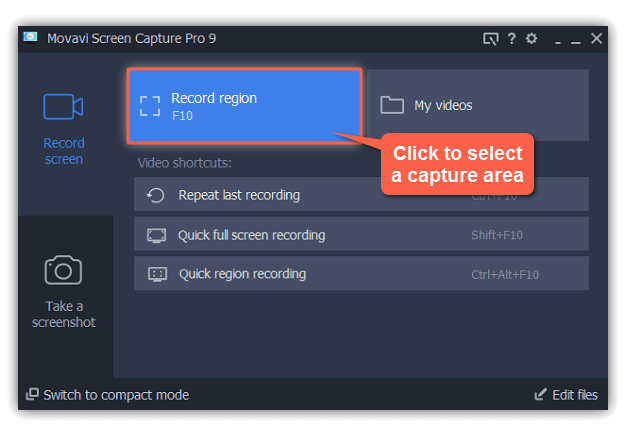
Step 2. Click the red "REC" button on the right side to start the recording. Three seconds later, the video you need will be recorded.
Step 3. Click on the "Stop" button when you want to save the recorded video. You can choose the output format, the file name, and the location if it's necessary. Finally, you can download the video to your computer.
4. Record Video on Laptop Windows 10 using Camtasia
TechSmith produces Camtasia for professional users to record onscreen videos and edit videos with annotations, behaviors, animations, cursor effects, etc. With a built-in recorder, you can easily record videos on Windows 10 PC with ease.
Check out how to video record on Windows 10 using Camtasia:
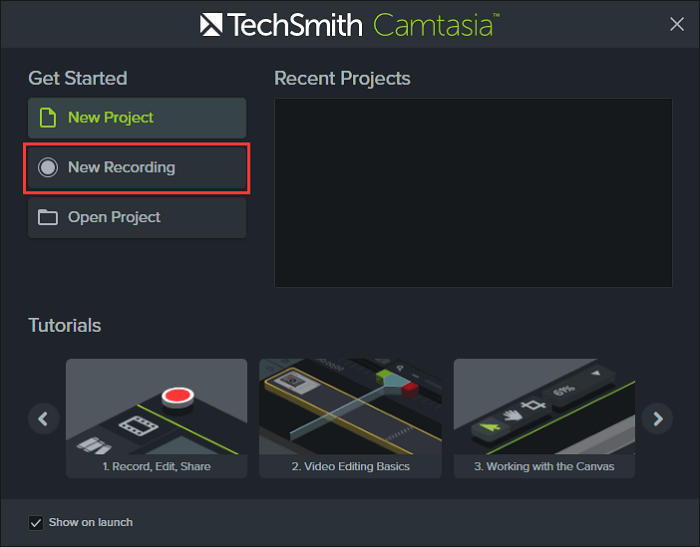
Step 1. Install and run Camtasia. Click "New Recording" to continue.
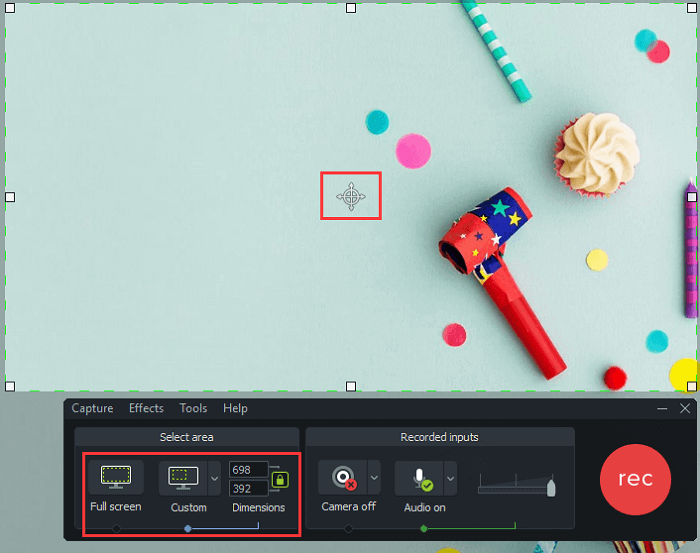
Step 2. Drag the window center to the desired region, and adjust the window size, and dimensions from the pane below. Click the red "rec" button to start recording.
Step 3. When you finish the recording, click the "Stop" button to complete.
After this, Camtasia will load the recorded video, and you can play the video or add more effects to the video there.
5. Record Video on Windows 10 with Screen App
This online screen recording tool is effortless to use. As the icons on its main interface indicate, you can only use those three browsers to utilize it: Google Chrome, Firefox, and Opera. You don't even create an account and log in to that website; all the on-site operations are easy enough for beginners to use.
How to Record Video Windows 10 with online recorder:
Step 1. Click the"Get Started" button on the main interface.
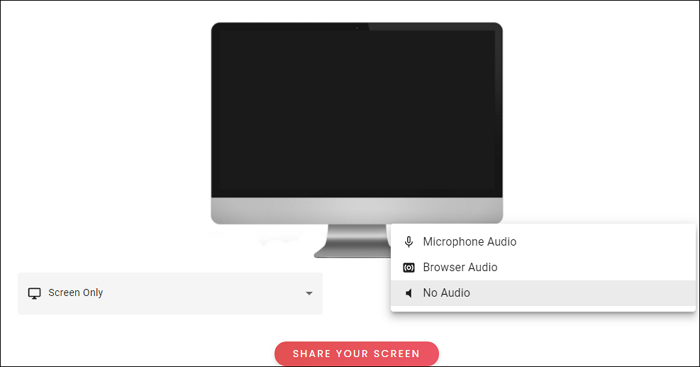
Step 2. Choose the audio source from three options, "Microphone Audio," "Browser Audio," and "No Audio."
Step 3. Click on "Start your Screen," then there will be a red button for you to "Start Recording," select it to continue. Then, click "Stop Recording" when you captured all the contents you need.
Step 4. Under the words "Your Video is Ready," there is an icon you can click to download your video on your left side. It's worth noting that you can only save the video in WebM format.
6. Record Video in Windows 10 with Clipchamp
Although it may have fewer features than the best free video recording software on Windows 10 PC, Clipchamp can be considered one of the most versatile video recorder online tools. For instance, you can use it to record a video on a PC at the resolution of 360p, 480p, 720p, or 1080p. In contrast, most online free video recorders can only record 720p videos. Clipchamp can fully satisfy the needs of people who have high expectations for video resolution.
How to record a video on Windows 10:
Step 1. Open the page, and click "Record a video now."
Step 2. You need to sign in to continue the following steps. Then, click "Create a video" and choose the most suitable size of your recording.
Step 3. When you enter the video editing interface, two options are available: "Record webcam" and "Record screen." If you want to capture the video on your screen, choose "Record screen."
Step 4. Hit the recording button and share the window and audio you want to capture. When you stop sharing and click "Add to project," you can download the recording in WebM format.

FAQs about How to Record Video on Windows 10
Check the frequently asked questions related to this topic below.
1. Does Windows 10 have a video recorder?
Yes, Windows 10 and Windows 11 have a built-in screen recording feature that can record video from your screen. It's called Xbox Game Bar.
2. How do I record video on my PC?
If you don't want to use a third-party app, just use the default video recorder on your PC. To start recording, use the combination "Windows + Alt + R" or press the "Start recording" button on the Game Bar.
Conclusion
This page is for people who don't know how to record video in Windows 10, and it covers 8 Windows 10 video recorder programs. If you want to find the best Windows 10 video capture software, don't miss Qiling RecExperts, as it enables you to record whatever is on your screen as a video. If you want to record a webcam, it's free to record the webcam as a video or use the webcam as a video overlay on the recordings.