How to Find Recently Deleted Folder/Photos on Mac
Similar to the Trash bin recovery on Mac, the Recently Deleted folder in Photos saves the latest removed pictures for 30 days, making it easy to restore deleted photos. If you're unable to find this folder, it might be because it's been deleted, and you'll need to restore it. This post will help you recover the Recently Deleted folder and explain why it might have disappeared in the first place.
| Workable Solutions | Step-by-step Troubleshooting |
|---|---|
| 1. Find Recently Deleted Photos | On Mac OS X: Open "Photos", go to...Full steps |
|
2. Recover Permanently Deleted Photos |
Select the disk location (it can be an...Full steps |
How to Find Recently Deleted Photos on Mac
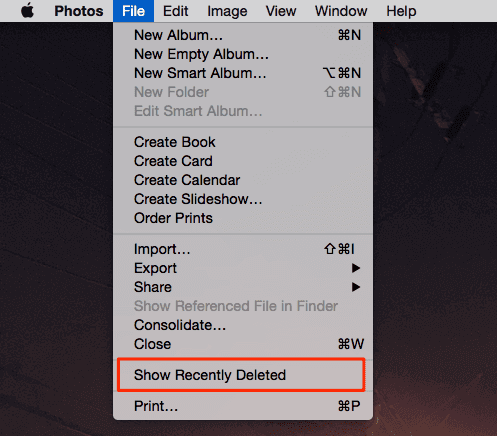
- On Mac OS X, open the "Photos" app, go to "File" and click on "Show Recently Deleted" to access deleted photos.
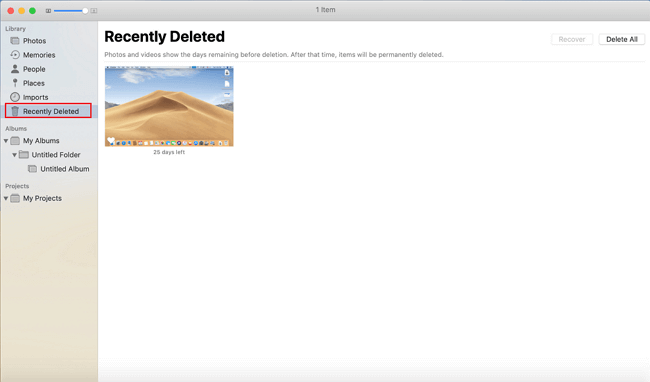
- To access the Recently Deleted folder on a Mac, open the Photos app and look for the "Recently Deleted" folder in the right sidebar.
If you're unable to delete a photo using the methods in this guide, you can try deleting it first, and then attempt the methods again.
Why You Can't Find Recently Deleted Folder in Photos
The Recently Deleted folder in photos keeps deleted images for 30 days, after which they are permanently deleted and the folder disappears. This means any deleted photos older than 30 days are gone.
How to Recover Permanently Deleted Photos on Mac
If you want to recover a photo that has exceeded the 30-day limit, you can use data recovery software like Qiling Data Recovery for Mac, which is a top-rated tool that can help you recover photos and other files from a Mac hard drive, external hard drive, SD card, USB drive, digital camera, and more.
Step 1.Run Deep Data Recovery on your computer. Select the file types you want to recover and click "Next" to initiate the recovery process.

Step 2. Select the disk location where you lost data and click the "Scan" button to start the recovery process.

Step 3. Deep Data Recovery for Mac will immediately scan your selected disk volume and display the scanning results on the left pane.

Step 4. To recover the file(s) from the scan results, select the desired file(s) and click the "Recover" button to have them restored.
Also Read: How to recover deleted photos on Windows 10.
Related Articles
- Task Manager Not Opening or Responding in Windows
- How to Fix Corrupted Recycle Bin in Windows 10 and Restore Lost Data
- Fix Windows 10 Doesn't Recognize or Detect Second Hard Drive Error
- How to Solve Webcam Freeze Up in Windows 10 Error?
- Windows Mail Backup and Restore [Everything You Need Know]
Windows Mail is an email client developed by Microsoft. The Mail program keeps our email data within a hidden folder located on our computer. We may need to backup and restore our mail to protect our data. If you do not know how to make windows mail backup and restore, this guide will give you a detailed answer. - Fix Windows Taskbar Not Working | For Windows 11/10
If your Windows Taskbar is not working, you can refer to this article to identify the potential causes and solutions in Windows 10/11. However, be aware that resolving the issue might result in data loss, so consider installing Deep Data Recovery to prevent such losses.