Windows Mail Backup and Restore [Everything You Need Know]
Windows Mail is a Microsoft-developed email client that stores email data in a hidden folder on the computer. To protect this data, it's essential to back up and restore the mail, which can be a challenge for those unfamiliar with the process. this guide aims to provide a detailed guide on how to make Windows Mail backups and restores, offering a solution for those who need to safeguard their email data.
Why Need to Backup and Restore Windows Mail
Windows Mail is an email program that allows easy management of email accounts, enabling quick receipt, writing, and sending of emails from the desktop. It's also important to know how to do Windows Mail Backup and Restore to make workflow smoother.
Backing up Windows Mail is crucial in various scenarios, such as when you need to transfer emails to a new device, recover lost emails due to system crashes or malware attacks, or access emails from a previous Windows version. Additionally, backing up Windows Mail helps in preserving important emails, contacts, and calendar events, especially if you're switching to a new email client or provider. Overall, having a backup of your Windows Mail data ensures that your valuable emails and associated information are safely stored and can be easily restored if needed.
-
Redundancy
Having a backup of your Windows Mail is crucial for redundancy, ensuring you have a copy of your email data in case your computer is lost, emails are deleted due to a virus, or other unforeseen events occur. This is especially important if you use Windows Mail for work or business emails, where losing access to your emails can be detrimental.
-
Sharing
Having a backed-up copy of Windows Mail is also beneficial for professional email users, as it allows them to share their email data with co-workers or employees without any hassle, providing a convenient and organized way to manage email communications within a team or organization.
-
Moving Data to a New Computer
Since Windows Mail stores mail files locally on your computer, backing up your emails is essential to ensure that you can easily set up your Windows Mail on a new computer without losing any important emails.
How to Back Up Windows Mail
To back up your Windows 10 Mail app, you can export your emails and contacts to a file. You can do this by going to the "File" menu, then selecting "Export" and choosing the format you want to save your emails and contacts in.
1. Backup on Computer via EML Files:
To back up your Windows 10 mail via EML file, follow these steps: you can export your emails to an EML file, which is a widely supported format that can be easily imported into other email clients. To do this, you'll need to access the Windows Mail app, select the account you want to back up, and then click on the "Export" button. From there, you can choose to save the emails as an EML file, which will contain all your emails in a format that can be easily imported into other email clients.
Step 1. Choose the Email you Wish to Back Up
To back up an email, start by selecting the email you want to save. Once chosen, open the email and click on the three dots in the menu to access more options.

Step 2. Convert it into .EML File
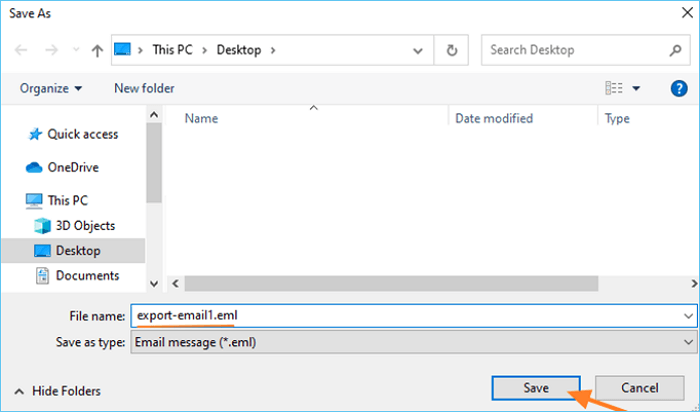
To save a draft as an email message, click on "Save As" in the menu and select the format as Email Message (.eml).
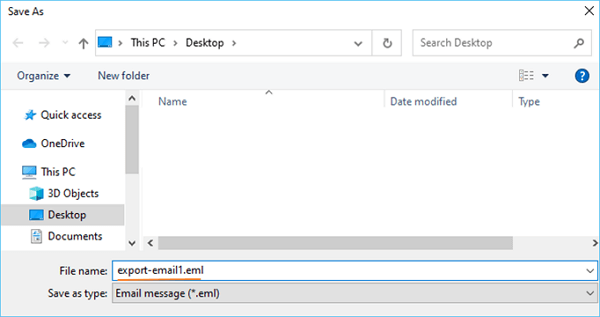
Step 3. Save It In Your Desired Location
Now, browse to your desired location and click on Save.
2. Backup on Computer via Print-to-PDF:
The Print-to-PDF method is a way to back up your emails by printing them as a PDF document, which can be saved on your computer. To do this, simply select the emails you want to back up, go to the "File" menu, and click on "Print". Then, select the printer as "Save as PDF" and choose a location on your computer to save the file.
Step 1. Choose the Email
Select the email you wish to backup and click on the menu denoted by three dots. From the menu, select "Print" to backup the email in Dropbox.

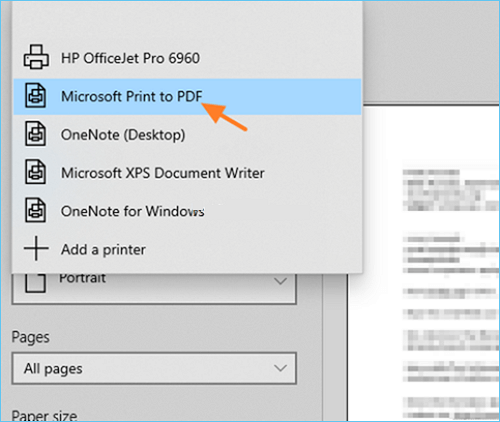
Step 2. Opt for Microsoft Print-to-PDF
Now, you'll get a few options. Select Microsoft Print-to-PDF.
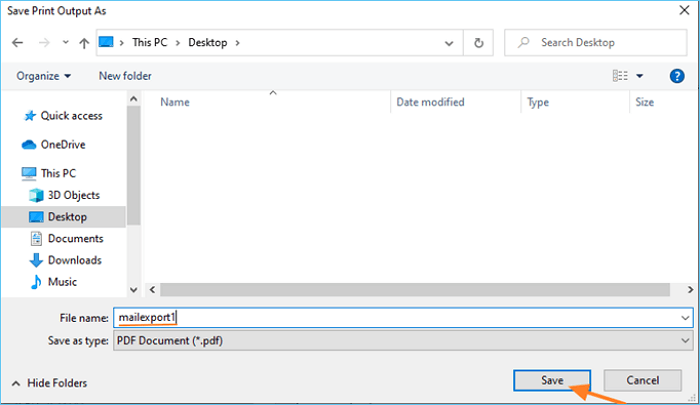
Step 3. Save the PDF File In Your Desired Location
To save the exported PDF, you can type in the file name you'd like to use and select a location on your computer where you'd like to save it, such as your desktop or documents folder. This will allow you to easily access and manage your exported PDF file.
How to Restore Windows Mail
If you have a backup of your Windows Mail and want to restore it on your current computer or a new one, you can follow these steps.
Step 1. Restart your Computer in Safe Boot Mode
Press Windows + R keys, type "msconfig," select Safe Boot and restart your computer.

Step 2. Copy the Backed Up Files into the System Folders
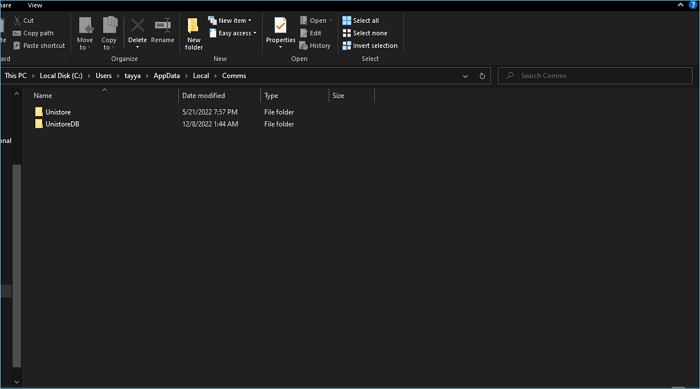
Go to the "C:\Users\UserName\AppData\Local\Comms" location, and paste the data from your backed-up Comms folder there.
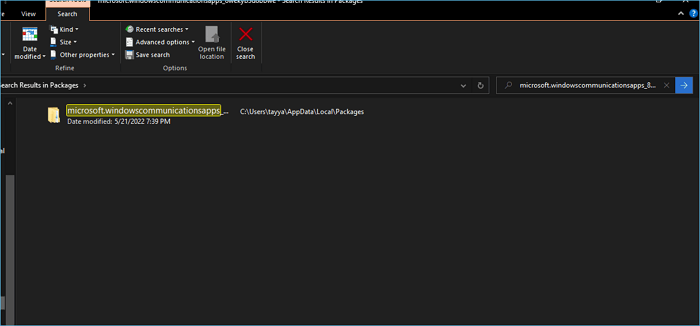
To restore your backed up emails, go to "C:\Users\UserName\AppData\Local\Packages" and search for a folder named "microsoft.windowscommunicationsapps_8wekyb3d8bbwe", then copy the data from the backed-up folder of the same name into this folder, allowing you to view all your backed up emails there.
- Editor's Recommendation
- Microsoft Outlook is a more popular email app than Windows Mail, offering a personal information manager with features like email, calendars, task managers, notes, and tasks. We recommend using Outlook for email management and consider using a professional Outlook backup software, such as Qiling Disk Master, to ensure the security of your emails.
- Qiling Disk Master is an integrated utility with both backup and restore features, allowing users to create a copy of their Outlook mails and restore them easily.

To ensure the security and integrity of your Windows 10 system, it's essential to learn the necessary backup and recovery tools and options. This includes understanding how to backup and restore your system using built-in tools like File History, System Image Backup, and Windows Backup, as well as external hard drives and cloud storage services like OneDrive.
Windows Mail Backup and Restore FAQs
1. Can I Export emails from Windows Mail?
To export emails from Windows 10, you can use either the .eml format or export them as a PDF. This allows you to save your emails in a format that can be easily accessed and viewed on other devices or platforms.
2. Where are Windows Live Mail files stored?
To access your Windows Live Mail files in Windows 10, you can navigate to the AppData folder, where the files are stored. The path to access your Windows Live Mail files is: C:\Users\YourUsername\AppData\Local\Microsoft\Windows Live Mail. This allows you to access and manage your Windows Live Mail files.
AppData\local\Microsoft\Windows Live Mail
3. Is Windows Mail the same as Outlook?
Windows Mail and Outlook are two different email clients, with Windows Mail being geared towards personal or work-related emails, while Outlook is designed for business owners, professionals, and enterprises.
4. How do I save Windows Live Mail to a flash drive?
You can export the desired Windows Live Mail as shared in the "How to Backup Windows 10 Mail" section above. Save the .eml or PDF file directly to your flash drive.
Related Articles
- How to Recover Unsaved/Lost/Corrupted Adobe Acrobat Files on Windows PC
- How to Fix Error Code 100060 on Mac [Step-by-Step Tutorial]
- Quick Fixes for Windows Stuck on Repairing Disk Error in Windows 10/8/7
- What Is SD Card? How Is SD Card Used For? [Beginner's Guide]
- How to Delete a User Profile From Windows 10 [Fixed]
Learn how to delete a user profile from Windows 10 safely. Remove old user profiles through Settings, System Properties, or File Explorer. - Disk2vhd: Detailed Introduction to Convert Physical to Virtual Machine
Disk2vhd is a utility that converts logical disks into virtual disks in VHD format. In this article, I will explain in detail what is disk2vhd and how it can be used to help us meet our virtualization needs.