Essential Guide to Windows 10 Backup and Restore in 2022 [ All You Need to Know]
- How to Backup and Restore in Windows 10
- Windows 10 File History: How to Backup and Restore Files
- Windows Backup and Restore: How to Backup and Restore System Image
- Windows Backup and Restore: How to Create a Windows 10 Recovery USB
- System Restore: How to Create a System Restore Point
- 4-in-1 Backup Software: How to Create Full Windows 10 Backup
How to Backup and Restore in Windows 10
Windows 10 has two default backup and restore options: File History, which saves files by capturing snapshots and allows restoring in different versions, and Backup and Restore (Windows 7), which allows backing up and restoring files using a system image.
You can back up large files on Windows 10 using various techniques, including System Restore and external tools like recovery USB. Additionally, you can use built-in tools like System Restore and external tools like recovery USB. This article will discuss these techniques and recommend a free backup software called Qiling Backup Free that combines their functions into one.
Windows 10 File History: How to Backup and Restore Files
Microsoft introduced File History in Windows 8 as a replacement for the Backup and Restore feature in Windows 7, but it has since become a popular backup method among Windows 10 users.
Windows 10's File History feature allows you to select files or folders to back up and automatically capture regular snapshots, enabling you to restore multiple versions of your saved files and folders in case of system failure.
How to Backup Files Using File History
To set up File History, you'll first need to connect an external drive to your computer, then go to the Control Panel, click on "System and Security", and select "File History" from the resulting menu. From there, you can choose the drive you've connected and select the folders you want to back up. Once set up, File History will automatically back up your selected files to the external drive.
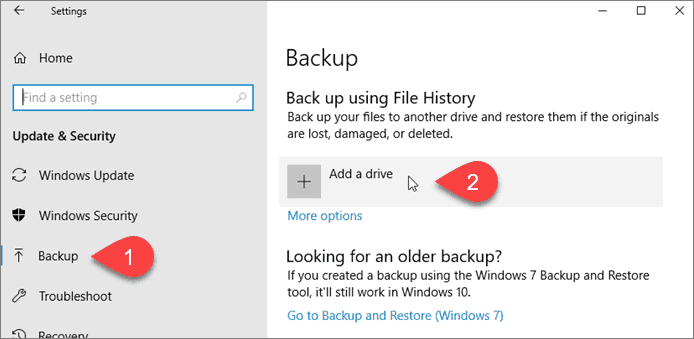
Step 1.To access the backup settings on Windows, navigate to the search bar and type "Backup settings", then click on the first result that appears.
Step 2.Under "Backup using File History", click on "Add a drive."
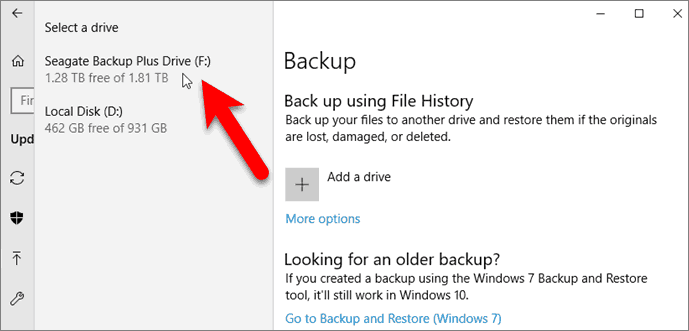
Step 3.Next, choose the drive to store your backup files.
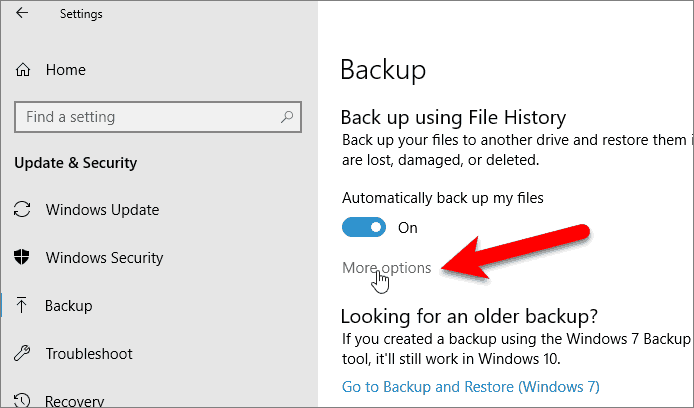
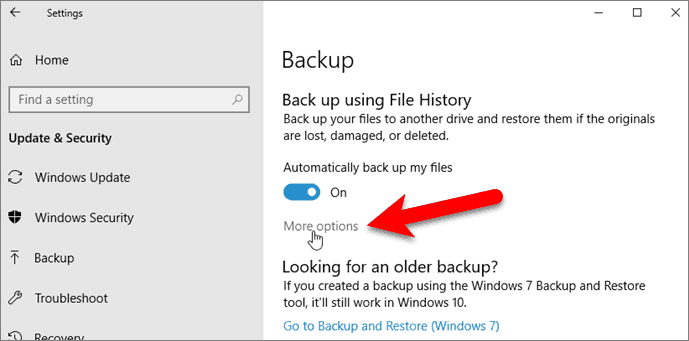
Step 4.Click on "More options" to configure the selected drive.
Step 5.Under "Backup options", select a backup frequency, such as hourly, and choose to retain backups indefinitely. This ensures your data is frequently backed up and kept for an extended period.
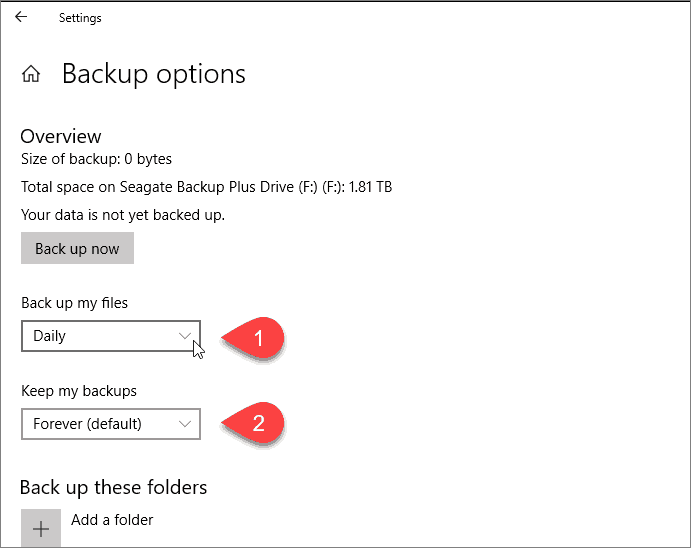
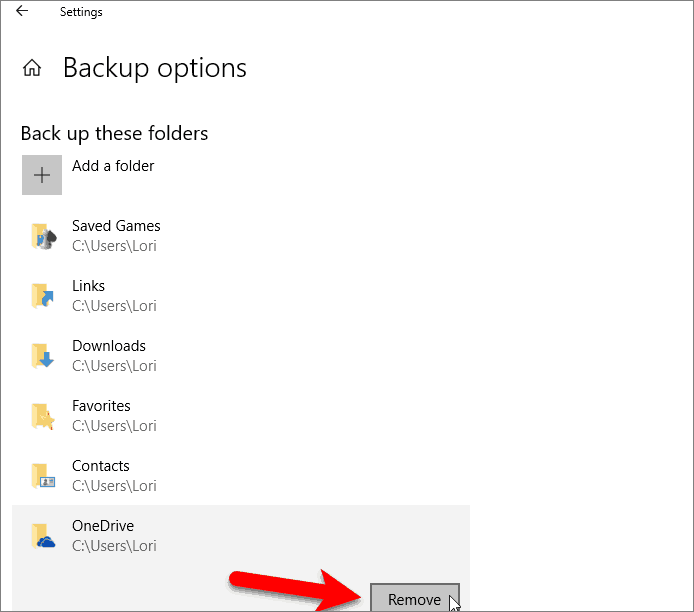
Step 6.Select the files and folders you want File History to keep, such as Music, Downloads, Desktop, and Pictures, by scrolling to the "Backup these folders" section and clicking on them. If a specific file is not listed, you can add it by clicking "Add a folder".
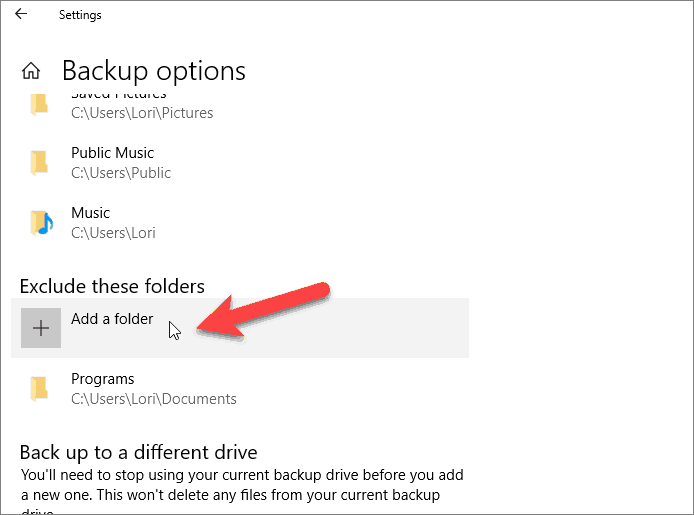
Step 7.If you don't want to back up a given folder, select it and click "Remove".
Step 8. When you've finished making the selection, click on "Back up now". File History will start backing up your data. Depending on the size and number of folders, this might take some time. Be patient until the entire process completes.
How to Restore Files Using File History
To recover files using File History, follow these steps:
Step 1. Go to the search bar, type "Backup settings" and press enter. Click on the first search result that appears.
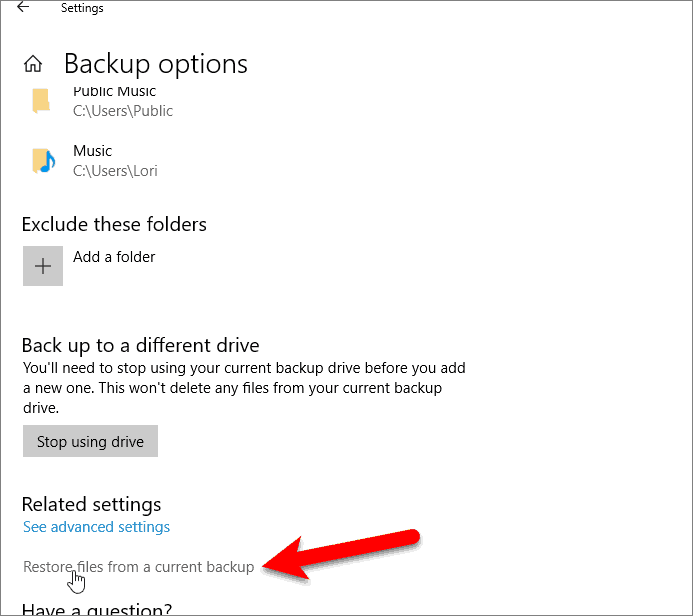
Step 2. Click on "More options" under "Backup using File History".
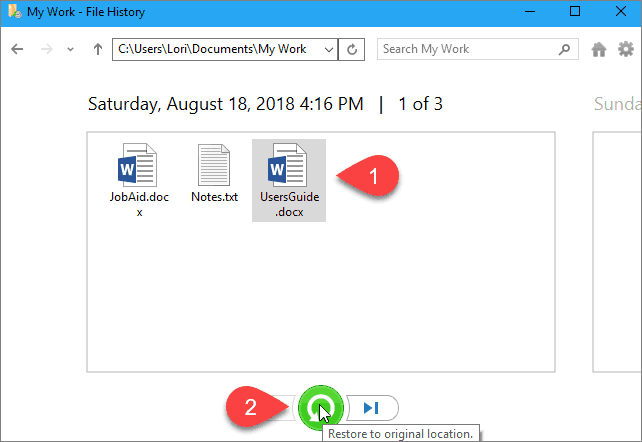
Step 3.To restore files from a current backup, navigate to the "Related settings" section and click on "Restore files from a current backup".
Step 4.When the list of files in the current backup is shown, choose the ones you want to restore and click the "Restore" button, and your system will make the selected files available for use again.
Windows Backup and Restore (Windows 7) Windows 10: How to Backup and Restore System Image
You can make a full backup for your Windows 10 device with a system image, which saves system settings, programs, and personal files, making it suitable for large files.
The Backup and Restore feature on Windows 10 allows you to save important files using the system image. To start, you create a system image on a USB drive, hard disk, or other device, which is the first step in the Windows backup process.
How to Create a System Image in Windows 10
Below are steps to create a system image:
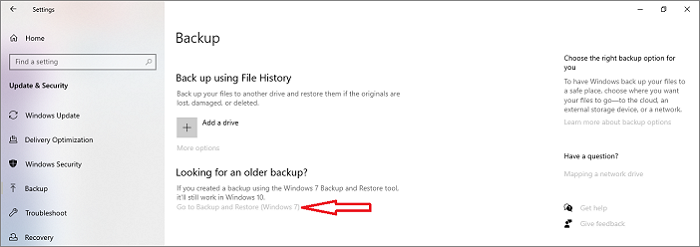
Step 1.Type Backup settingsin the search bar and open it.
Step 2.Click on "Go to Backup and Restore (Windows 7)".
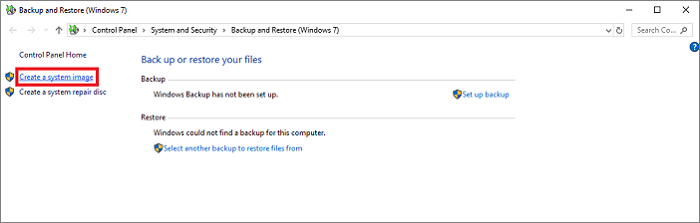
Step 3.To create a system image, navigate to the left side of the panel and click on "Create a system image".
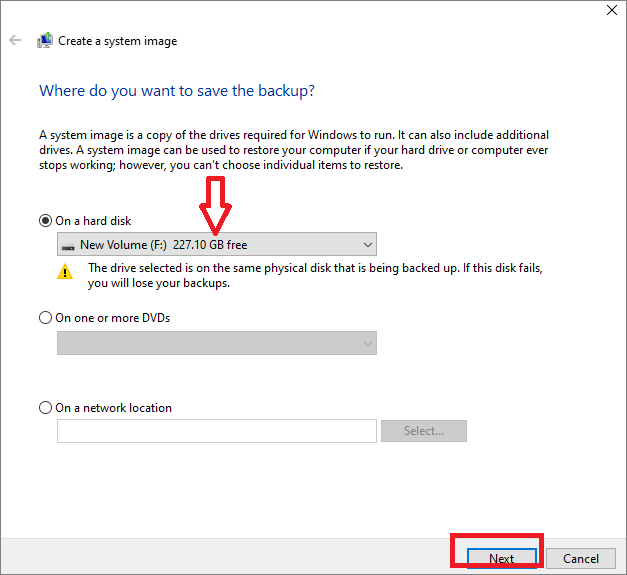
Step 4.Select a location to save your backup, such as a hard disk, DVD, or network location, and then click "Next".
Step 5.On the next window, choose the drives to include in the backup and click "Next".
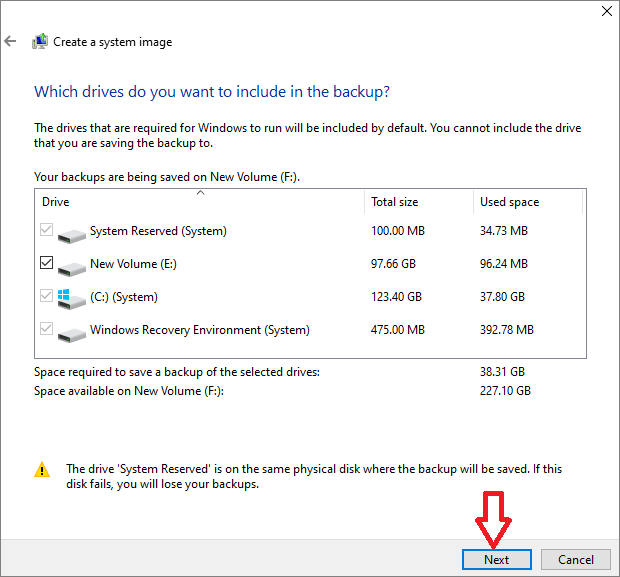
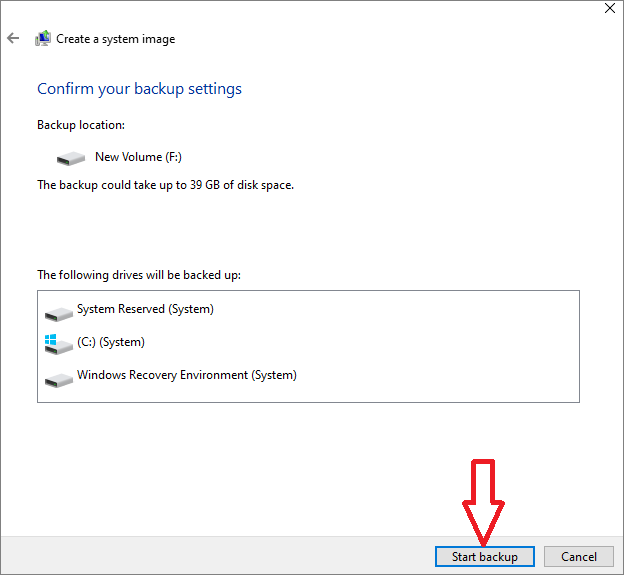
Step 6.Confirm the backup settings, then click "Start backup" to save your data. The system will back up your data.
How to Restore Files Using System Image Backup
To recover files using system image backup, you'll need a bootable USB or DVD and can follow these steps:
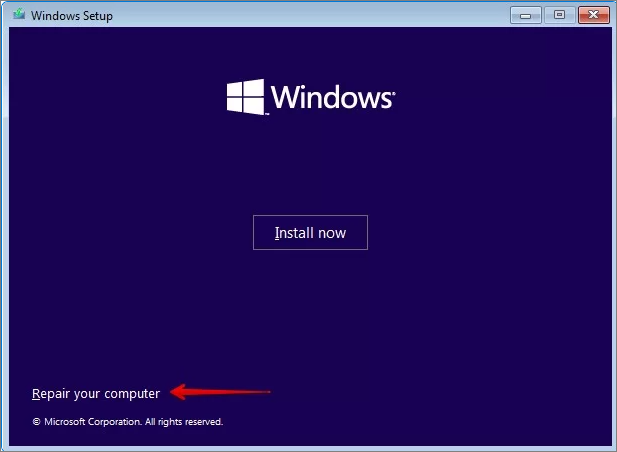
Step 1.To start the process, boot your PC and enter the Windows pre-install environment. From there, click the "Next" button.

Step 2.In the next window, click "System Repair" on the bottom left.
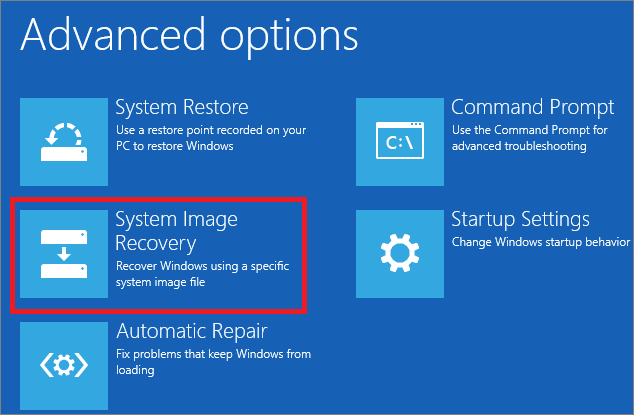
Step 3.Under "Choose an option", click "Troubleshoot."

Step 4.Next, click on "System Image Recovery".
Step 5.Select your system image and click "Next".
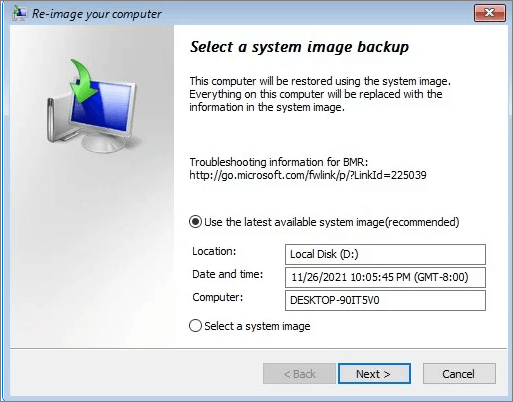
Step 6.Under additional restore options, select whether to format and repartition disks and click next.
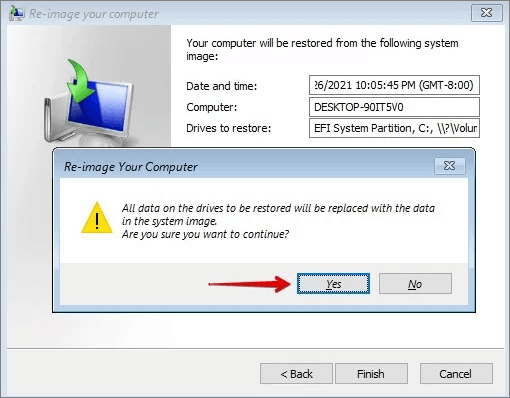
Step 7.Click "Finish".
Step 8.Confirm if you want to replace the current files with the system image and click "Yes". The restoration process will then begin.
Windows Backup and Restore (Windows 7) Windows 10: How to Create a Windows 10 Recovery USB
The Backup and Restore feature on Windows 10 allows you to create a recovery drive to save your system files and recover them when needed. To do this, you'll need a USB drive of at least 16GB, as using a smaller one will result in an "insufficient space" error. You can create a recovery drive through the Windows settings, following a straightforward process.
Step 1.Connect a USB drive to your PC.
Step 2.To create a recovery drive on Windows, start by opening the search bar and typing "Create a recovery drive" in it. This will bring up the first result, which is the "Create a recovery drive" tool.
Step 3.Once the "Create a recovery drive" window opens, select the option to backup system files to the recovery drive.
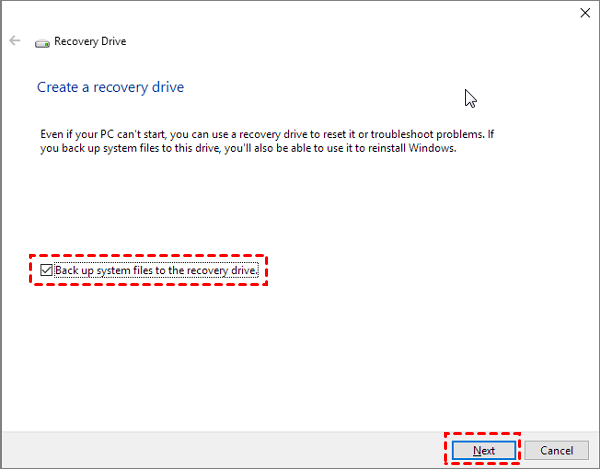
Step 4.Click "Next".
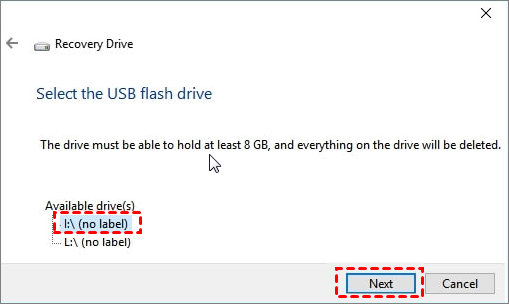
Step 5.To create a Windows recovery drive, select the USB device you want to use as the recovery drive and click "Next" in the Windows Recovery Drive wizard.
Step 6.Once you confirm the warning message, click "Create".
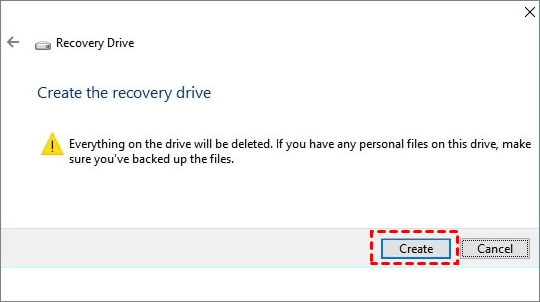
Step 7.When the "The Recovery drive is ready" message appears, click "Finish" to create a recovery drive using a recovery USB.
How to Restore Windows 10 from a Recovery USB Drive
Connect a recovery USB drive to your computer, then follow the steps to use System Restore and recover Windows 10 from the drive.
Step 1.Boot your computer from the USB recovery drive.
Step 2.Under the "Choose an option" window, select "Troubleshoot".

Step 3. Click on "Recover from a drive".
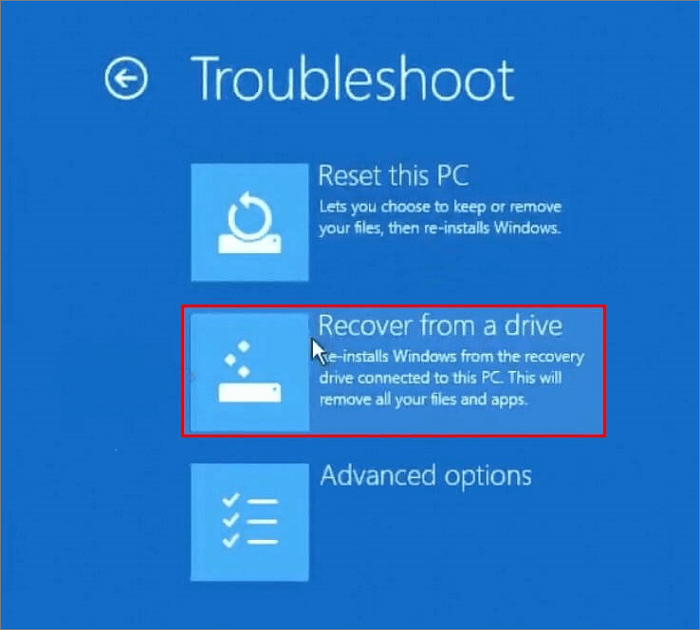
Step 4.After selecting the option to erase your data, you'll be prompted to choose between two options: "Just remove my files" or "Clean the drive fully".
Step 5.Click on "Recover" and the system will start recovering from the USB drive, which will take some time and then automatically restart your computer.
Step 6.Set up your computer with the on-screen instructions, and you're ready.
System Restore: How to Create a System Restore Point
System Restore is a Windows 10 feature that helps you backup and restore important settings and programs on your computer. It creates restore points to revert to an earlier working version of your system in case of a failure or malware attack.
To enable System Restore on Windows 10, which is disabled by default, you'll need to follow these steps: first, enable System Restore, and then create system restore points.
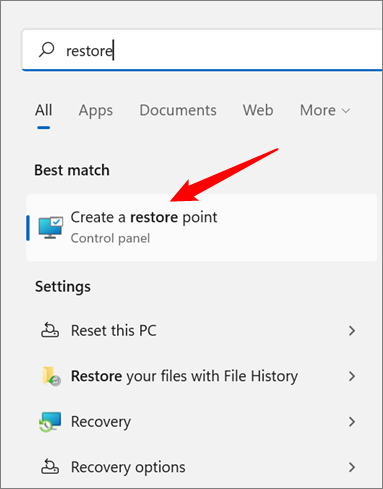
Step 1.Navigate to the search bar and type System Restore.
Step 2.Once the results display, click on "Create a restore point".
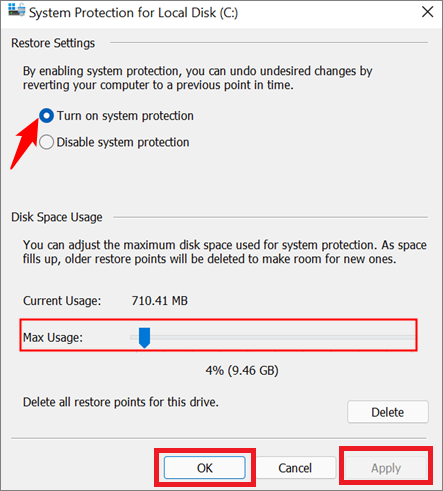
Step 3.To configure System Protection on your computer, open the System Properties window, click on the "System Protection" tab, select the drive you want to configure under "Protection Settings", and then click "Configure".
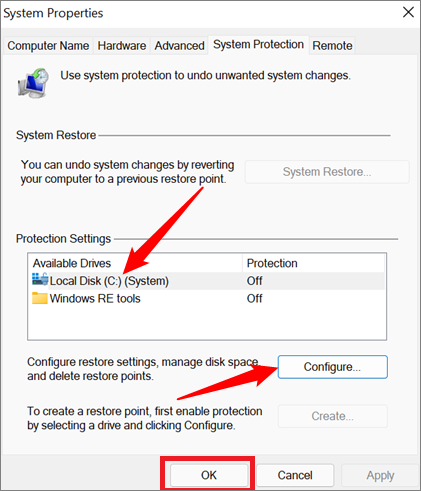
Step 4.To restore settings, select the "Turn on system restore" option and choose a preferred disk space for the system restore points.
Step 5.Click on "OK" and then "Apply" to activate System Restore and create restore points. Your computer will do the rest.
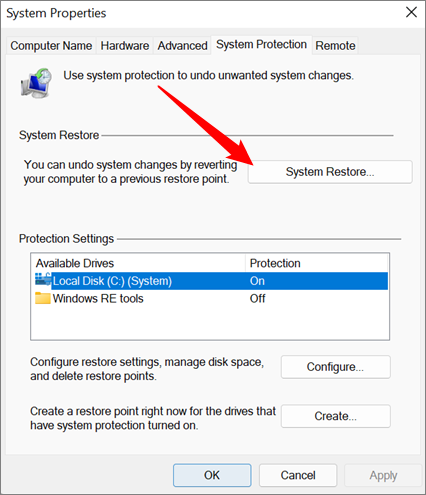
To manually create a system restore point, click on the "Create" button under the "System Protection" tab, then select the drive you want to create the restore point for and click "Create".
Here are the solutions to the problem: If System Restore points do not work, try checking if the restore points are available, running the System File Checker, booting in Safe Mode, checking for disk errors, and reinstalling the operating system.
How to Restore Your Computer Using System Restore Point
Restoring a system to a previous point helps recover your computer to a working state if the current system stops functioning as expected. When you restore the system, you'll recover all the settings and programs saved on your computer, reverting it to a previous state where everything was working properly. To use this feature, follow the steps below.
Step 1.Navigate to your Windows search bar and type System Restore.
Step 2.Click on "Create a restore point".
Step 3.Open the "System Protection" tab and click"Restore".
Step 4.Read through the instructions on the System Restore window and click "Next".

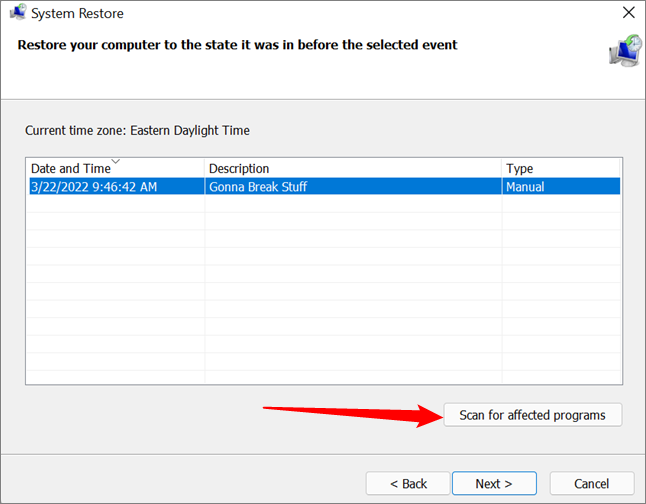
Step 5. To revert to a previous system state, choose the desired restore point from the available options. You can then click "Scan for affected programs" to see a list of programs and drivers that will be affected by this process. This allows you to anticipate and prepare for any potential issues that may arise during the restore.
Step 6.If everything is okay, click "Next".
Step 7.Confirm the restore point you selected and click "Finish" to start the recovery process. This process may take time, so be patient until it completes.

More system restore software is provided below the article:
To create a Windows Recovery Disk on Windows 10, you can use free system restore software. This software allows you to create a recovery disk that can be used to restore your system to a previous state in case of a system failure or other issues.
Download the best free system restore software for Windows 10 to restore your Windows system, files, and installed applications in case of a disaster, such as a system crash or accidental deletion.
4-in-1 Backup Software: How to Create Full Windows 10 Backup
You can use backup software, such as Qiling Backup Free, to create a full Windows 10 backup that combines the four techniques mentioned earlier, making it easy to back up and restore personal files, system settings, and programs.
This software comes with top-Notch Backup offers robust features that ensure the security of your files and settings in the event of a malware attack or system failure. With this feature, you can create backups of your files to a local drive, cloud storage, external drive, NAS, or network, providing multiple layers of protection. Additionally, Notch Backup allows for incremental and differential backups, further safeguarding your data. This comprehensive approach to backup and protection helps safeguard your digital assets and prevent potential data loss.
Features of Qiling Backup Free
- This feature enables you to schedule automatic backups at a frequency of your choice, such as daily, weekly, or monthly, ensuring your data is safely stored and easily recoverable in case of a system failure or other issues.
- Allows bootable backup and recovery for your system if it fails, creating a self-bootable backup that can be used to restore your system in case of a failure.
- Allows you to perform multi-path backup storage for data safety.
- Has password-enabled protection for all backup files.
- This software enables you to create an exact replica of your hard drive, including all files, folders, and settings, allowing for easy backups and cloning of your system.
Since Windows 10 built-If Windows 7's built-in system Backup and Restore tools fail, we recommend using Qiling Backup Free, a software with a free trial version. Download and install it on your computer to get started with easy-to-follow steps.
Step 1. Launch Qiling Backup on your computer, and click System Backup on the home screen.

Step 2. You won't need to manually select any system files or partitions as your Windows operating system information and all system related files and partitions will be automatically selected. Next, choose a location to save the system image backup by clicking on the illustrated area.

Step 3. The backup location can be another local drive on your computer, an external hard drive, network, cloud, or NAS. We recommend using an external physical drive or cloud to preserve system backup files.

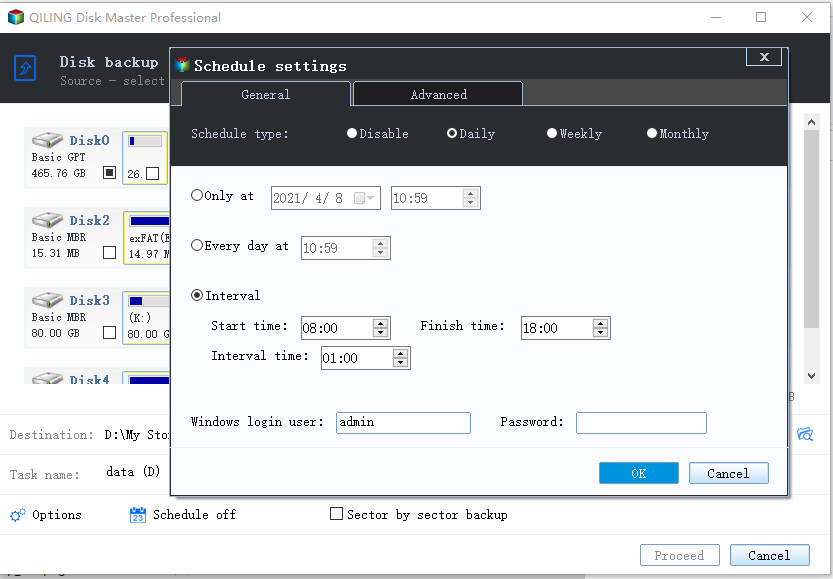
Step 4. Customization settings, such as scheduling automatic backups daily, weekly, monthly, or upon an event, and creating differential and incremental backups, are available in the Options button. Clicking Proceed initiates the Windows system backup process, which can be tracked on the left side in a card style once completed.
Windows 10 Backup and Restore FAQs
You may also have questions about backing up and restoring Windows 10, such as how to create a system image, how to create a recovery drive, how to use File History to back up your files, and how to restore your system to a previous state. These are all important topics to consider when it comes to maintaining your Windows 10 computer.
1. Does Windows 10 have Backup and Restore?
Microsoft included the Backup and Restore feature on Windows 10, offering users a familiar option from previous Windows versions, alongside File History.
2. How Do I Backup Entire Computer on Windows 10?
To back up your entire computer, including personal files, system settings, and programs, use a third-party tool like Qiling Backup Free, which combines the functions of File History, Backup and Restore, System Restore, and Recovery USB. You can download the trial version of Qiling Backup Free to get started.
3.How do I view Windows backups?
To check if File History is running, go to Control Panel, select "System and Security", click on "File History" and check the backup status.
Related Articles
- How to Backup SSD to Image with The Best SSD Image Backup Software [Full Guide]
- How to Backup NAS to Google Drive (2 Proven Ways)
- Free Download USB Image Tool on Windows 10/11
- Partition Backup|How to Backup Partition with Windows Partition Backup Software
- How to Clone HDD to M.2 NVMe SSD on Windows 10 using Ghost
Want to know how to use the Ghost Image to clone an HDD to M.2 NVMe SSD? You'll get a detailed stepwise guide in this post, and we'll also provide a Ghost Image alternative to help you clone HDD to M.2 NVMe SSD easier. - How to Create a Dell Recovery Disk for Windows 7/8/10/11 (Three Ways)
If you're looking for ways to create a Dell recovery disk, this article will guide you through three methods to help Dell laptop users create a recovery disk, making it easy to get back to a working state in case of a system failure or other issues.