Windows 10/8/7 System Restore Points Not Working
You may receive error messages that indicate your System Restore is not working, such as "System Restore did not complete successfully," "System Restore encountered a problem," or "System Restore did not complete." These error messages can be caused by various issues, including corrupted system files, disk errors, or conflicts with other system processes.
- System Restore failed
- A shadow copy could not be created
- Error 0x80070005/0x800423F3/0x80070570
- System Restore did not complete successfully
- System Restore was unable to retrieve the original version of the folder from the designated restore point.
- The restore point for the system could not be created due to an error detected in the Volume Shadow Copy Services (VSS), which is a Windows feature responsible for creating snapshots of the system at regular intervals to enable system restore points. This error typically indicates a problem with the VSS service or a disk issue that prevents the creation of a restore point.
Windows System Restore often fails to work after users update their system, install an application, or their computer becomes infected with malware or a virus. However, there are many other factors that can cause System Restore to fail, making it a frustrating problem for users. Fortunately, there are simpler alternatives to restoring your system, and you may not need to rely on System Restore every time something goes wrong with your PC.
You can create restore points of your system, applications, and personal files using third-party software, such as Qiling Backup, which can perform a complete system restore in Windows 10/8/7. However, for direct fixes, we'll discuss how to resolve Windows System Restore issues.
Five Solutions to Fix System Restore Not Working in Windows 10/8/7
If you're experiencing issues, there are five potential fixes you can try to resolve the matter.
Fix 1: Run System Restore in Safe Mode
To enter Windows Safe Mode, you can restart your computer and press the F8 key before the Windows logo appears. This will bring up a menu that allows you to select Safe Mode. Alternatively, you can also use the Windows Settings app to enable Safe Mode. For Windows 7, you can also use the System Configuration utility to enable Safe Mode.
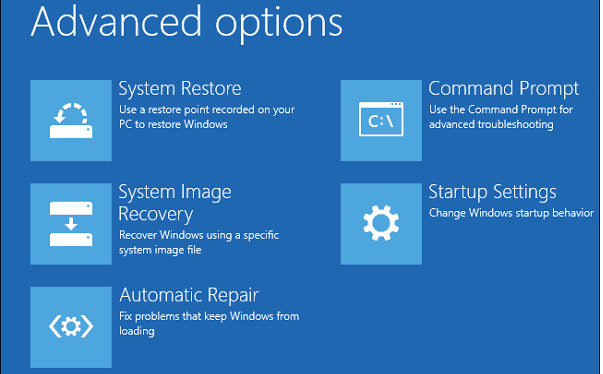
Step 1. To resolve the issue, simply restart your computer and, as it boots up, press the "F8" key repeatedly. This will open the Windows "Advanced Boot Options" menu, where you can select "Safe Mode" to enter a troubleshooting environment.
Step 2. In the Safe Mode menu, type recovery into the Start Menu search bar and select "Recovery" from the list.
Step 3. Open "System Restore" from the Advanced recovery tools menu.
If you're experiencing issues with system restore, try booting into Safe Mode and creating a system restore point or restoring to a prior point. If that doesn't work, try a Clean Boot to isolate the problem and potentially resolve it without interfering with other applications.
Fix 2: Check System Protection Settings and Configure Disk Space Usage
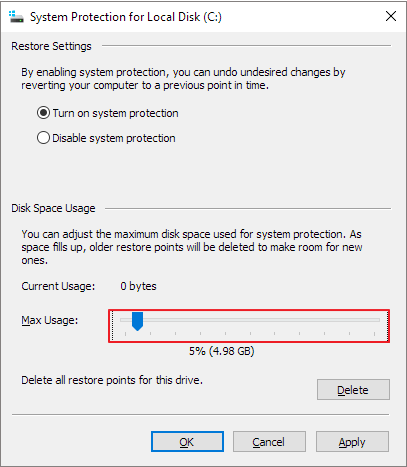
If your system restore points exceed the maximum disk space, you'll lose many new backup images, making it impossible to restore Windows to the desired point. To fix this, simply allocate more space for system restore points.
Step 1. Right-click "Computer/This PC" icon and select "Properties" -> "System Protection" -> "Configure".
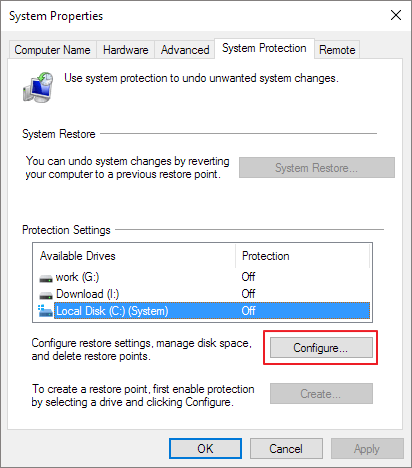
Step 2. When you arrive at the Configure area, you can adjust the "Max Usage" bar, and consider increasing it from the default 3 percent to over 5 percent.
Fix 3: Check the Status of Volume Shadow Copy Service & System Restore Service
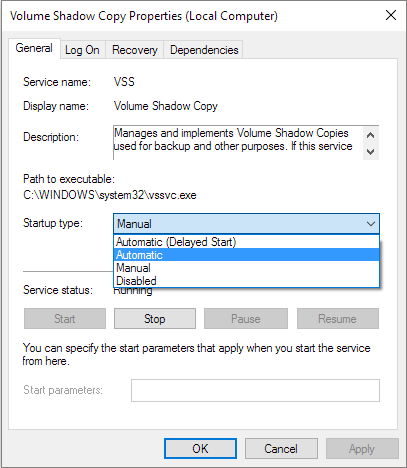
Another reason why System Restore may not work properly is due to the Volume Shadow Copy Service (VSS) being disabled or its registry value altered. VSS is a system implementation that enables volume backups to be taken while applications are running, and any issues with it can lead to Windows System Restore problems.
To set the Volume Shadow Copy Service to "Automatic":
Step 1. Type Services.msc in the Start Menu search box and hit "Enter".
Step 2. Search for "Volume Shadow Copy, Task Scheduler, and Microsoft Software Shadow Copy Provider Service" and check if they are running and have their startup type set to "Automatic".
Step 3. Reboot your computer and retry System Restore.
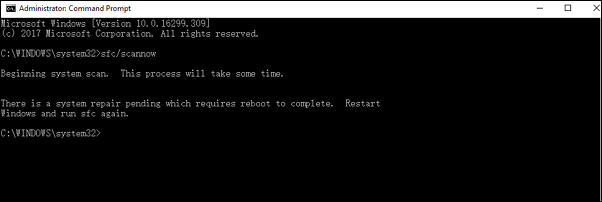
Fix 4: Repair Corrupted System Files
If System Restore stops working, it may be due to corrupt system files. Running the System File Checker (SFC) from the Command Prompt can help identify and repair any damaged system files, potentially resolving the issue.
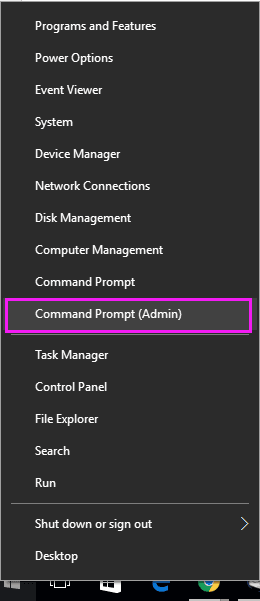
Step 1. Press "Windows + X" to bring up a menu and click "Command Prompt (Admin)".
Step 2. On the Command Prompt window, type: sfc /scannow and press "Enter".
Fix 5: Windows System Restore Alternative - Qiling Backup
System Restore is a helpful feature that can be a lifesaver when your computer experiences an issue and needs to be restored. However, sometimes despite having multiple restore points created automatically, you may encounter a situation where System Restore simply won't work, leaving you unable to restore your computer.
If your Windows System Restore isn't working, you're left without a specialized consultant to help solve the issue, making it wise to have a backup plan that can replace this function, ensuring you're prepared for any problems that may arise.
Qiling Backup is a reliable tool for creating a backup image of your system, including data, applications, and files, onto internal/external hard drives, Network, or Cloud storage, providing double protection of your system restore points. This backup software offers direct access to a dedicated support team in case of any issues, ensuring that you can always restore your computer to a safer state.
Create a system restore point with Qiling Backup
The detailed steps are provided here:
Part 1. Create a system backup
Step 1. Download and launch Qiling Backup. Choose the option "System backup" on the "Backup and recovery" page.
Step 2. Then it will detect and selected the operating system automatically.

Step 3. Select the backup destination, the software will choose the most suitable location by default.
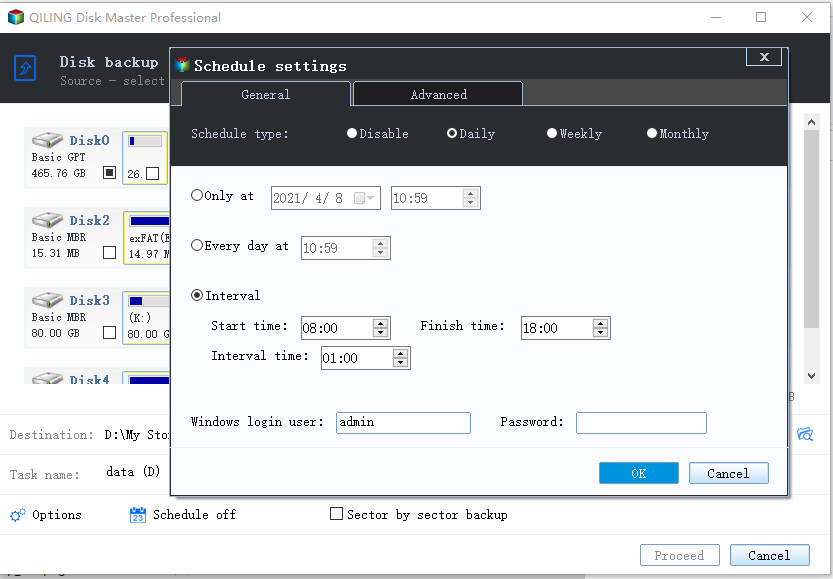
Step 4. To schedule a backup, click the "Schedule" option, which will open the Backup Scheme window. Here, you can create a plan to automatically back up your operating system at a later time, or on a daily, weekly, or monthly basis, or even upon a specific event. This will ensure that your OS is backed up regularly without requiring manual intervention.
Step 5. Save all of the changes. Click "Proceed" to start Windows 10 system backup.
Part 2. Restore the system
After backing up the system, you can restore it from its restore points using the detailed guide or follow the simple steps below to get things done.
Choose a system backup image -To initiate the system recovery process, click on "System Recovery" and then select a recovery drive. Once you've chosen the recovery drive, click on "Proceed" to continue with the system recovery.

Related Articles
- How to Backup Your Computer - Cloud Storage or Backup Software?
- Run Disk Clone Windows 10 with Qiling Backup
- [New] How to Install and Run 64 Bit Programs on 32 Bit Windows 10/8/7
- Lenovo OneKey Recovery Free Download for Windows 10 64 Bit/32 Bit
- How to Copy/Move Recovery Partition to USB or Another Hard drive [2 Ways]
- How to Backup Windows 7 in Different Ways - Full Steps with Pictures
If you want to back up your data on Windows 7, you can follow this guide to learn how to back up your system to a USB or external drive. Alternatively, you can use a third-party tool that offers a better solution for backing up your data.