How to Backup Windows 7 in Different Ways - Full Steps with Pictures
Securing data is a top priority for everyone, and there are several ways to achieve this. One option is to use a reliable backup service, which can provide an extra layer of protection for important files. Alternatively, individuals can consider investing in a storage device, such as an external hard drive or cloud storage, to safely store and backup their data.
Windows 7 users have an inbuilt backup solution that allows them to create a complete system image backup, making it easier to restore data and get their system back to a previous state. This backup can be saved to a network location, internal hard drives, or external drives, providing a secure way to safeguard their data.
A secure backup solution is essential for protecting your data from corruption, hard disk failure, malware infection, and other potential threats. This guide will provide a comprehensive overview of how to back up your Windows 7 system effectively.
Windows 7 Backup Software Overview
Windows 7 has an inbuilt backup solution, but users can also opt for third-party backup software like Qiling Backup Home, which offers various backup options, including full, incremental, and differential backups.
It is a feature-Qiling Backup Home offers users the flexibility to schedule backups of their Windows system at various intervals, including daily, weekly, monthly, or yearly, and allows them to back up data to USB drives, external hard drives, or cloud drives, supporting Windows 7 to Windows 11.
It is a one-Click Backup and Instant Recovery is a trusted solution that ensures users have higher efficiency. It is one of the most popular backup solutions, used by over 20,000,000 users globally, and offers 250GB of free cloud storage.
How to Make a Backup of Windows 7 Using System Backup Software
Qiling Backup Home is a reliable tool that provides incremental backup without compromising data security, making it a safe choice for users who want to save space on their device.
The tool interface is kept accessible to Go, making it easy for everyone to use. If you're looking to experience the tool's full capabilities, we're here to guide you through a detailed process and steps to follow carefully.
Step 1. Click the "File backup" button to start backup.

Step 2. Local and network files are listed on the left, allowing expansion of directories to select files for backup.

Step 3. Follow the on-screen guide to select the destination where you want to save the backup.

Step 4. To encrypt the backup with a password, click on the "Options" tab and select the "Backup Options" section. This allows you to customize the backup task to your needs and explore other available options.

Set the backup schedule and choose to start backing up at a certain event in "Backup Scheme".

Step 5. The backup can be stored on a local drive, Qiling's cloud service, or a Network-Attached Storage (NAS) device.

Step 6. Qiling Backup allows users to back up data to both third-party cloud drives and its own cloud drive.
To back up data to a third-party cloud drive, select Local Drive, scroll down to add a Cloud Device, and then add and log in to your account.
Step 7. After clicking "Proceed" to start the backup task, it will be displayed as a card on the left side of the panel once completed. To further manage the task, click the "Advance" button within the backup task card.

How to Back Up Windows 7 Using Backup and Restore Utility
Backup and Restore are built-Windows 7's backup tools create a secure backup on the operating system, allowing for complete recovery without any hassle.
The tool is designed to be easy to use and doesn't require a lot of effort. You just need to follow a few simple steps, such as
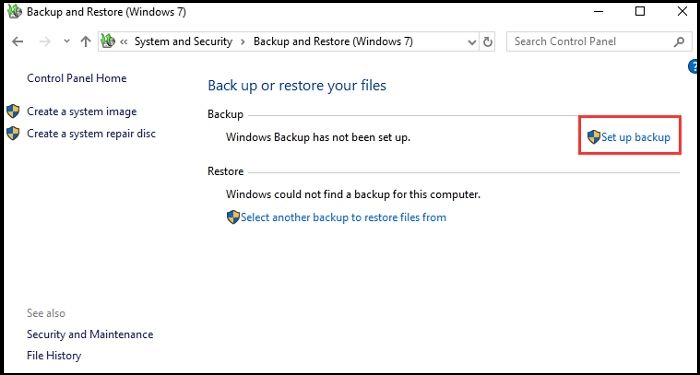
Step 1. To access the Backup and Restore feature on your PC, click the "Start" button and select the "Control Panel". From there, choose the "System and Security" option and click on "Backup & Restore".
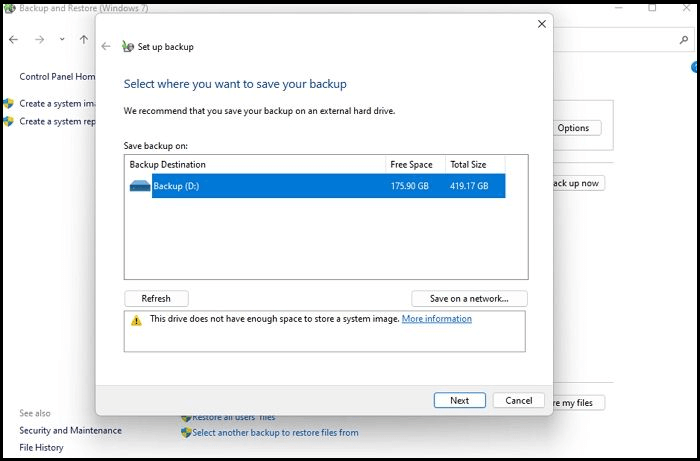
Step 2. Once the backup process is complete, proceed with the backup chance to move further with the process. It will prompt you to add an external drive. Connect your external storage device to your Windows 7 PC.
Step 3. On the backup screen, click the Refresh button to enable smooth functioning. Then, navigate to the Backup Destination option and select your external storage device from the given options. Finally, click Next to proceed with the backup process.
Step 4. Windows' built-in Backup and Restore tool allows users to back up files from specific folders, such as Documents, Music, Pictures, and Videos, and also enables adding additional folders to the backup by including them in the Computer section.
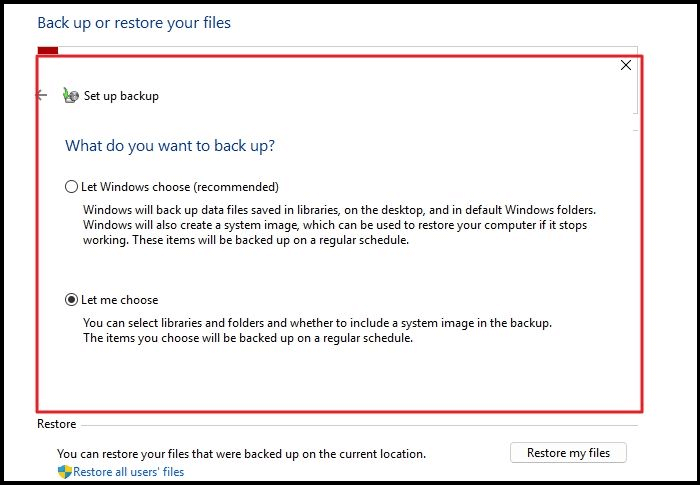
Step 5. After completing the above process, unselect the checkbox that says "Include a system image of drives" and then tap on the "Next" button to proceed.
Step 6. To change the schedule for backing up your data, select the "Change Schedule" option, then uncheck the box that says "Run backup on a schedule," and finally tap the "OK" button.
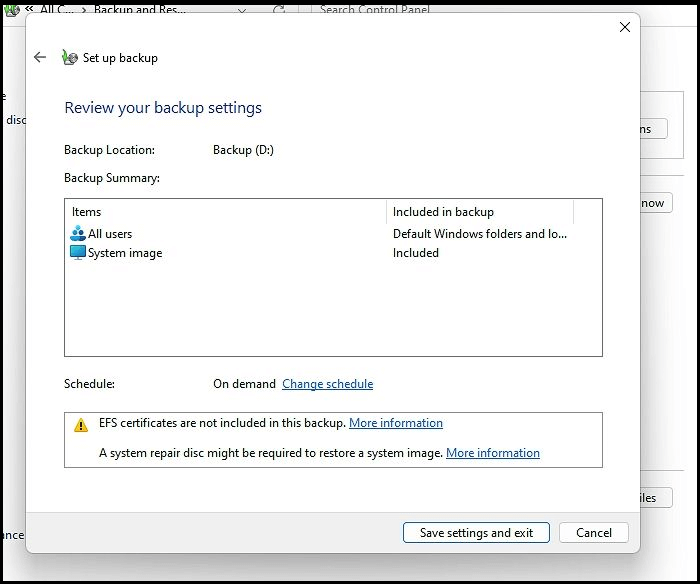
Step 7. Once you have completed the setup, select "Save settings" and run the backup option, which will initiate the backup process to the external storage device.
To safely remove the drive, you can use the Eject option before disconnecting it from your PC, ensuring all data files are kept safe.
To back up your preferable files on Windows 7 using the Backup and Restore utility, you can follow these steps: First, go to the Start menu and select "Control Panel". Then, click on "System and Security" and choose "Backup your computer". Next, select the files and folders you want to back up by clicking on "Add" and selecting the desired files.
More FAQs on How to Make a Full Backup of Windows 7
Creating a backup is the best way to keep your data safe from unwanted situations. It is the process that not only stores your data from other platforms but offers you easy accessibility over the same as well. To create a full backup of Windows 7, you can use the built-in backup tool, Windows Backup and Restore. This tool allows you to create a backup of your entire system, including files, settings, and applications. You can also schedule automatic backups to run at regular intervals.
1. Does Windows 7 have a Backup and Restore?
Windows 7 has an inbuilt backup solution called Backup and Restore, which helps users keep their data safe and offers easy accessibility to their backed-up files.
2. How do I set up a Windows 7 backup?
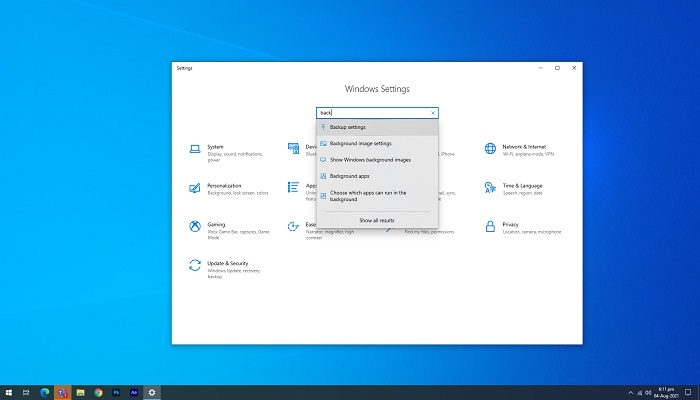
To set up a Windows 7 backup, follow these steps: click on the Start button, type "backup" in the search bar, and select "Backup and Restore (Windows Backup)" from the results. Then, click on "Set up backup" and choose the drive you want to use for backups. Select the files and folders you want to include in the backup, and choose a location to save the backup. Finally, click on "Save changes" to complete the setup process. This will ensure that your important files and data are safely backed up.
3. How do I back up my entire Windows 7 computer?
Windows 7 automatically backs up files in the Documents, Music, Pictures, and Videos folders, but to back up the entire computer, you can select all files and folders for backup.
4. How to back up a computer to external hard drive Windows 10?
To back up your computer to an external hard drive using Windows 10, you can easily use the File History section to do so conveniently. Simply follow these steps:
- To start, select the "Start" button from your device, followed by the "Settings" option.
- To update Windows, tap on the "Update & Security" segment, then proceed to the "Backup" option.
- Once you've completed the previous steps, tap on the "Add a drive" option and select an external drive for your backups.
For those interested in learning how to backup their computer to an external hard drive on Windows 11, there's an article available that provides more information on the process.
To back up your PC automatically in Windows 11, you can use the built-in Backup and Restore feature, which allows you to schedule backups to an external hard drive, network location, or OneDrive. You can also use the File History feature to automatically back up files to a network location or external hard drive.
Our guide to backing up your PC automatically in Windows 11 is a game-changer. Say goodbye to tedious steps and hello to getting the job done in minutes - click now to start!
Final Thoughts
Backing up Windows 7 is a necessity that makes it easier to keep your precious data safe under various circumstances. It provides users with easy access to their data without much effort, making it a vital term in the context of data preservation.
Windows 7 has an inbuilt data backup tool called Backup and Restore, but Qiling Backup is a recommended option to extend user experience, offering a user-friendly interface to back up files, folders, clones, disks, or even the entire operating system.
Related Articles
- WD Backup Not Working on Windows 10 - What to Do [2022]
- How Do I Backup Thousands of Photos [Photo Backup Strategy for Beginners]
- Fix "Recovery Drive Please Wait" [Step-by-Step Guide]
- 2022 Best Samsung Backup Software for PC/Phone (Free Download)
- How to Transfer Files from Flash Drive to Computer Windows 10
Transferring files between computers and smartphones is simple with USB devices, requiring only a simple drag and drop. However, as file sizes and numbers increase, this process can become more challenging. In such cases, using Qiling PCTrans software can provide a reliable solution for confidentially copying files without risking data loss. - How Do I Transfer Files from Google Drive to OneDrive [Ultimate Guide]
Download the files from Google Drive to your local hard drive and upload them to OneDrive. Use Google Takeout and share feature to transfer files from google drive to OneDrive.