How Do I Backup Thousands of Photos [Photo Backup Strategy for Beginners]
You can never have too many backups. It's essential to back up photos to ensure they're always safe and accessible, especially when you have thousands of them.
Page Content
Photo Backup Types
To store digital photos long term, consider using a cloud storage service like Google Photos or Amazon Drive, which offer automatic backup and organization features. You can also use external hard drives or solid-state drives (SSDs) for local storage, and consider using a NAS (Network-Attached Storage) device for a home-based solution.
To backup thousands of photos on Windows and Mac, use cloud services like Google Photos, Amazon Prime Photos, or Microsoft OneDrive, which offer unlimited storage for photos and videos. Alternatively, use external hard drives or portable SSDs for local backups, and consider using backup software like Qiling backup to automate the process. Additionally, use the built-in backup features of your operating system, such as Windows File History or macOS Time Machine, to create backups of your photos and other files.
Best Way to Backup Photos on Android
Best Way to Backup Photos iPhone
Photo Backup Types
There are two main types of backup systems: on-site and off-site. On-site backups involve storing data on a local device, such as an external hard drive or a network-attached storage (NAS) device, located within the same physical location as the data being backed up.
On-site Systems can store backups either locally, at the user's location, such as on an external hard drive or USB flash drive, or off-site, at a separate location, like another computer or cloud storage. This distinction has its own set of pros and cons.
On-site backup systems are more expensive to set up and maintain, but offer faster recovery times, while off-site systems are less expensive, but take longer to recover lost data, making the best choice dependent on budget and recovery needs.
In the next part, let me explain more details about each method - Figure out the best way that won't stress enough.
What Is the Best Way to Store Digital Photos Long Term
Photo backup strategy on Windows/Mac computer:
✔️(Techradar Recommended) Run third-party software: Free, secure password-protected backup.
✔️Removable media includes external hard drives, solid-state drives (SSDs), USB sticks, SD cards, CDs, and other devices that can store and transfer data.
✔️Cloud: Google Drive, or OneDrive.
If you have an external hard drive or cloud account, don't leave it idle; you'll spend time manually copying and transferring. Consider downloading third-party backup software for a fast and automatic backup experience.
Best Way to Backup Photos on Android and iPhone
For smartphone users, you can directly download apps or tap preloaded ones, making it easy to access various features and services.
✔️Android users can access Google Photos by tapping on the app icon. It is a tool used for storing and organizing photos and videos.
✔️iPhone Users: Use iCloud.
Best Free Backup Software for Windows 11
With the advancement of technology, backing up your data has become simple. Fortunately, we have identified 5 solutions that make your data easily retrievable, and the best part is that they are free Windows 11 backup software.
How Do I Backup Thousands of Photos on Windows and Mac?
#1. Back-Up to External Hard Drive
External hard drives are becoming increasingly popular due to their convenience and affordability. To back up photos with an external hard drive, simply connect the drive to your computer, select the photos you want to back up, and drag and drop them onto the drive. Alternatively, you can use software like Time Machine or Backup and Sync to automatically back up your photos to the external hard drive.
1. Connect the external hard drive to the computer.
2. Open the external hard drive.
3. Create a new folder and name it "Photos."
4. Open the "Photos" folder.
5. To back up your photos, select the ones you want to save and copy them into the designated "Photos" folder.
6. Eject the external hard drive safely from the computer.
#2. Free Windows & Mac Photo Backup Software - Qiling Backup
Qiling Backup is a free backup software that works with both Windows and Mac, making it a great option for photo backup. This software allows you to easily create backups of your photo files, ensuring your precious memories are safe and sound. You can choose which folders to include in your backup and set up automatic backups to run on a schedule that suits you.
This software also features a Cloud storage function, allowing users to try a free 250GB for 30 days.
Quick Download:
Download Mac Version: Qiling Backup Mac
Step 1. To start backup, click the File backup button.

Step 2. The tree view displays a list of local and network files, allowing users to select files to be backed up by expanding the directory.

Step 3. Follow the instructions on the screen to select the desired location for storing the backup.

Step 4. In the Backup Options section, click on Options to encrypt the backup with a password. This allows you to customize the backup operation to suit your needs.

In the Backup Scheme section, you can specify the frequency of backups, such as daily, weekly, or monthly, and choose whether to start the backup at a specific event, like a system reboot or a user login. This allows you to customize the backup schedule to suit your needs.

Step 5. Backups can be stored on a local disk, in Qiling's cloud service, or on a network attached storage device (NAS).

Step 6. Qiling Backup enables customers to securely back up their data to either a third-party cloud storage service or Qiling's own cloud storage solution.
To back up your data to a third-party cloud drive, select Local Drive, scroll down to add Cloud Device, and enter your account information.
Step 7. To start a backup, select the "Proceed" option. Once the backup process is complete, it will appear as a card on the panel. For more detailed information about the backup job, click the "Advance" button on the card.

#3. Back-Up to Cloud
Google Drive and OneDrive are two of the most popular and user-friendly cloud storage options.
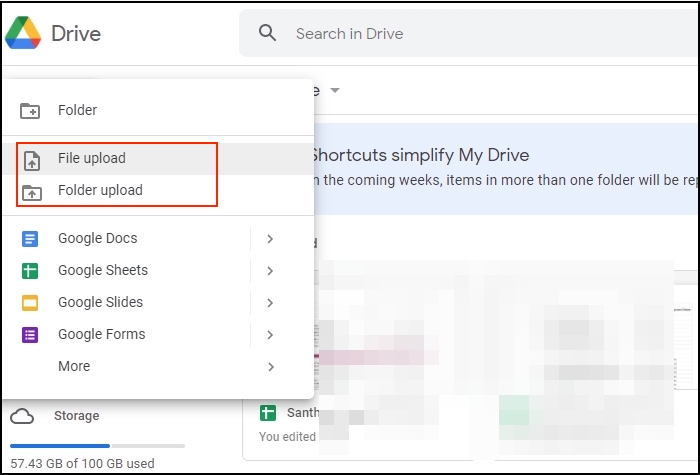
⚙️To back up photos to Google Drive:
Step 1. Download and install the Google Drive app on your computer.
Step 2. To upload photos to Google Photos, open the app, sign in with your Google account, and click the "File Upload" button to select the photos you want to upload.
⚙️To back up photos to OneDrive:
Step 1. Download and install the OneDrive app on your computer.
Step 2. To upload photos to the app, open the app, sign in with your Microsoft account, and click the "Upload" button to select the photos you want to upload.
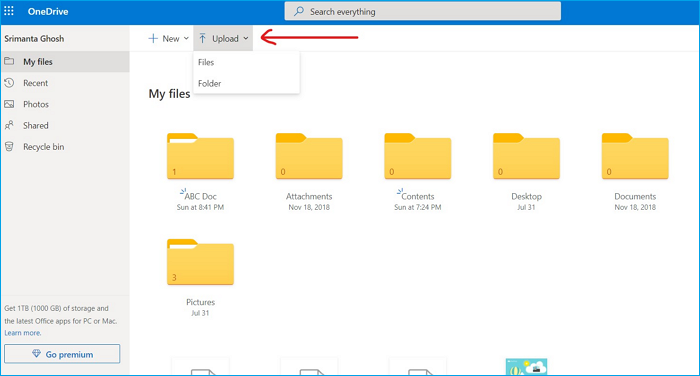
Step 3. Start upload process.
Both Google Drive and OneDrive offer free storage plans that are sufficient for most users, but it's a good idea to periodically check your available storage space and delete unnecessary files to free up space.
Best Way to Backup Photos on Android
Backing up photos on Android is a simple process that can be done in a few different ways. It can be done through Google Photos, which automatically saves all of your photos to the cloud, or through the device's built-in backup feature, which can be set to automatically backup photos to a Google account or other storage service.
To store photos without running out of space, one way is to use the Google Photos app, which offers free unlimited photo storage.
⚙️To back up photos using the app:
To back up and sync your Google account data, follow these steps: Open the Google account settings menu, and select the "Back up & sync" option. This will allow you to choose what data you want to back up and sync with your account, such as contacts, calendar events, and photos.
Storing photos on a microSD card is a simple and cost-effective way to back up large numbers of images, making it a great alternative to traditional backup methods.
⚙️To back up photos to a microSD card:
To transfer files from your Android phone to a memory card, insert the card into your phone and then copy or move the desired files to the card. Alternatively, you can also back up your photos by uploading them to a cloud storage service like Dropbox or Google Drive.
Best Way to Backup Photos iPhone
⚙️One option is to use the iCloud Photo Library:
This will upload your photos to iCloud, where they can be safely stored and accessed from any device.
⚙️Another option is to use iTunes:
Step 1. Connect your iPhone to your computer and launch iTunes.
Step 2. To back up your photos, select your device and click the "Photos" tab, where you can choose to sync all photos or select specific albums. Alternatively, use third-party storage services like Google Photos or Dropbox, by downloading their app and following the instructions. Regularly backing up your photos ensures you never lose them.
Photo Backup Strategy FAQs
1. What can I do with thousands of digital photos?
Creating a digital photo album or a physical one can be a great way to preserve memories. You can use online services or software like PowerPoint to create a digital slideshow, or print out favorite photos and compile them into a physical album. This can be a fun project to do with the family, and it's a wonderful way to share memories with future generations.
2. Where can I save my photos forever?
A hard drive can't keep health forever, making it essential to save photos permanently. The best way to do this is by storing them in the cloud, where services like iCloud and Google Photos offer unlimited storage for a small monthly fee. This not only saves your photos but also automatically backs them up, so you don't have to worry about losing them.
Related Articles
- [Backup Question] How Often Should I Create A System Image
- Backup Data to Tape with Tape Backup Software
- [3 Ways] How to Backup Laptop to OneDrive Quickly
- Is It Possible to Backup RAID in a Safe and Easy Way
- How to Migrate Windows Server 2008 (R2) to 2016/2019 Step by Step
Upgrading from Windows Server 2008 to 2016 can be a straightforward process with the right tools. Qiling Disk Master allows you to transfer data, applications, and user accounts from the old server to the new one in just a few clicks, making the migration process quick and easy. - Migrating from Dropbox to Google Drive: A Step-By-Step Guide 2022
Do you want to switch from Dropbox to Google Drive? If yes, follow this easy guide on Migrating from Dropbox to Google Drive. It's a step-by-step guide that will help you seamlessly move from one cloud service to another. You can also use third-party software to transfer files, making it very easy to transfer files.