Fix System Restore Failed and Did Not Complete Successfully Error in Windows 10
PAGE CONTENT:
- 1. Why did system restore fail
- 2. How to execute system backup and restore when system restore failed
- 3. How to fix system restore fail error in Windows 10/8/7
- 4. How to address system restore error codes: 0x80070091, 0x80070005, 0x8000fff,0x8007045b
Reading Duration: 5 - 7 minutes
To fix system restore failed error in Windows 10/8/7, start by running the System File Checker (SFC) tool to scan and replace corrupted system files. Then, run the DISM tool to check and repair any issues with the system image.
This solution is best suited for experienced Windows users, but a one-size-fits-all system restore solution is also included for beginners.
Overview of "System Restore Did Not Complete Successfully" in Window 10 Issue
System Restore is a feature in Windows that rebuilds your system and restores data in case of an emergency, and is also used to revert systems to a previous state.
System Restore might fail due to various reasons, including insufficient disk space, corrupted system files, or issues with the restore point itself, which can prevent the process from completing successfully.
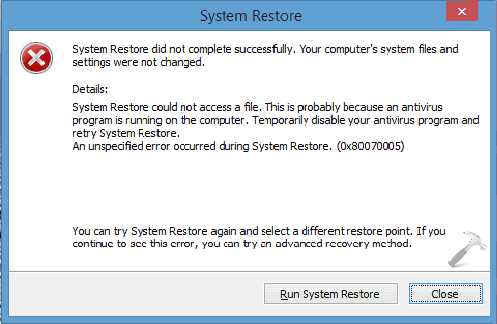
- System Restore was unsuccessful and your computer's system files and settings remain unchanged.
- System Restore failed due to an antivirus program running on the computer, so try temporarily disabling the antivirus and retrying System Restore.
- The error code 0x80070091, 0x80070005, 0x8000ffff, 0x8007045b, 0x800423F3, 0x81000203, and others like 0x8007000d, 0x8007000e, 0x8007001c, 0x8007000f, 0x80070020, 0x80070021, 0x80070022, 0x80070023, 0x80070024, 0x80070025, 0x80070026, 0x80070027, 0x80070028, 0x80070029, 0x8007002A, 0x8007002B, 0x8007002C, 0x8007002D, 0x8007002E, 0x8007002F, 0x80070030, 0x80070031, 0x80070032, 0x80070033, 0x80070034, 0x80070035, 0x80070036, 0x80070037, 0x80070038, 0x80070039, 0x8007003A, 0x8007003B, 0x8007003C, 0x8007003D, 0x8007003E, 0x8007003F, 0x80070040, 0x80070041, 0x80070042, 0x80070043, 0x80070044, 0x80070045, 0x80070046, 0x80070047, 0x80070048, 0x80070049, 0x8007004A, 0x8007004B, 0x8007004C, 0x8007004D, 0x8007004E, 0x8007004F, 0x80070050, 0x80070051, 0x80070052, 0x80070053, 0x80070054, 0x80070055, 0x80070056, 0x80070057, 0x80070058,
In Windows 10/8.1/8/7, when System Restore fails, you won't be able to restore your system or data, but you can try to fix the issue by troubleshooting the problem that caused System Restore to fail. This can involve checking for corrupted system files, ensuring that the backup point is valid, and checking for any disk errors. If you're still having trouble, you can try using a third-party system restore tool or seeking help from a professional. Additionally, you can try to force a system restore by booting your computer in safe mode and then running the System Restore tool from there.
Why Did System Restore Fail
The System Restore operation may fail due to several factors, including corrupted system files, insufficient disk space, or conflicting system configurations. Additionally, issues with the System Restore point itself, such as a missing or damaged restore point, can also cause the operation to fail. Furthermore, problems with the Windows Update process or a failing hard drive can also prevent System Restore from working properly.
- Antivirus software interruption
- System Protection setting interruption
- System file loss or corruption
- System restore point file loss or corruption
- Insufficient space on C drive for system restore
To execute system backup or restore on Windows while the built-in feature is malfunctioning, you can use alternative methods such as using a third-party backup software like Qiling Backup, or using the built-in Windows Backup feature in a different way, like using the command line or creating a system image using the built-in Windows feature. To fix system restore failed error on Windows 10 or 8/7, you can try running the System File Checker (SFC) tool, checking the system restore point, running the Windows Update troubleshooter, or using the DISM tool to repair corrupted system files, and then try to restore the system again. Additionally, you can also try to create a new system restore point and then try to restore the system to that point, or you can try to use a third-party system restore software like Qiling Disk Master or WinZip System Restore.
Part 1. Execute System Backup and Restore when System Restore Failed
This tool helps Windows users create a system backup image and perform system restore when the built-in System Restore feature fails. It provides an alternative solution for users to recover their system to a previous state, ensuring their data and settings are preserved, even when the standard System Restore function is unable to complete the task.
If System Restore fails to work on your computer, it's recommended to create a system backup of your current Windows operating system right away. This will ensure that you have a copy of your current system configuration and can restore it if needed.
When system restore fails, you can use reliable Windows backup software such as Qiling Backup to backup system and data in a few clicks in all Windows versions.
Step-by-Step Guide to Create System Backup Image (Back Up Windows 10)
Step 1. To back up your Windows 10/8/7 operating system, download and launch Qiling Backup, then click on "System backup" on the "Backup and recovery" page.
Step 2. Then in the next window, it will detect and display the operating system information automatically.

Step 3. Select the backup destination, the software will choose the most suitable location by default.

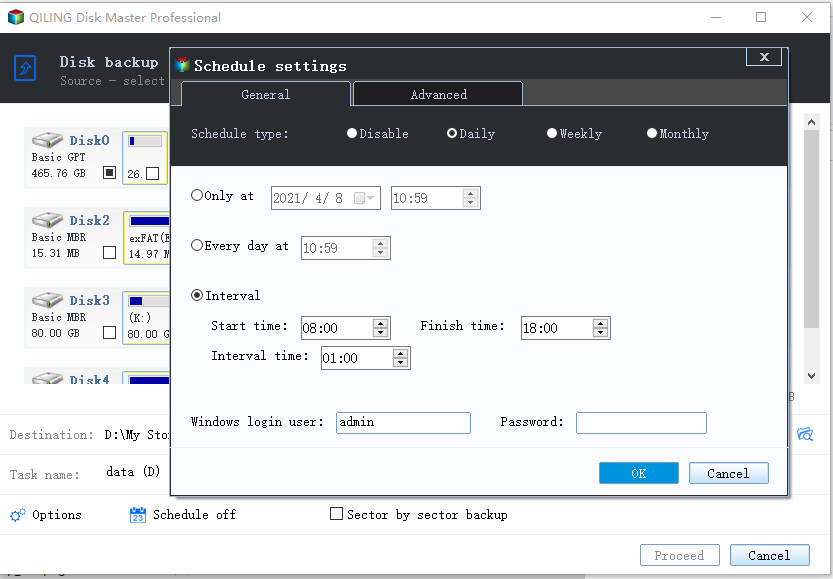
Step 4. To schedule a backup, click the "Schedule" option to open the Backup Scheme window, where you can create a plan to automatically back up your OS at a later time, or on a daily, weekly, or monthly basis, or even when a specific event occurs. This way, your OS will be automatically backed up.
Step 5. Save all of the changes. Click "Proceed" to start Windows 10 system backup.
Part 2. How to Fix System Restore Failed & Did Not Complete Successfully Error
To resolve the "unspecified error occurred during system restore" issue and fix the "system restore did not complete successfully" error, you can try running System Restore in Safe Mode, checking for corrupted system files, running a System File Checker scan, and reinstalling the problematic driver or software. Additionally, you can try running a System Restore from a previous restore point, creating a new restore point, and checking for any Windows Updates that may have caused the issue.
If you've created a Windows backup, you can try the solutions to fix the system restore failed error in Windows 10/8/7. The process involves following tutorial steps, which may vary depending on the Windows version you're using.
#1. Disable Antivirus Software
#2. Check System Protection Settings
#4. Run System Restore from Safe Mode
#6. Run System Restore from Other Restore Point
Notice:
To avoid data loss, make sure to backup your data in advance before attempting fixes or running system restore.
You can directly backup your data with Qiling file backup software as recommended in Part 1.
Method 1. Disable Antivirus Software
The System Restore failed and did not complete successfully error is often caused by antivirus software interfering with the restore process. To resolve this, try disabling your antivirus software temporarily.
Disable Antivirus Software:
Step 1. Find running antivirus software.
Step 2. Wait for the virus cleaning process to complete if the antivirus is scanning your device.
Step 3. Close antivirus and exit it from your taskbar in Windows 10.
Disable Windows Defender:
Step 1. Press Windows Key + R keys to open the Run Dialog.
Step 2. Type regedit and click "OK" to open the Registry Editor.
Step 3. Navigate to HKEY_LOCAL_MACHINE\SOFTWARE\Policies\Microsoft\Windows Defender.
Step 4. Find a registry entry named DisableAntiSpyware, double-click it, and set its value data to 1.

Method 2. Check System Protection Settings
To troubleshoot the "System Restore failed and did not complete successfully" error, check if System Protection settings are correct, as corrupt settings can cause the issue. Follow the steps to verify and correct System Protection settings, which may resolve the problem.
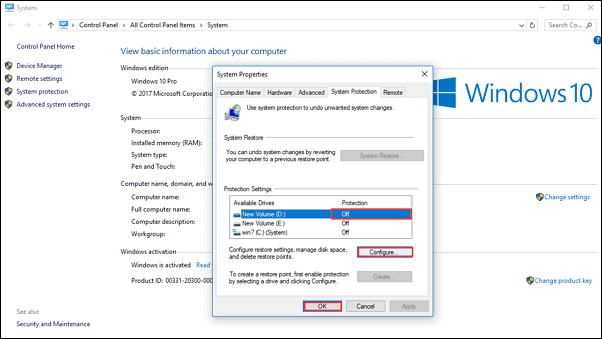
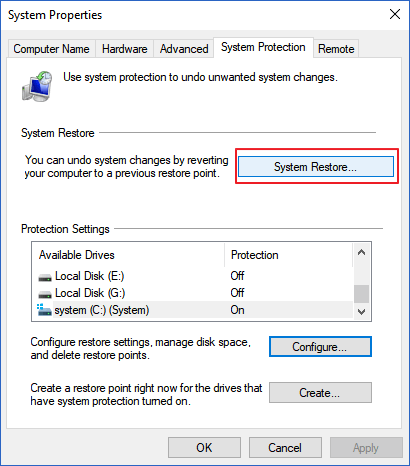
Step 1. Boot into Windows, right-click on "This PC", and select "Properties"
Step 2. Click "System Protection".
Step 3. Under the "Protection" column, check if the protection is set to "On" in your system C drive.
If the Protection column value is "Off", select the hard disk and click "Configure".
Method 3. Run SFC Command to Check and Repair Corrupted File System
System Restore failed and did not complete successfully error can also occur due to system file corruption. Running the System File Checker (sfc) can help identify and repair corrupt system files, potentially resolving the issue.
Step 1. Boot into Windows, click "Start". Type command prompt in the search box.
Step 2. Right-click on "Command Prompt" and click "Run as administrator".
Step 3. When Command Prompt has loaded, type sfc /scannow and press "Enter".
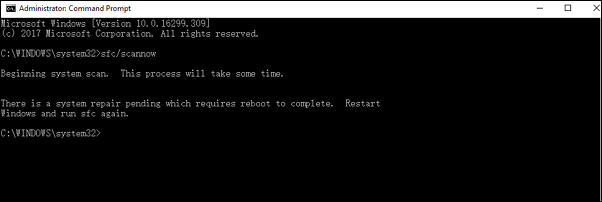
This command will scan your system for corrupted system files and automatically repair them for you.
Method 4. Run System Restore from Safe Mode
Some users suggest that running System Restore from Safe Mode can help bypass the 'System Restore did not complete successfully' error.
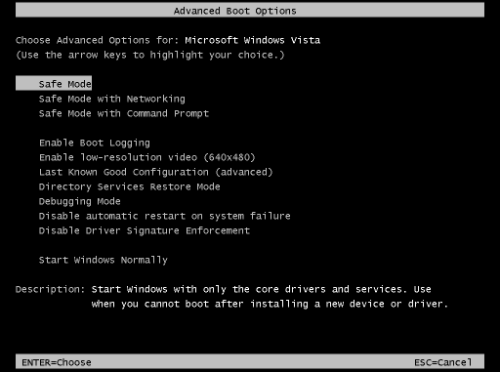
Step 1. Restart your computer and press F8 before the Windows logo appears.
Step 2. Select "Safe Mode" and press Enter.
Step 3. Wait for Windows to complete loading.
Now, you can open System Restore and follow the wizard steps to restore your Windows to a previous state. For a detailed guide, move to and follow Method 6 for help.
Method 5. Try Clean Boot to Run System Restore
To troubleshoot if System Restore works on your Windows 10 PC, you may try Clean Boot to see if the issue persists. To do this, you can follow these steps:
Step 1. Press Windows + R keys, and type msconfig.exe, and hit Enter.
Step 2. Open System Configuration, go to the General tab, uncheck "Load startup items" from the Selective startup radio button.
Step 3. At the Services tab, check "Hide all Microsoft services", and click "Disable all".
Step 4. Click "OK" to confirm and restart your PC.

After this, you may try steps in Method 6 to continue performing system restore in Windows 10.
Method 6. Run System Restore from Other Restore Points
If you've created multiple restore points, you can still force system restore on your computer, reverting Windows to the previous state with previously created restore points, even if system restore failed.
Here are the steps for you to follow:
Step 1. Press Windows + R keys, type create a restore point in the Search box.
Step 2. Click the top result to open "System Properties".
Step 3. Click the System Restore button under the System Protection section.
This will bring up all the restore points that you've created.
Step 4. Click "Next" and select another restore point to restore on your PC.
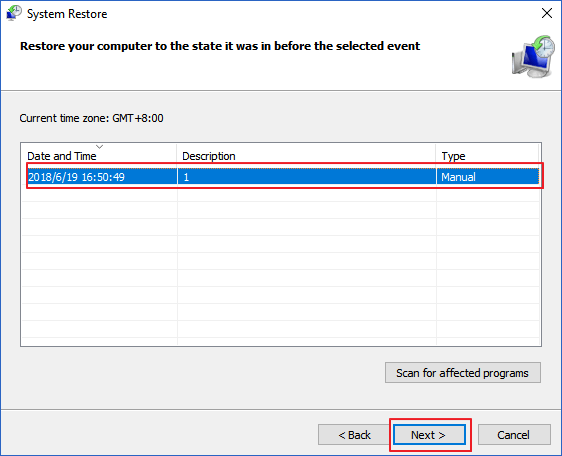
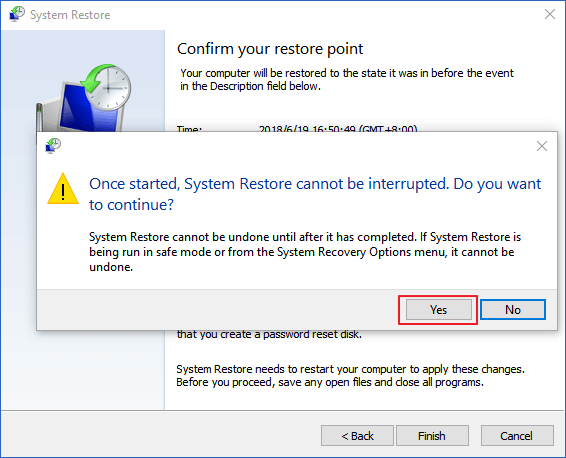
Step 5. Click "Finish" and "Yes" to execute the System Restore on your PC.
After updating the drivers, wait for the process to complete. To ensure the changes take effect, restart your PC. This will finalize the updates and keep your system running smoothly.
These are all the possible solutions for System Restore failed and did not complete successfully. Hope at least one of them is helpful!
Part 3. How to Address System Restore Failure Error Codes
Due to various reasons, system restore errors may occur, resulting in different error codes when an unspecified error occurs during the process.
If System Restore fails in Windows 10/8.1/8/7 with error codes like 0x80070091, 0x80070005, 0x8000fff, 0x8007045b, and others, you can try a different approach to resolve the issue. You can attempt to fix the problem by trying the method mentioned above.
To fix System Restore failed with Error 0x80070091 in Windows 10, you can try running the System File Checker (SFC) tool to scan and replace any corrupted system files. You can also try running the DISM tool to check and repair any issues with the Windows image. Additionally, you can try running the System Restore as an administrator, or try restoring from a different restore point.
#2. Fix System Restore Didn't Complete Successfully with Error 0x80070005
To resolve Windows 10 System Restore failed with error code 0x8000fff, try running the System File Checker (SFC) tool, which scans and replaces corrupted system files. Check for any pending updates and install them, as outdated drivers or software may cause the issue. You can also try running the DISM (Deployment Image Servicing and Management) tool to repair corrupted system files.
#4. Address System Restore Failed with 0x8007045b Error Code
Fix System Restore Failed with Error 0x80070091 in Windows 10
Users experiencing the "System Restore did not complete successfully" error 0x80070091 on Windows 10 may encounter an unspecified error during the restore process, resulting in a failed system restore. This issue can be frustrating, but troubleshooting steps can help resolve the problem. To resolve this issue, you can try running the System File Checker (SFC) tool, checking the disk for errors, and running a System Restore with the "Create a restore point" option enabled. Additionally, you can try running the DISM tool to check and fix corrupted system files. If none of these steps work, you can try resetting Windows 10 to its default settings.
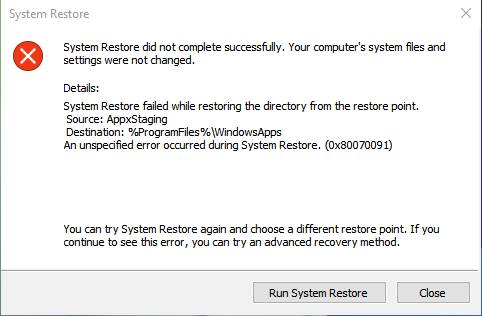
To fix the error "0x80070091" that occurs during System Restore in Windows 10, you can try the following steps. First, run the built-in System File Checker tool (SFC) to scan and replace any corrupted system files.
Step 1. Boot into safe mode.
Step 2. Right-click on the Start button, click on "Command Prompt (Admin)" to open a command line.
Step 3. Type takeown /f "C:\Program Files\WindowsApps" /r /d Y and press Enter.
Step 4. icacls "C:\Program Files\WindowsApps" /grant "%USERDOMAIN%\%USERNAME%":(F) /t
Step 5. You can delete the Windows Apps folder by typing `rd /s "C:\Program Files\Windows Apps"` in the Command Prompt and pressing Enter. It will prompt you to confirm, and once you confirm, the folder will be deleted.
Step 6. Reboot your computer and System Restore should work, eliminating the 'System Restore did not complete successfully' error message.
Fix System Restore Did Not Complete Successfully with Error 0x80070005
If System Restore fails in Windows 10 with error 0x80070005, you'll see an error message saying 'An unspecified error occurred during System Restore. (0x80070005)' in the Details window, indicating a failed attempt to complete the restore process.
To fix an unspecified error occurred during System Restore 0x80070005 in Windows 10, try the following: Run System Restore from Safe Mode, check for corrupted system files using the System File Checker (SFC) tool, and ensure that the Windows Update service is running and set to "Start". Also, try running the System Restore process as an administrator by right-clicking on the System Restore shortcut and selecting "Run as administrator".
Step 1. Type Services.msc in Start Menu Search Box, hit Enter.
Step 2. Ensure that the "Volume Shadow Copy", "Task Scheduler", and "Microsoft Software Shadow Copy Provider Service" are running and set to "Automatic" in the Services window.
Step 3. To resolve the issue where the Status of System Restore Service is Not Started, follow these steps: Start the System Restore Service, and then set it to Automatic. This can be done by going to the Services window, finding the System Restore Service, right-clicking on it, and selecting Start. Then, in the Startup type dropdown, select Automatic.
Step 4. Reboot your PC, re-confirm again, and then check if System Restore failed issue is fixed or not.
Resolve Windows 10 System Restore Failed with Error Code 0x8000ffff
If System Restore fails with error 0x8000ffff, you'll see an error message stating "An unspecified error occurred during System Restore. (0x8000ffff)" in the Details section of the window.
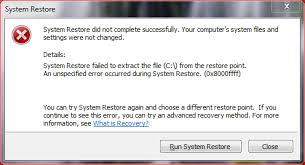
To fix an unspecified error occurred during System Restore 0x8000ffff in Windows 10/8/7, follow these steps: Run System Restore from Safe Mode, check the system files by running the System File Checker (SFC) and DISM tools, and then try System Restore again. If the issue persists, run the Windows Update troubleshooter and check for any pending updates.
Step 1. Click "Start", and then type System Restore in the Start Search box.
Step 2. Right-click "System Restore", and then click "Run as administrator".
Step 3. In the System Restore dialog box, click "Next".
Step 4. Select a restore point, and then click "Next".
Step 5. In the "Confirm your restore point" window, click "Finish".
Address System Restore Failed with 0x8007045b Error Code
Windows System Restore failure issue with 0x8007045b is a specific error that occurs due to a problem with an exact restore point file.

Here are steps for you to apply and fix this issue:
Step 1. Press Windows + R, type command prompt, right-click the top result and select "Run as Administrator".
Step 2. Type reagentc /boottore and hit Enter.
If this command fails, type reagentc /enable and hit enter.
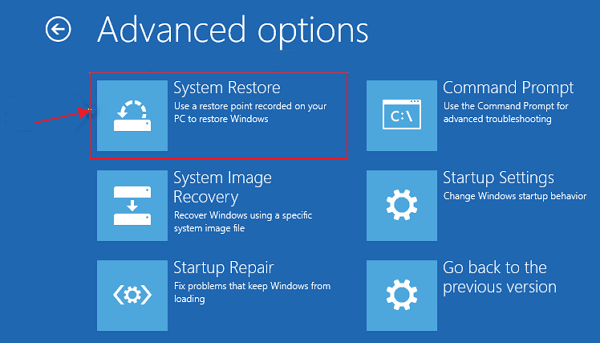
Step 3. Restart PC and enter Windows RE environment.
Step 4. Click "Troubleshoot", click "Advanced Option" and then click "System Restore".
Step 5. Follow the on-screen guidelines to start running System Restore on your PC.
If you encounter errors during system restore, such as error code 0x80070570, 0x800423F3, 0x81000203, or 0x80070002, don't worry. You can revert to Method 6 for a step-by-step tutorial to complete the process. Alternatively, you can follow the additional steps provided to troubleshoot and resolve the issue.
Just revert to Part 2 with presented solutions to fix this issue with ease.
The Bottom Line
On this page, we explained why system restore failed in Windows 10/8/7, and provided a reliable solution - Qiling Backup - to create a system image and protect your Windows data, offering a more effective alternative to system restore.
Related Articles
- [Solved] Upgrade or Clone PS3/PS4 Hard Drive to a Larger Drive
- HP Laptop Slow Startup Fixes for HP Laptop Taking Forever to Restart
- Running [Bootrec /fixboot] Returned Error 'Access is denied'
- Fix boot sector of FAT16/FAT32/NTFS partitions
- 6 Solutions to Fix Unmountable Boot Volume Windows 10/8/7
- How to Fix Slow USB Transfer Speed and Speed Up USB in Windows 10/8/7
- [Handy & Fast] How to Backup Google Drive to Another Google Drive in 3 Ways
How do I backup Google Drive to another Google Drive? This article describes three ways to back up Google Drive to another Google Drive, including using Qiling Backup and Google Drive built-in feature.