Fix 'Startup Repair cannot repair this computer automatically' in Windows 10/8/7/Vista
If you're experiencing the "Startup repair cannot repair this computer automatically" error on Windows 10/8/7, this page offers 6 fixes to help you resolve the issue, with step-by-step tutorial guides to walk you through each solution.
| Workable Solutions | Step-by-step Troubleshooting |
|---|---|
| Fix 1. Remove Peripheral Devices | If you have recently attached a device to your computer, remove the device...Full steps |
| Fix 2. Run Bootrec.exe | Restart your computer and press "F8", then choose "Repair Your Computer"...Full steps |
| Fix 3. Run CHKDSK | Restart your computer, choose "Repair Your Computer" > "Command Prompt"...Full steps |
| More Fixes | Restart your computer. Once it starts, press "F8", choose "Safe Mode with Command Prompt"...Full steps |
"Startup Repair cannot repair this computer automatically"
Startup Repair is a Windows tool that checks and replaces missing or damaged system files, but sometimes it can't repair the computer automatically, displaying an error message.
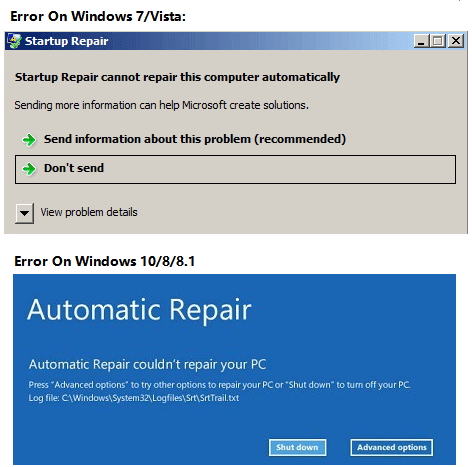
If you click "View problem details" in Windows 7/Vista, you will see the information below. (The problem signature might be shown with different variables on different operating systems.)
Problem Event Name: StartupRepairOffline
Problem Signature 01: 6.1.7600.16385
Problem Signature 02: 6.1.7600.16385
Problem Signature 03: unknown
Problem Signature 04: 21200442
Problem Signature 05: AutoFailover
Problem Signature 06: 65
Problem Signature 07: CorruptFile
OS Version: 6.1.7600.2.0.0.256.1
Locale ID: 1033
You may be experiencing issues with your Windows operating system. Startup Repair is a built-in tool that attempts to fix problems that prevent Windows from starting. If Startup Repair fails, it could be due to a variety of reasons, such as a corrupted system file, a faulty hardware component, or a problem with the Windows installation itself.
- There is a problematic device attached to your computer
- The file system of your system disk is damaged
- The Master Boot Record (MBR) of the hard drive is corrupted, which is preventing the operating system from loading properly. This is often caused by a virus or malware, a power outage, or a hardware failure.
- There may be virus attacks, disk write errors, or power outages on your disk, which can cause data corruption or loss.
6 Fixes for "Startup Repair cannot repair this computer automatically" in Windows 10/8/7
If Windows Startup Repair fails, there are several simple fixes to try even if you cannot identify the cause of the failure.
Method 1. Remove Peripheral Devices
If you've recently attached a device to your computer, such as a camera or portable music player, try removing the device and restarting your computer. This can sometimes resolve the issue and allow Windows to automatically repair the computer.
If this tip doesn't work, there are many other ways for you to try. You can experiment with different approaches, seek guidance from experts, or explore alternative solutions.
Method 2. Run Bootrec.exe
The Bootrec utility, provided by Microsoft in the Windows Recovery Environment, can be used to fix the Master Boot Record (MBR), Boot Sector, Boot Configuration (BCD), and boot.ini, requiring a Windows recovery disk to correct the MBR or BCD record.
In Windows 7:
Step 1. Restart your computer and press "F8" once you see the Windows logo.
Step 2. Among the advanced boot options, choose "Repair Your Computer".
Step 3. In the system recovery options, choose "Command Prompt".
Step 4. Enter the commands below in order:
bootrec /fixmbr bootrec /fixboot
Method 3. Run CHKDSK
Running CHKDSK can help check and repair disk errors, including bad sectors and file system errors, which may be the cause of the "Startup Repair cannot repair the computer automatically" error message.
Step 1. Restart your computer and press "F8" once you see the Windows logo.
Step 2. Among the advanced boot options, choose "Repair Your Computer".
Step 3. In the system recovery options, choose "Command Prompt".
Step 4. Enter the command below: chkdsk C: /f /r
"C" is the drive letter of your Windows installation drive.
Method 4. Run Windows System File Checker Tool
The Windows System File Checker Tool can check and repair missing or corrupted Windows system files on your computer, and it doesn't require a Windows installation CD, only booting into Safe Mode with Command Prompt.
Step 1. Restart your computer. Once it starts, press "F8" in 1-second intervals until you see the Windows logo.
Step 2. Then you will see the menu of "Advanced Boot Options". Under it, choose "Safe Mode with Command Prompt".
Step 3. In Command Prompt, enter the following command: sfc /scannow /offbootdir=d:\ /offwindir=d:\windows
Step 4. Restart your computer.
Method 5. Perform System Restore
System Restore in Windows 10/8/7 allows you to fully restore your PC to its original state by reverting system files, installed applications, Windows Registry, and system settings to a previous point in time, effectively recovering from system malfunctions or other problems.
Procedure 1. Restore Important Data from the Dead PC
When you encounter the "Startup Repair cannot repair this computer automatically" or "Automatic Repair couldn't repair your PC" error message, don't rush to perform System Restore. Instead, try using powerful data recovery software like Deep Data Recovery with Bootable Media to retrieve your data from the current 'dead' PC. System Restore can take your PC back to an earlier point in time, removing apps, drivers, and updates installed after the restore point was made, which may not be the best solution. By using data recovery software, you can get your data out of the current PC without affecting your personal files.
Notice: This will require a second healthy computer for help.
Note: To maximize the chances of successful data recovery, install a data recovery software like Qiling on a separate disk, rather than the original disk where the files were lost.
Step 1. Launch Deep Data Recovery on your Windows computer, select the file types you want to recover, and click "Next" to begin the recovery process.

Step 2. Select the disk partition or storage location where you lost data and click "Scan".

Step 3. This recovery software will scan the disk to find lost and deleted files, and after the scan completes, you can filter the results by file type.

Step 4. You can preview and restore lost Windows files by scanning them, double-clicking to preview the scanned files, and then selecting the target data to recover. Once you've chosen the files you want to recover, click the "Recover" button to save them to a safe spot in your PC or an external storage device.
Procedure 2. Perform a System Restore
If you've enabled System Restore on your computer and created a system restore point, you can fix the "Startup repair cannot repair this computer automatically" issue in Windows 10/8/7/Vista by performing a system restore. This will revert your system to a previous state when it was working properly, potentially resolving the problem.
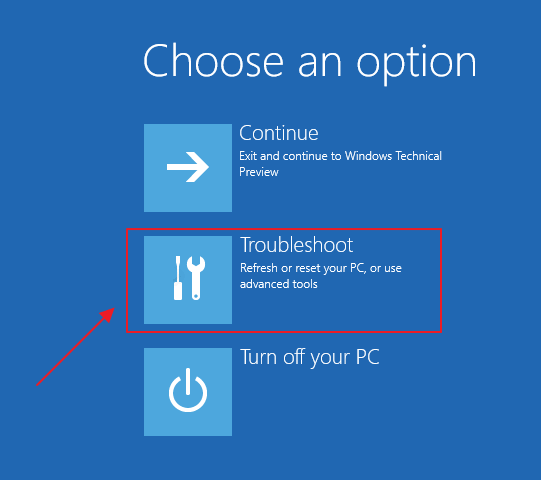
For Windows 10/8/8.1 users:
Step 1. Reboot your Windows 10/8 PC into Advanced Startup, and click "Troubleshoot".
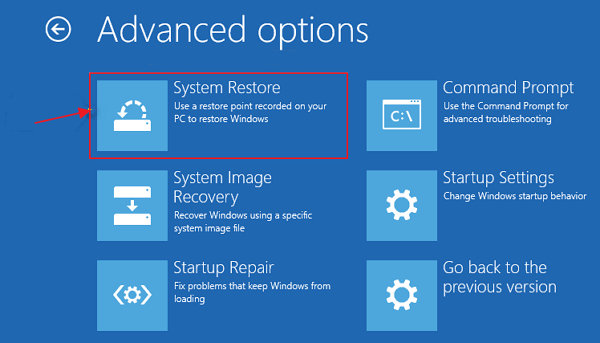
Step 2. Select "Advanced options", choose "System Restore".
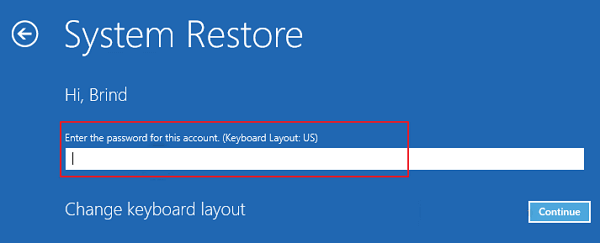
Step 3. Click on the Administrator Account and enter your password, click "Continue" to move on.
Step 4. Choose your system restore point created previous and follow the on-screen guidelines to complete the whole process.
For Windows 7/Vista Users:
Step 1. Insert your Windows installation CD or disc.
Step 2. Press any key when "Press any key to boot from CD or DVD" message appears.
Step 3. Select a language, a time and currency, and a keyboard or input method, and then click "Next".
Step 4. Click "Repair your computer".
Step 5. Select your Windows installation drive, which is usually C:\ and click "Next".
Step 6. In the System Recovery Options Dialog Box, click on "System Restore".
Step 7. Follow the System Restore Wizard instruction and choose the appropriate restore point.
Step 8. Click "Finish" to restore the system.
After completing the system restore, restart your computer and transfer the restored data back to your PC, allowing you to resume using your computer and access your data again.
Method 6. Repair Startup Error Without System Backup
If you don't have a system backup, fixing "Startup Repair couldn't repair your PC" error will be more complex. You can try running the System File Checker (SFC) tool, which scans and replaces corrupted system files. You can also try running the DISM tool, which can fix issues with the Windows image.
Procedure 1. Restore from the Problem PC
To rescue your data, follow the guidelines above and use Deep Data Recovery with Bootable Media. This allows you to recover data when your PC won't boot or start in Windows 10/8/7/Vista.
Procedure 2. Clean Install/Reinstall Windows OS
If you don't have a system restore point on your PC, the best way to remove the 'Startup Repair' error on Windows 10/8/7 is to perform a clean install of Windows OS. Alternatively, you can seek online assistance from Microsoft, or refer to an article on how to clean install Windows 10. This method is particularly recommended for Windows 7 and Vista users.
How to Prevent "Startup Repair cannot repair this computer automatically" Error
After rescuing your data and restoring your PC, it's essential to remember that your system and data are still vulnerable to various issues like virus attacks, system failures, and data loss. While it's challenging to prevent these problems entirely, taking proactive steps can significantly reduce the risk. By implementing robust security measures, regularly backing up your data, and staying up-to-date with software updates, you can minimize the impact of potential disasters and keep your system and data secure.
Qiling Backup is a powerful Windows system backup software that provides various features such as System Backup, File Backup, Disk/Partition Backup, and System Clone to protect your PC from issues like 'Startup Repair failure' error. It helps prevent complete data loss by making a backup.
The Bottom Line
Startup Repair cannot repair this computer automatically due to its complexity, making it a relatively difficult issue to resolve. While solutions exist, applying them may be challenging, as they're not typically encountered in daily use. If you're not comfortable attempting the fix yourself, consider sending your computer to professionals for manual repair.
Related Articles
- How to Backup and Restore Google Chrome Bookmarks?
- How to Free Up Space on SSD in Windows 10/8/7
- 8 Fixes for WD External Hard Drive Slow Transfer Rate in 2022 [New]
- Fix Deleting Files Does Not Free Up Space Error in Windows 10/8/7
- Fix Word The Add-In Template is Not Valid
If you encounter the error message "Cannot display the template" with the note "add in template is not valid template name" when opening a Word document, don - Adobe Serial Number Checker Free Download | Find Adobe Software Serial Key in Windows
You can easily find your Adobe serial number for your installed Adobe applications using a reliable Adobe serial number checker that can be downloaded and applied in a few simple clicks.