What Is Windows Hyper V? [Detailed Description]
What is Windows Hyper-V? Windows Hyper-V is a virtualization software that allows different operating systems to run on a single machine, virtualizing both software and hardware, making it ideal for cloud service providers, data centers, and developers who need to test apps.
To learn more about Windows Hyper-V and how to use and run it, continue reading!
What Is Windows Hyper-V?
Windows Hyper-V is a virtualization software that virtualizes software and hardware components, launched by Microsoft in 2008, a time when virtualization was still relatively new for many.
Virtualization has revolutionized the way data centers, developers, and cloud providers operate, transforming every step and action they take.
With Hyper-V, you can virtualize a variety of operating systems, including server operating systems in data centers, Windows Phone environments on desktops, and other operating systems.
Additionally, Hyper-V is a system that allows developers to test their software in a safe and isolated environment, which is beneficial for testing and debugging purposes.
Why Use Windows Hyper-V?
A virtual machine allows you to run different operating systems on a machine that is using a different OS, essentially removing hardware limitations and enabling the use of multiple OS on a single machine. For instance, a Mac can run Windows or Linux OS through a virtual machine, which would otherwise be impossible.
Using a virtual machine provides an added layer of security as it isolates the virtual environment from the host device, preventing viruses or malware from affecting the host device even if they are downloaded within the virtual machine.
Administrators can use Hyper-V to create multiple virtual machines with different operating systems on a single physical machine, saving costs and increasing efficiency.
How to Run Windows Hyper-V?
To enable Hyper-V, you need a 64-bit version of Windows 10/11 Pro, Enterprise, or Education, a 64-bit processor with SLAT, and at least 4GB of RAM, with a CPU that supports VM Monitor Mode Extension, specifically Intel's VT-c.
So, if you're interested in upgrading Windows 10 32 bit to 64 bit without losing data, click this article below:

Upgrading a 32-bit Windows 10 to a 64-bit version without losing data involves a few steps. First, ensure the computer meets the minimum system requirements for a 64-bit operating system.
Upgrading Windows 10 32 bit to 64 bit can be a daunting task, but with this tutorial, you can do it without losing any data. Whether you're currently running Windows 7, 8, or 10 32 bit, this guide will walk you through the process of upgrading to 64 bit, ensuring that all your files and programs remain intact. So, relax and follow along to complete the upgrade with ease.
Unfortunately, you cannot install Hyper-V on the Windows 10/11 Home version.
To enable Hyper-V on your computer, you have two options. You can either enable it through the Control Panel by going to System and Security, then clicking on Programs and Features, and finally selecting Turn Windows Features on or off, or you can enable it through PowerShell by running the command "Enable-WindowsOptionalFeature -Online -FeatureName Microsoft-Hyper-V".
- Using Powershell
- Using Settings
Enable Hyper-V using Windows PowerShell:
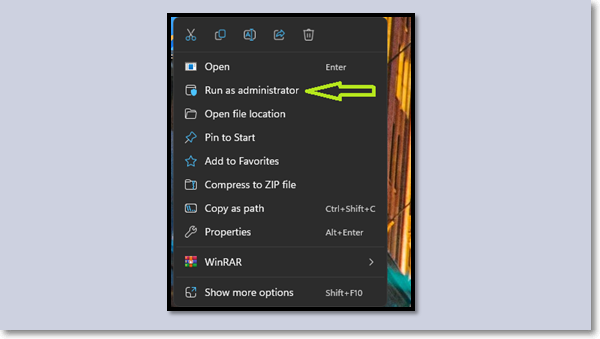
- Click on the Start button and search for "Windows PowerShell."
- To open Windows PowerShell as an administrator, click on the "Run as administrator" option.
- Type the command "Enable-WindowsOptionalFeature -Online -FeatureName Microsoft-Hyper-V -All".
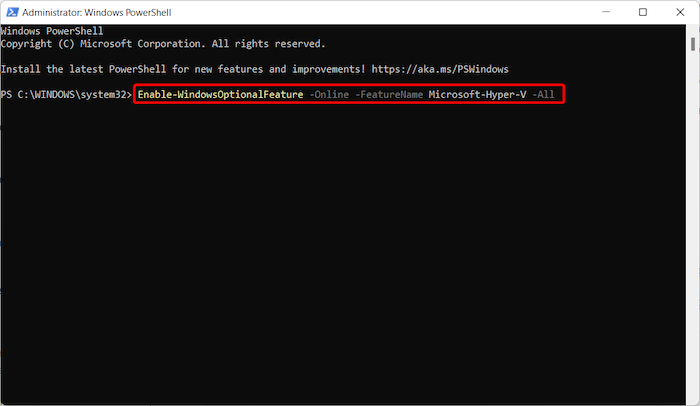
- Once the installation is complete, restart your computer.
Enable Hyper-V using Settings:
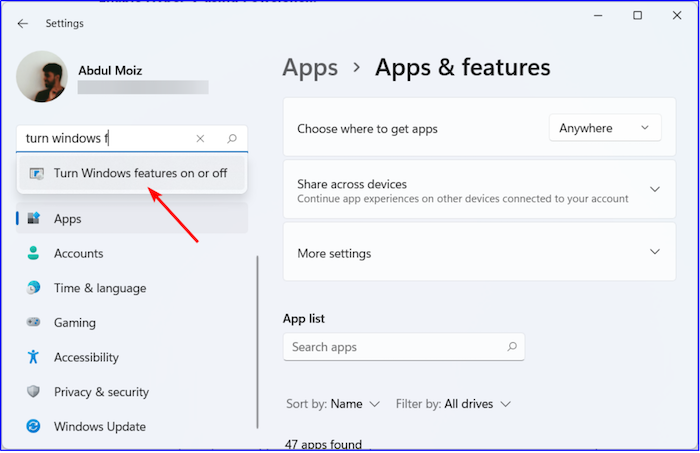
- Right-click on the Windows button, and choose "Settings."

- Type "Turn Windows Features on or off" in the search bar and open it from the results.
- Scroll down and locate "Hyper-V" and then click on it to enable it.
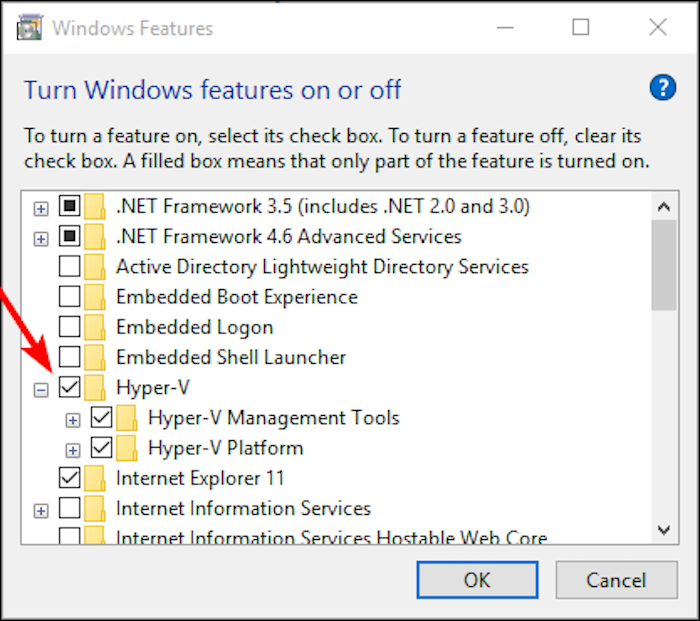
- Click on "OK" to enable Hyper-V.
- Once the installation is complete, restart your computer.
Conclusion
Microsoft includes Hyper-V with all its Windows Pro, Enterprise, and Education edition versions, making it a cost-effective option for virtualization. The activation and usage process is also relatively straightforward.
FAQs
1. How many VM can run on Hyper-V?
The maximum number of active virtual machines that can be supported by Hyper-V is around 1,024.
2. What happens if I disable Hyper-V?
When you disable Hyper-V, you will encounter a list of technologies that are needed to run Hyper-V and whether they are already available on your system.
3. How much is a Hyper-V license?
Hyper-V is a free product included with Windows Pro, Enterprise, and Education editions, but the cost of using certain tools like clustering, VMotion, and others varies depending on each user, their workflow, and what tools they need.
Related Articles
- What Is System 32 in Windows and Why You Shouldn't Delete It? [Detailed Information]
- GPU vs CPU? What's the Difference? Which Is Better?
- Reviews on Paragon Backup & Recovery [All Information]
- Fix: System Restore Failed To Extract the File
- File System Verify or Repair Failed. : (-69845) | How to Fix
If you're experiencing the error “file system verification or repair failed. : (-69845)”, you're not alone. This error can be frustrating, but don't worry, there are ways to fix it. To resolve the issue, you can try various fixes, and if you've lost data in the process, a top-notch data recovery tool like Deep Data Recovery for Mac can help you recover your lost files. - Fix Finder Not Responding After Updating to Sonoma with 5 Proven Ways
If you're experiencing issues with the Finder not finding files after updating to Sonoma, this article will help you troubleshoot the problem. We'll explore the possible causes and provide step-by-step solutions to get your Finder working smoothly again. By following these proven methods, you'll be able to resolve the issue and get back to using your Finder without any hiccups.