How to Backup and Restore Active Directory in Windows 2022/2019/2016?
What is Active Directory?
Active Directory is crucial for connecting users to network resources, allowing them to accomplish their tasks. However, if data in Active Directory gets lost, users will no longer be able to access the computer, making backup essential.
Why Do I Need to Backup and Restore Active Directory?
Active Directory is a crucial component of any Windows network, and not having a backup strategy can put the entire system and devices at risk. If the Active Directory Domain Controller becomes unavailable, users cannot log in, and computer systems cannot function properly, potentially causing economic loss and disrupting business activity. To mitigate this risk, it's essential to back up Active Directory, and a good backup tool like Qiling Backup Enterprise can help achieve this.
A Good Helper - Qiling Backup Enterprise
As an easy-Qiling Backup Enterprise provides a range of utility functions, including backup and restore, data synchronization, and data compression, as well as features for managing backup tasks, monitoring backup progress, and reporting on backup results. Additionally, it offers advanced features such as incremental backups, data deduplication, and encryption for enhanced data protection and security.
- Simple, efficient, powerful.
- A Smart Windows backup solution can provide comprehensive protection for both computers and servers by automating data backups, ensuring business continuity, and safeguarding against data loss due to hardware failure, software corruption, or human error.
- Protect businesses and systems.
- Deliver Affordable Solutions to lower total cost.
If you're experiencing issues with backup and restore, try downloading Qiling Backup Enterprise for a stress-free automatic or external backup experience.
To ensure data security, backing up Active Directory is crucial, especially since it's vital to a computer's functioning. Fortunately, backing up Active Directory is possible, and the solution will be revealed in the next part. These projects are compatible with Windows Server 2019/2016/2012.
Backup and Restore Active Directory with Windows Server
To back up Active Directory, you can use the built-in tool called ntds.dit. This file is located in the %systemroot%\system32\ntds folder on the domain controller.
Windows Server Backup uses the Volume Shadow Copy Service (VSS) to create backups of system files and user-selected items. This method is suitable for backing up Active Directory.
Backup Active Directory with Windows Server
First, here is a step-by-step guide about backup Active Directory with Windows Server.
Step 1. To set up Windows Server Backup, open the Server Manager, click on the "Tools" menu, and select Windows Server Backup.
Step 2. Click on "Backup Once" to initiate a manual AD.
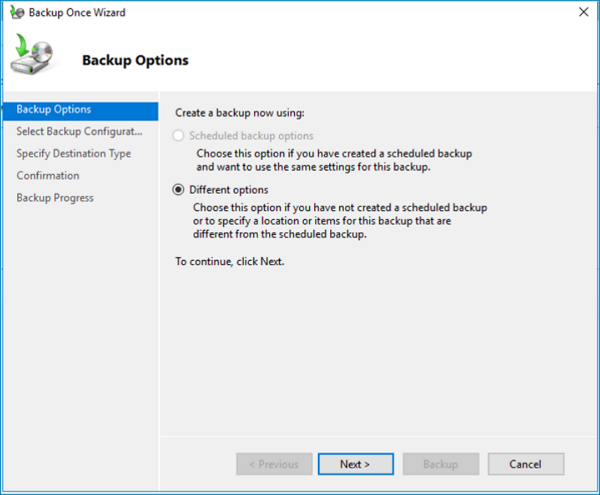
Step 3. Select "Different options" and click "Next".
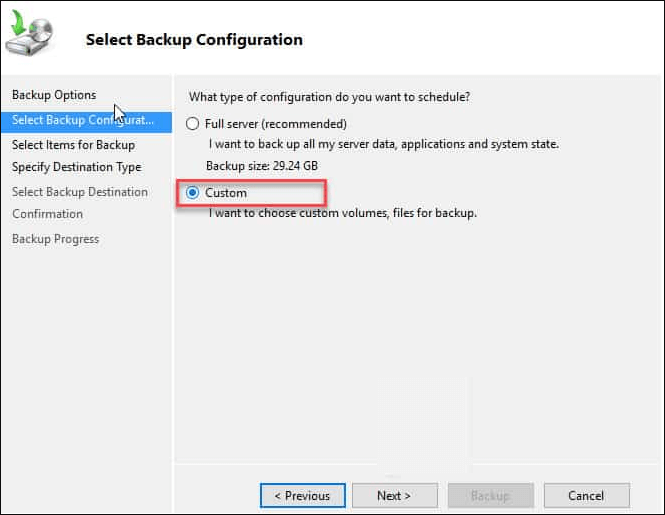
Step 4. select "Custom" and click "Next".
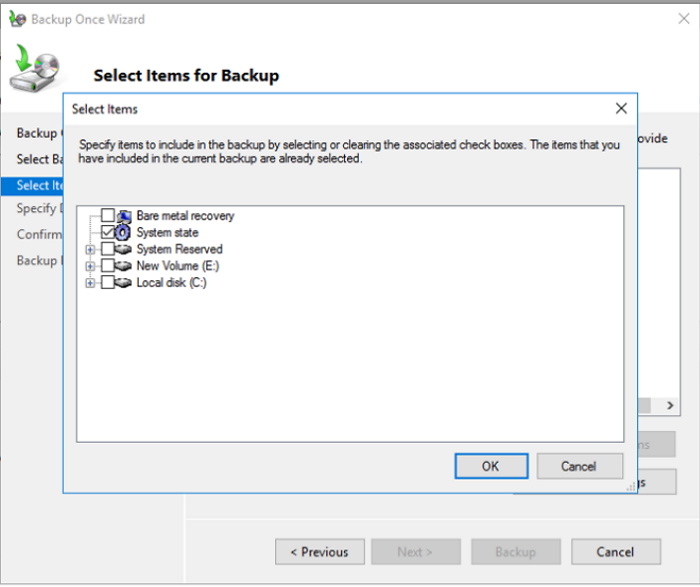
Step 5. Select the files you want to back up by clicking on "Add items", then choose "System State" and click "OK".
Step 6. Specify the backup destination type: Local drives or Remote shared folder.
Step 7. To confirm your backup, double-check the details on the confirmation screen and click "OK" once you're satisfied.
Restoring Active Directory (AD) with Windows Server involves several steps. First, ensure you have a backup of the AD database, which can be done using the Windows Server Backup tool or a third-party backup solution.
Restore Active Directory with Windows Server
Before restoring AD, you need to boot in Directory Services Restore Mode (DSRM).
To boot in DSRM, you need to:
- Reboot the server.
- In the boot menu, press F8 for advanced options.
- Then, select the Directory Services Restore Mode.
- Press the enter button, which will reboot the computer in safe mode.
Then, you can restore AD now. Follow these steps.
Step 1. Run the Windows Server Backup.
Step 2. Look for the "Recover" option and click it.
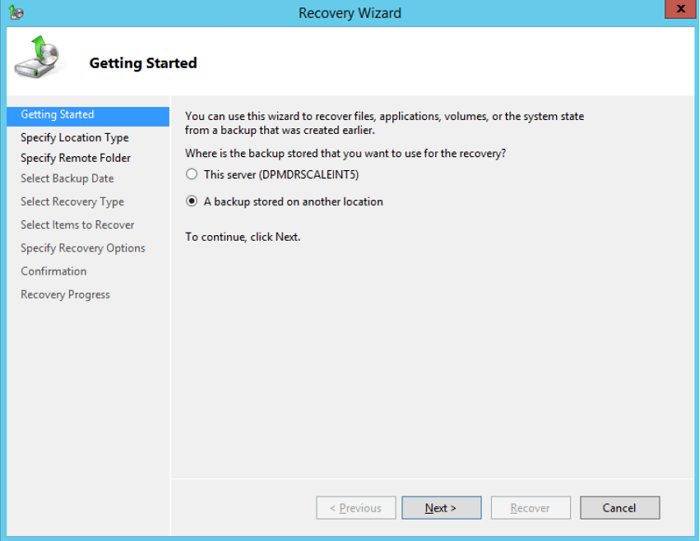
Step 3. To begin the recovery process, open the recovery wizard and select the "A backup stored on another location" option. This will allow you to choose a backup location where the system can restore the data from.
Step 4. Select the disk and give the exact path where your backup is located.
Step 5. Select the data of the backup you want to use.
Step 6. Next, choose the recovery type.
Step 7. Choose the location for recovery.
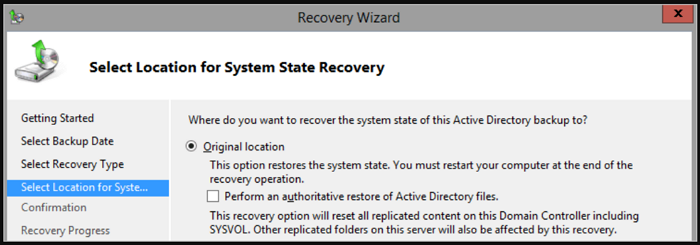
To recover your data, you can find some warnings depending on the recovery type. Click OK for everything, and then you can recover your data.
Backup and Restore Active Directory with Qiling Backup Enterprise
To back up the Active Directory with Qiling Backup Enterprise, simply select the "Active Directory" option from the backup source list, choose the desired backup settings, and click "Backup" to initiate the backup process. This will create a backup of the Active Directory, allowing for easy recovery in case of data loss or corruption.
Backup Active Directory
Follow these steps, and you can finish an easy backup.
Step 1. To begin the backup process, click the File backup button.

Step 2. The tree view on the screen displays lists of both local and network files, allowing you to expand the directory and select the files you want to back up.

Step 3. Follow the guidance on the screen and choose the place where you want to store the back up

Step 4. To secure your backup, ensure it's encrypted, and set a schedule by clicking on "Options" in "Backup Options".

You can also choose to start the backup at a certain time in Backup Scheme by clicking Options, where you can also explore other customizable options.

Step 5. You can save the backup file either on your computer, in Qiling's cloud service, or on a network-attached storage device (NAS).

Step 6. Qiling Backup allows customers to store backup copies of their files on either a third-party cloud drive or the company's own cloud storage.
To back up your data on a third-party cloud drive, select Local Drive and scroll down to add Cloud Device, then fill in your account information.
Step 7. To start a backup, click on the "Proceed" button. The backup process will be displayed as a card on the left-hand side of the screen once it's complete. You can click on this card to view more information about the backup job and learn how to handle it.

We are going to use Qiling Backup Enterprise to restore.
Restore Active Directory
Restoring Active Directory can be achieved easily by following a few steps. To do this, you can restore Active Directory by following the steps outlined in the provided text.
Step 1. Launch Qiling Backup, click "Browse to Recover".
Step 2. To recover a backup file, navigate to your backup destination and select the fvd file created by Qiling Backup. This file contains the backup data you want to recover.

Step 3. You can choose to recover data to a specific location or back to the original location after it has been lost or corrupted.
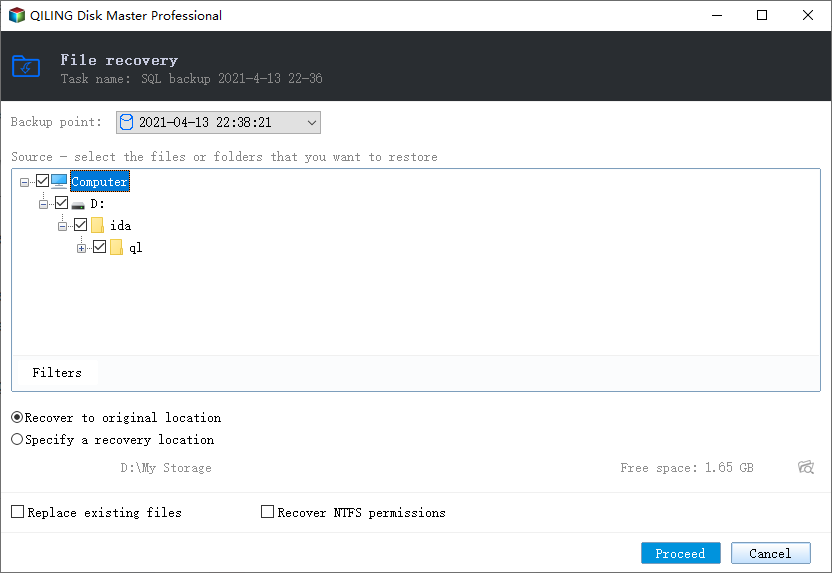
Step 4. Click "Proceed" and the recovery would start.
Backing up and restoring with Qiling Backup Enterprise is a straightforward process. It allows users to easily backup and restore their data, and also enables them to backup a hard drive to another hard drive, making business operations smoother. To experience this, simply download and try it out.
FAQs About Backup and Restore Active Directory
This section addresses some common questions about backing up and restoring Active Directory, providing helpful information for users who want to learn more about these processes.
Can I back up and restore Active Directory to another server?
Yes, you can. You are free to use Windows Server or a third-party backup tool to help you with this.
How do I restore a Windows Server backup to another server?
Step 1. Launch "Windows Server Backup" and choose choose "Local Backup".
Step 2. To recover your computer, select "Recover" in the "Action" section to open the Recovery Wizard.
Step 3. In "Getting Started", you will be asked to select the source server for data restoration.
To restore a Windows Server backup to another server, you can use the built-in Windows Backup and Restore tool. This tool allows you to create a backup of your server and then restore it to another server, either on the same network or on a different one.
Where are Windows server backups stored?
Windows Server stores its backup in the ComputerName of the BackupStorageLocation folders. The ComputerName is the name of the computer where the backup is being stored.
Related Articles
- How to Create Qiling Bootable USB, CD/DVD, and ISO Image with Qiling Backup
- Open Source Backup Software for Windows Server 2003(2022 New List)
- SQL Server Full Backup Tutorial with Examples
- How to Schedule MySQL Automatic Backup in 3 Quick Ways [Beginner's Guide]
- How Do You Copy Over Everything from One SSD to a Larger SSD?
How do you copy over everything from one SSD to a larger SSD? Do you want to get the answer? This article will tell you how to copy data from one SSD to a larger one and offer you a cloning tool. - How Long Does It Take to Back Up a Laptop With About 500GB of Files?
Find out how long it takes to back up a laptop with about 500GB of files and what affects backup speed and storage choice.