How to Backup SD Card Before Formatting [2021 Updated]
Backing up SD card data is crucial to prevent data loss in case of device failure, physical damage, or software corruption. To ensure your important files and memories are safe, consider the following practical methods: using a computer or external hard drive to transfer data, utilizing a cloud storage service like Google Drive or Dropbox, creating a backup on another SD card, or using a dedicated backup software to automate the process. By implementing these methods, you can safeguard your SD card data and enjoy peace of mind knowing your memories are protected.
PAGE CONTENT:
- Why Is SD Backup Important
- How to Backup SD Card Before Formatting
- Format SD Card after Backing UP Data
Why Is SD Backup Important
The SD card is a compact storage media commonly used in older Android devices, digital cameras, music players, and dashcam recorders. Its portability makes it easy to transfer data between different devices.
Using a memory card on multiple devices can increase the risk of data loss. Issues like false deletion, file system corruption, and virus infections can occur, causing you to lose data on the card. However, having a backup of your SD card data can protect you from these problems, ensuring your data remains safe even if errors occur.
When an SD card is not functioning properly, the recommended solution is to format it, which can be done with an SD backup to prevent data loss.
To save the backup and backup SD card before formatting, you can use a third-party app like Titanium Backup or Helium. These apps can create a backup of your SD card's contents, including files, apps, and settings. You can then save this backup to your internal storage or another SD card.
How to Backup SD Card Before Formatting
To protect your data, it's essential to back up your SD card. This can be done by backing up the data on your own, which involves transferring the contents of the SD card to a computer or another storage device.
To backup SD card data, first determine where you want to save the backup, such as a computer or cloud storage, and then follow the specific steps for that location.
Where to Backup SD Card Data
Here are four common devices you can use to save a backup on:
- Back up to external storage device, like external disk, USB
- Back up to computer
- back up to a Cloud drive
4 Ways to Backup SD Card Before Formatting
To back up an SD card, copying and pasting files is a common method, but not the most effective one. Instead, consider the following four methods to safely back up your SD card before formatting:
#1. Copy and Paste to Backup SD Card
#2. Create a Backup Image of SD Card
#4. Upload SD Card to Cloud as Backup
For people with a 2-8 GB memory card, the first method is recommended, but for larger SD cards, especially those over 32 GB, it's better to use methods 2, 3, or 4 for large data backup.
Way 1. Copy and Paste to Backup SD Card
To manually back up a small amount of data to another external hard drive, USB, or computer, simply locate the files you want to back up and copy them to the desired destination. This can be done using the built-in file explorer or file manager on your device, or by using a backup software if you prefer a more automated process.
Step 1. Remove the SD card from your device and connect it to your computer.
To backup SD card data to another external device, connect both the SD card and the external device to your computer. This will allow you to transfer the data from the SD card to the external device using your computer as a intermediary.
Step 2. Open Windows File Explorer and open your SD card.
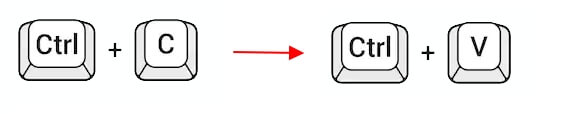
Step 3. To copy data from your SD card to another location on your PC or an external device, you can use the keyboard shortcuts "Ctrl + C" (Copy) and "Ctrl + V" (Paste). This allows you to quickly and easily move files and data from your SD card to a more convenient location for further use or storage.
How can I help you with creating a copy of your SD card data on another device?
Way 2. Backup SD Card Before Formatting and Save as a Backup Image
The process involves creating a backup of the SD card's data as an image, which is then saved to a target device, effectively preserving the storage device's contents.
If you don't need to use the SD card frequently or want to save storage space on the target device, using reliable backup software is highly suggested. A professional file backup software like Qiling Backup with its File Backup feature can be very helpful in this situation.
To use Qiling Backup to backup your SD card before formatting, it's a simple three-step process that requires just three clicks.
Connect your devices to your computer, then follow these steps to back up your SD card easily.
Step 1. Launch Qiling Backup and then choose the backup mode "Disk/Partition".
Step 2. Select the backup destination, or it will choose the most suitable location by default.

step3. Click "Proceed" to complete the whole process.
Way 3. Clone to Backup SD Card Data
To clone the SD card data to another device in a more efficient way than Copy and Paste, you can use a cloning software or utility that can directly copy the data from the source SD card to the target device without the need for manual copying and pasting. This method is often faster and more reliable than manually copying files, especially when dealing with large amounts of data.
Qiling Backup is a reliable tool for cloning and backing up SD cards with large-size files. Its clone feature allows for a 100% copy of everything on the SD card, making it a convenient option for users who want a precise duplicate within just a few clicks.
Connect the external device to your computer before cloning the SD card data to it.
Preparations:
- To combine two SD cards, first, ensure that both cards are connected to your computer and can be detected by it. This allows you to access and manage the files on both cards.
- Download Qiling Backup to your computer.
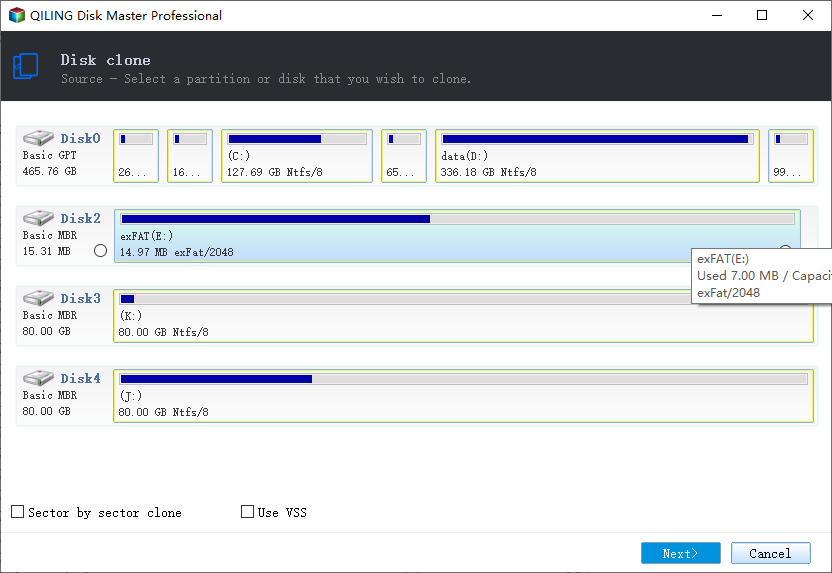
Step 1. Open Qiling Backup and go to the "Clone" feature.

Step 2. Select one of the SD cards that you want to clone.
Step 3. Select the other SD card as the destination to save your data.
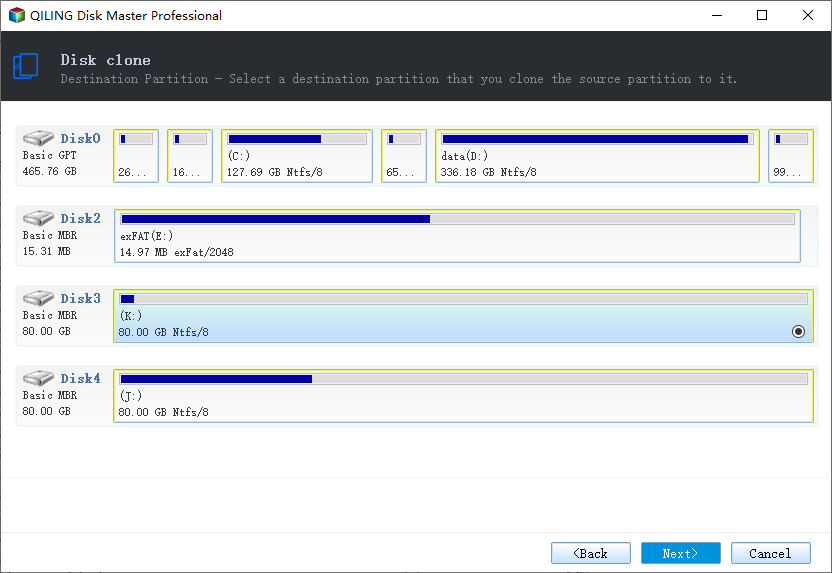
Step 4. Preview the disk layout and then click Proceed to execute the SD card cloning process.

Way 4. Upload SD Card to Cloud as Backup
To upload and save SD card data to Cloud drive as a backup, you can use the cloud storage service's built-in features or third-party apps. Many cloud storage services, such as Google Drive, Dropbox, or OneDrive, allow you to upload files from your SD card directly to your cloud account.
With the increasing use of Cloud drives, people are now using them to back up their files and data. In addition to backing up files, you can also use your Cloud drive to back up data from your SD card.
For a step-by-step guide, follow the links below for help:
#1. Backup SD Card to Google Drive
Format SD Card after Backing UP Data
After backing up your SD card data, you can now apply an SD card formatter to format and reset your SD card to a healthy state again, which will erase all data on the card.
Format SD card Using File Explorer
Step 1. Connect SD card to PC and open File Explorer.
Step 2. Right-click on the connected SD card and select "Format".
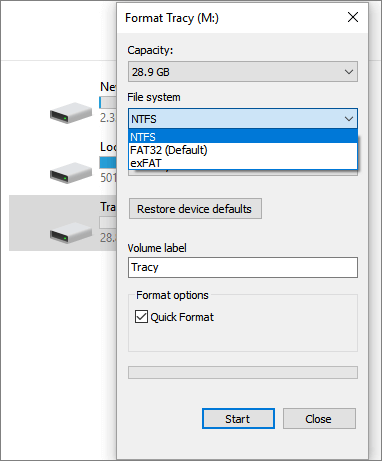
Step 3. On the format window, select a proper file system among NTFS, FAT32, or exFAT. Click "Start".
Conclusion
Backing up your SD card and other storage devices like hard drives, external hard drives, and USB drives is crucial, and we've explained why on this page. To help you with this, we've provided four methods to backup SD card data on Windows PC, which can also be applied to other types of storage devices, including Windows 10, 8, and 7.
With a backup, you can recover your data even if your device is damaged, corrupted, or dead, ensuring you can always access your important files and information.
Related Articles
- 6 Solutions for Windows 10 Can't Create Recovery Drive
- Copy a Flash Drive to Another Flash Drive on Windows & Mac
- Create Portable Windows 10/8/7 USB Drive in 2 Ways
- How to Clone a Bootable Hard Drive in Windows 10/8/7
- How to Clone SSD to Larger SSD in Windows 10/8/7
- How to Transfer Adobe Photoshop from Windows 10 to Windows 11 without Reinstallation
Transferring Adobe Photoshop from Windows 10 to Windows 11 without reinstallation may seem tricky. But this guide will provide a solution to transfer Adobe Photoshop from Windows 10 to Windows easier and quicker.