Can You Copy a Windows Recovery Drive to Another USB Drive?
“Recovery drive” can mean a bootable USB created by Windows or a hidden recovery partition on an internal disk. Copying visible files from one to another does not necessarily produce bootable recovery media. Decide which item you actually need.
Method 1: create a new Windows recovery USB
Microsoft recommends the built-in Recovery Drive utility. Connect a blank USB drive, search for Recovery Drive in Windows, allow the app to make changes, and choose whether to include system files when that option is offered.
Read the displayed required capacity, select the correct USB drive by size, click Next and Create, and wait for completion. The chosen USB drive is erased. Label it for the source PC and test that the firmware can boot from it. A recovery drive does not replace a backup of personal files.
Method 2: copy a bootable USB with care
A direct disk clone may copy partitions from one USB to another, but it can still fail if the new stick is smaller in actual bytes, the firmware does not accept it, or the recovery media is tied to a particular device. Back up the destination first and verify boot afterward.
Do not simply drag files in Explorer and assume boot records, hidden partitions, and recovery configuration came along. Creating a fresh recovery USB from Windows is usually clearer than cloning an older stick.
Method 3: protect the internal recovery layout
An internal OEM or Windows RE recovery partition is not itself a ready-made USB installer. When replacing a Windows boot disk, use a whole-disk clone or restorable image to carry the intended system and recovery partitions together. Do not delete recovery partitions merely to make copying easier.
Keep a separate full-disk image and personal-file backup, and record the BitLocker recovery key. Test both the USB recovery media and the backup restore path before a failure occurs.
Back Up the Windows Disk with Qiling Disk Master
This Qiling image protects the internal Windows and recovery layout. It does not create the Windows Recovery Drive USB described above; use Microsoft's utility for that separate task.
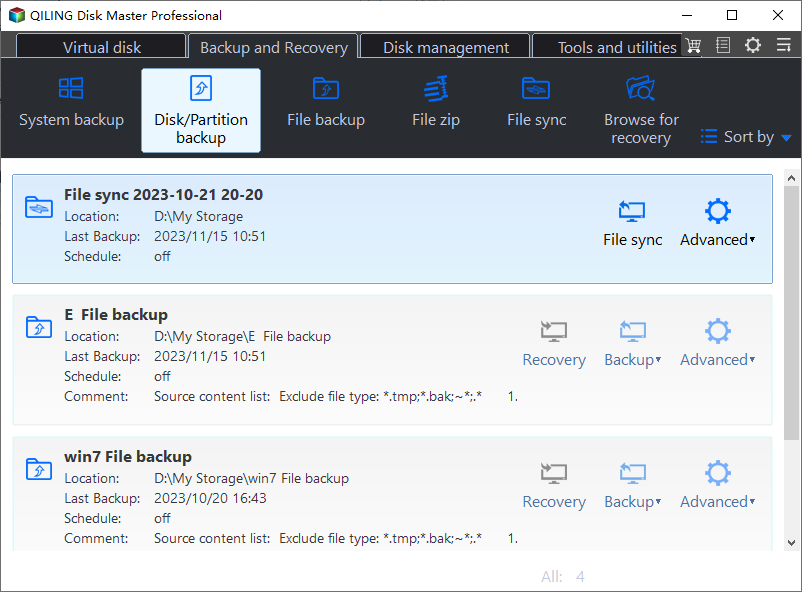
Step 1. Connect independent storage with sufficient free space. Open Qiling Disk Master and choose Backup and Recovery > Disk/Partition backup. Connect external storage other than the USB recovery medium.
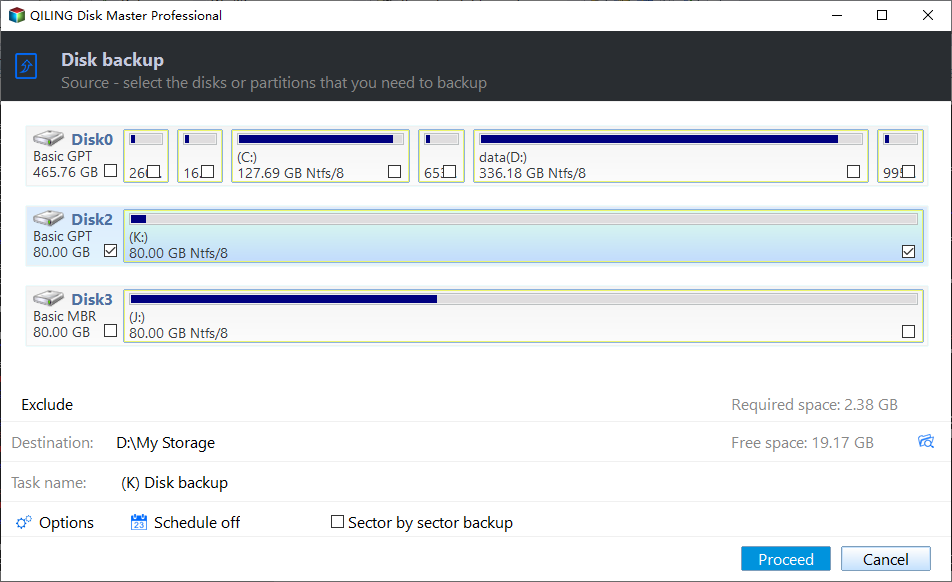
Step 2. Select the source disk directly in the disk list by model and capacity; select a partition only if that narrower scope is intentional. Select the complete Windows disk, including hidden system and recovery partitions.
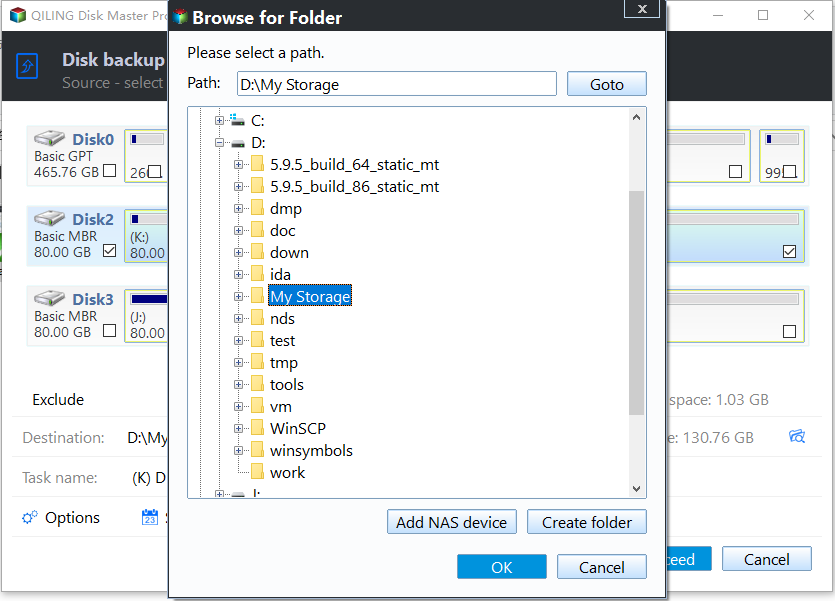
Step 3. Use the destination browse control to choose a folder on the separate storage. Check required space and confirm the image is not being saved to the protected disk. Choose an external backup folder with adequate free space.
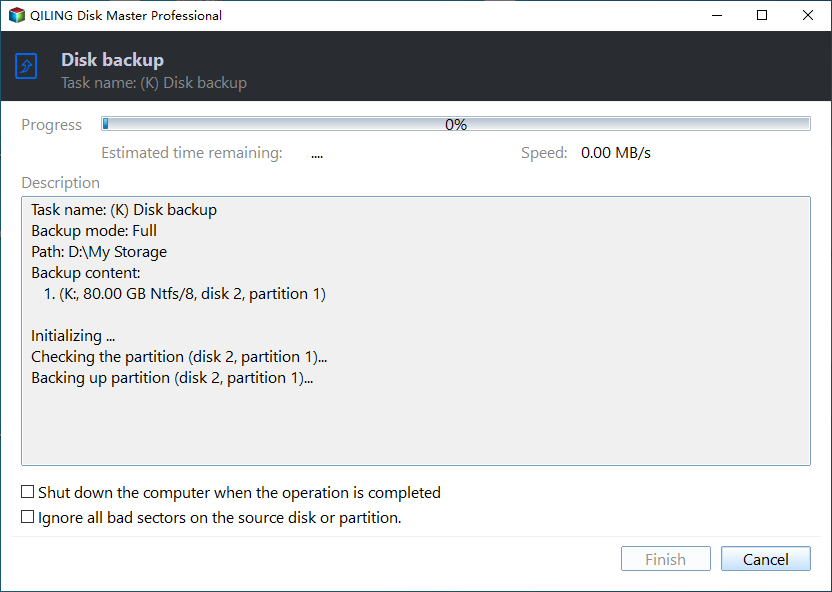
Step 4. Review the source, destination, and task name. Click Proceed; keep the drives connected until the progress window reports completion. Confirm the full disk is selected rather than only the visible C: volume.
Step 5. Check the backup log and perform a small recovery test or restore to spare storage. Keep the image and recovery USB in separate safe locations and test restoration.
Frequently Asked Questions
Can I just copy recovery USB files in Explorer?
Not reliably. Use Windows Recovery Drive to create new media or verify a proper disk clone by booting it.
Will a recovery USB include my documents?
No. Back up personal files separately.
Conclusion
Create fresh recovery media where possible, distinguish it from an internal recovery partition, and keep a tested disk image and file backup.
Related Articles
- Image the Windows Disk
Protect the full recovery layout. - Clone Multiple Partitions
Understand hidden boot and recovery partitions.
Products
Articles & Tutorials
- Data Recovery
- Data Backup
- File Recovery
- File Backup
- System Backup and Restore
- Disk and Partition Clone
- Technical articles
- Mobile articles
- Disk Master Help
- Windows Data Recovery Tutorials
- Windows Secure Delete Tutorials
- Windows Partition Management Tutorials
- Windows File Backup and Restore Tutorials
- Windows System Backup and Restore Tutorials
- Windows Disk Backup and Restore Tutorials
- Windows Clone Tutorials