How to Clone IDE to SATA HDD/SSD (2 Ways)
Yes, it's possible to clone your IDE drive to a SATA SSD without reinstalling Windows. You can use a cloning software like Qiling Disk Master to create an exact copy of your IDE drive to the SATA SSD. This process is also known as a "disk-to-disk" clone. Make sure the SATA SSD is at least as large as your IDE drive, and that it's properly connected to your computer.
PAGE CONTENT:
- Part 1. Prepartions for Cloning IDE Disk to SATA HDD/SSD
- Part 2. Clone IDE Disk to SATA HDD/SSD Without Booting Issue
- Furthre Readings: How to Migrate OS from IDE to SATA HDD/SSD
Why Need to Clone IDE to SATA
As SSDs become increasingly popular, many users are replacing their traditional hard disk drives (HDDs) with solid-state drives (SSDs) by cloning their existing disks, with SATA drives being the primary type of disk being upgraded.
Users who still use IDE hard drives as their boot drive are facing inconvenience when trying to perform advanced tests or tasks on their PCs. As a result, they are attempting to migrate their system disk to a SATA HDD or SSD, replacing the IDE hard drive.
SATA vs. IDE
Upgrading an IDE disk to a SATA HDD or SSD is a common desire among IDE users, driven by the need for improved performance and reliability. A comparison table of SATA and IDE disks highlights the advantages of the former, including faster data transfer rates, lower power consumption, and increased storage capacity. As a result, users often seek to clone their IDE disk to a SATA HDD or SSD to take advantage of these benefits and enhance their overall computing experience.
| SATA | IDE |
|---|---|
|
Created in 2003 Inexpensive, large storage capacity Supports hot-plugging High data transfer rate, up to 6 GB/s Connects directly to the motherboard |
Created in 1986 Doesn't support the latest Windows system such as Windows 10/8 Doesn't support hot-plugging Low data transfer rate, up to 133MB/s |
You can clone your IDE disk to a SATA HDD or SSD without reinstalling Windows, as the entire contents of the old IDE disk will be transferred to the new SATA drive.
To clone an IDE hard drive to a SATA drive without boot issues, prepare the IDE drive as a slave in the BIOS, then connect the SATA drive as the master. Clone the IDE drive to the SATA drive using a cloning software, such as Qiling Disk Master. Make sure to clone the correct drive and partition, and that the SATA drive is set as the primary boot drive in the BIOS after cloning. Finally, verify the cloned data on the SATA drive to ensure it matches the original IDE drive.
Part 1. Preparations for Cloning IDE Disk to SATA HDD/SSD
To clone an IDE to SATA without reinstalling the system and experiencing boot issues, several preparation steps must be taken in advance.
#1. Check if the computer motherboard support SATA
If your computer's motherboard supports SATA, you can connect a SATA HDD or SSD to your PC using a SATA cable and a power cable, making it easier to transfer data and power to the storage device.
If your computer's motherboard doesn't support SATA, you can connect a SATA hard drive or solid state drive (HDD/SSD) to your PC by purchasing an IDE-to-SATA adapter. This adapter allows you to connect the SATA device to your PC through an IDE interface.
#2. Prepare a new SATA hard drive or SSD
Connect a brand new SATA hard drive or SSD to your computer and initialize it first. To do this, see the instructions on how to initialize a new HDD/SSD.
To connect a SATA SSD/HDD to a Windows PC, use a USB to SATA cable, then open Disk Management, right-click on the SATA disk, and select "Initialize Disk" to set it up as either GPT or MBR.
If you're dealing with a used SATA HDD/SSD that still has data on it, it's a good idea to back up and save that data to a separate, secure location or disk before proceeding. This will ensure that your important files are protected and won't be lost during the process.
#3. Download reliable IDE to SATA cloning software
The success of IDE to SATA disk upgrading largely depends on choosing reliable disk cloning software. A recommended option is Qiling Disk Copy, which allows for a seamless upgrade by cloning the disk without losing any data or experiencing boot issues.
Once you've completed the necessary preparation steps, you can proceed with cloning your IDE drive to a SATA hard drive or SSD.
Part 2. Clone IDE Disk to SATA HDD/SSD Without Booting Issue
To clone an IDE disk to a SATA HDD/SSD without encountering boot issues, simply follow these steps: clone the IDE disk data to the SATA HDD/SSD, and you'll be able to boot up without reinstalling your system.
First. Set the SATA drive to IDE mode in BIOS
Step 1. Connect the SATA HDD/SSD to the PC via the SATA cable and power cable or IDE-to-SATA adapter.
Step 2. Restart PC and press F2, F12, Del, etc., keys and release the key to enter BIOS.
Step 3. Got to Advance menu, locate and change SATA Controller Mode to IDE Mode.
The exact menu option in BIOS may differ, but look for "SATA Configuration", "SATA Mode", "SATA Controller Mode", "SATA Operation", etc. To resolve the issue, change the mode from AHCI / RAID to IDE mode. This change will allow the system to boot successfully.
Step 4. Save the changes and exit BIOS, start-up PC to continue the disk cloning process.
Next. Clone IDE disk to SATA HDD/SSD, upgrade IDE to SATA HDD or SSD
To clone IDE disk data to a SATA HDD/SSD, you can start the process using Qiling Disk Copy. Begin by following the tutorial steps:
Note: Before you start, remember to activate this software for a smoothy cloning process from IDE to SATA without any data loss or problems:
To upgrade and clone the IDE disk to a SATA HDD/SSD without data loss, you can follow these steps: First, connect the SATA HDD/SSD to the motherboard, ensuring it's set to AHCI mode if it's an SSD. Next, download and install a cloning software such as Qiling backup.
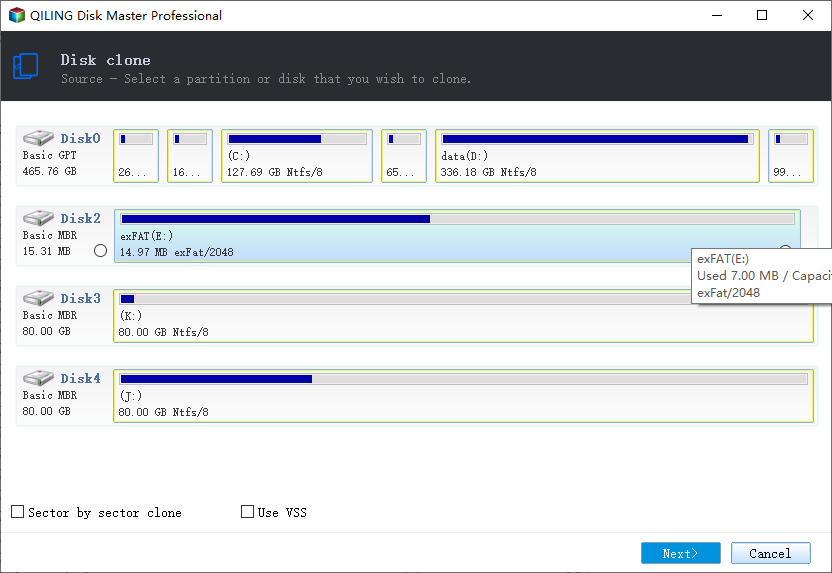
Step 1. On Qiling Disk Copy, click "Disk/Partition clone" to start cloning.

Step 2. Select the HDD that you want to clone and click "Next".
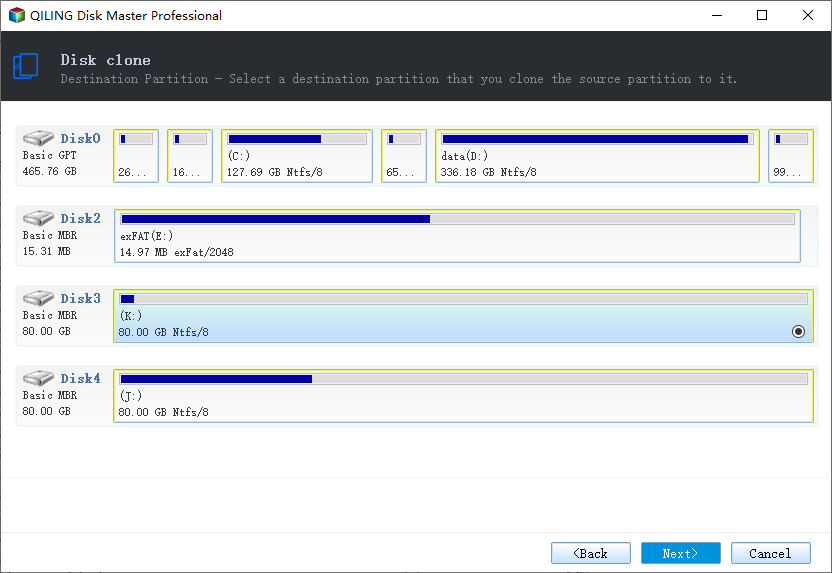
Step 3. Select the SSD as your destination.
Step 4. Edit the disk layout and then click "Proceed" to continue.

- Sector by sector clone: Copy as the source option will copy the layout of partitions on your source disk to the destination disk.
- Edit disk layout allows you to manually resize or move partition layout on the destination disk.
- If your destination disk is an SSD drive, make sure to select the "Optimize for SSD" option when setting up the destination.
A message now appears, warning you that data will be lost. Please confirm this message by clicking "OK".
Last. Set PC to boot from the SATA HDD/SSD
After cloning, don't rush to restart the PC. Instead, set your PC to boot from the SATA HDD/SSD via BIOS, which is another crucial step before restarting.
Step 1. Restart PC and press F2, F12, Del, etc., keys and release the key to enter BIOS.
Step 2. Go to the Boot section, set the newly cloned SATA HDD or SSD as the boot drive in BIOS.
Step 3. Save the changes and restart the PC.
After booting from the new disk, your Windows computer will start using the SATA disk as the primary drive, making all data and files visible. If you'd like to use the IDE disk as a data drive, you can delete the OS partition, clear its contents, and store new data on it.
Further Readings: How to Migrate OS from IDE to SATA HDD/SSD
Some of you may don't want to clone the whole disk data from IDE to SATA, but just want to migrate OS from IDE drive to SATA HDD or SSD. If you have the same needs, you are at a helpful guide.
To migrate your OS or transfer your Windows system from an IDE disk to a SATA HDD or SSD, you can use Qiling Backup, a reliable system cloning software. This software will guide you through the process, allowing you to easily transfer your operating system and data to a new storage device.
To migrate your OS from an IDE HDD/SSD to a SATA one, ensure your computer motherboard supports SATA. Then, prepare a SATA cable and power cable to connect it to your IDE PC. Follow these detailed steps to make the transition:
Tip
To clone a Windows system to a new HDD or SSD, first empty the target disk to ensure a clean slate. Additionally, make sure the target disk's partition style (MBR or GPT) matches the current system disk's partition style, which will allow for a seamless boot process after the cloning is complete. This will ensure a smooth transition and prevent any potential issues with booting the system on the new disk.
To clone your current Windows OS to a new HDD/SSD without reinstalling, you can use a cloning software such as Qiling Backup. This tool allow you to create a bit-for-bit copy of your existing OS, including all installed programs, settings, and files, to the new storage device.
Step 1. Connect the new HDD/SSD to your PC
Step 2. Run Qiling Backup to start system cloning
To perform a system clone, click the icon at the right top corner of the tool page and select "System Clone".
Step 3. Choose the destination disk - HDD/SSD to save Windows system
Select the new hard drive or solid-state drive (HDD or SSD) that you want to use as the target disk for cloning the Windows system. This is the disk where the cloned Windows system will be saved. Make sure it's empty or has nothing important stored on it, as the cloning process will overwrite its contents.
Click "Proceed" to start cloning Windows system to HDD/SSD now.
After cloning the Windows 10 system onto the new HDD or SSD, simply insert the new drive into your computer and reboot. Then, adjust the boot order in your computer's BIOS settings to prioritize the new drive, ensuring that your computer boots from the cloned Windows 10 system on the new HDD or SSD.
Related Articles
- Bad Sector Repair: How to Fix Bad Sectors on HDD in Windows 10/8/7
- 2021 Tips | How to Create Bootable Clone of Windows 10/8/7 Disk to New HDD/SSD
- Upgrade Sony PS4 Hard Drive to Bigger Drive without Reinstallation
- HDD RAW Copy Tool: Upgrade Disk, Copy Disk, Recover Disk
- Hard Disk Backup in Windows 10/8/7 [Beginners' Guide]
- How to Restore Windows 10 to Factory Settings
To restore Windows 10 to its factory settings, follow these steps: if your computer is not working properly or you're selling it, you can reset it to its original state. This process will erase all data, so make sure to back up any important files before proceeding. To start, go to Settings, then Update & Security, and click on Recovery.