Computer Freezes When Playing Games in Windows 10
If your computer freezes while playing games on Windows 10/8/7, there are several reasons why this might be happening. Common causes include outdated graphics drivers, overheating, insufficient RAM, or a faulty hard drive.
If your computer randomly freezes when playing games in Windows 10, 8, or 7, don't worry - you can resolve the issue by following the solutions on this page, which are designed to improve computer performance and ensure a smooth gaming experience.
Computer Randomly Freezes When Playing Games on Windows 10
After upgrading Windows 10 from 32-bit to 64-bit, I've been experiencing random game lockups. The games freeze, with a looped sound effect (a short sample that sounds like buzzing) playing in the background. Sometimes, the game resumes after a brief pause, while other times it remains stuck.
It sounds like you're experiencing frequent game freezes. This could be due to various reasons such as outdated drivers, overheating, or resource-intensive games. To troubleshoot, try updating your graphics drivers, checking for software updates, and ensuring your system has sufficient RAM and storage. You may also want to consider cleaning dust from your computer's vents to prevent overheating. If the issue persists, consider reinstalling the game or seeking further assistance from the game's support team. Would you like me to elaborate on any of these steps?
Many gamers experience frustration when their computers or PCs freeze while playing games at home. To resolve this issue and ensure a smooth gaming experience, it's essential to take preventive measures. This can include upgrading your computer's hardware, such as adding more RAM or a faster graphics card, as well as optimizing your system's settings for gaming.
Let's find out what is making your computer stuck and how to get rid of this issue now.
Why Does PC Keep Freezing When Playing Games
Your computer's slow performance or freezing can be caused by a variety of factors, including outdated drivers, overheating, malware infections, and full disk space, among others. These issues can also cause your games to freeze in Windows 10/8/7.
- High CPU or RAM Memory usage
- Graphics card low performance
- Low Internet speed, unstable network connection
- Computer hard drive slow or full
- Low memory storage
- Incompatible Graphics card driver or outdated Graphics card driver
- Insufficient disk space
- Computer or system compatible issue
- Windows 10 automatic update stuck games...
The factors that cause games to freeze on a computer are numerous, making the fixes varied. Even if you're unsure which factor is responsible, there are still ways to resolve the issue.
To get your computer running fast again while playing games, follow these tips one by one. First, close unnecessary programs and background applications to free up system resources.
Quick Tips to Fix "Computer Freezes When Playing Games" in Windows 10/8/7
In this part, we'll list some quick tips to help you avoid and fix computer freeze issues while playing games on Windows 10/8/7.
#1. Use Gaming Computer/Notebooks
You're right, using a normal computer or a business notebook for gaming can be a bad idea, especially for large online games. These devices are typically designed for productivity and may not have the necessary specifications or cooling systems to handle demanding games.
- Important
- Playing games on a regular notebook can be frustrating, as it may not have the necessary specs to run games smoothly. In contrast, professional gaming notebooks are specifically designed for gaming, with higher-end components such as CPU, graphics card, and hard disk that are optimized for game installation and performance. This makes them ideal for gaming, as they can handle demanding games with ease.
#2. Close Programs that Are Taking High CPU, RAM, Memory Usage
It's an efficient way to end the task of running programs that are taking high CPU and RAM memory usage when your computer gets stuck.
Here are the steps to fix a PC that freezes when playing games in one paragraph:
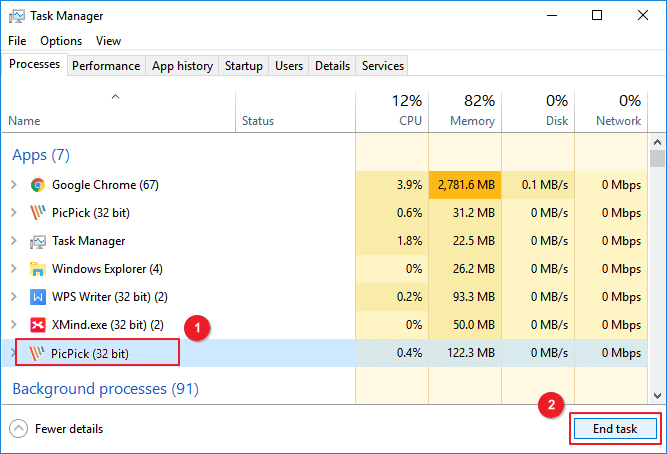
Step 1. Press the keys Ctrl + Alt + Del to bring up the Task Manager.
Step 2. Click "Task Manager" and go to the process tab.
Step 3. Identify high CPU or memory usage programs, select and click "End Task" to close them.
You can close the running game on your computer if you don't mind losing your game, and then restart your PC to play games again.
#3. Improve Internet Speed, Update Network Bandwidth
If the network connection is unstable or the network bandwidth is very low, consider taking steps to improve it, such as restarting your router or upgrading your internet plan. This can help prevent game lag and ensure a smoother gaming experience.
Step 1. Make sure the internet connection cables are good.
If you're having trouble with your internet connection, try changing the internet connection wire and reconnecting it to your computer tightly. This may resolve the issue.
Step 2. Make sure your router is functioning properly to ensure a stable and strong WiFi connection.
To optimize your gaming PC's performance, you can consider releasing the limit on network bandwidth. Additionally, if your router is outdated, it might be worth upgrading to a newer model to ensure a smoother gaming experience.
Step 3. Check the bandwidth of your network, if it's low, update it to a higher one.
Part 1. Update Computer Hardware to Get Rid Of 'PC Freezes While Gaming' Error
The issue of PC freezing while gaming or game freezing Windows 10 can be resolved by addressing low hardware performance issues.
When computer hardware devices aren't compatible with games, it can cause the PC to freeze while playing.
You can update your hardware devices by checking for updates in the Device Manager. To do this, press the Windows key + X and select Device Manager. In the Device Manager, look for any devices with a yellow exclamation mark or a red X, which indicate that there's an issue with the device.
#1. Update CPU Chip
If your computer's CPU chip is old or not compatible with your current motherboard, you can consider upgrading to a newer CPU or replacing the motherboard to maintain optimal computer performance.
Step 1. To upgrade your computer's processor, you'll need to purchase a new CPU that is compatible with your system. This involves checking the specifications of your current motherboard and ensuring the new CPU you choose has the same socket type and power requirements.
Step 2. Back up your computer data and OS. (Optional)
To avoid losing data and system crashes after upgrading your CPU, consider using reliable Windows backup software, such as Qiling Backup, for assistance.
Step 3. When you get the new CPU home, use the necessary tools to carefully remove the old one from your PC, and then securely install the new CPU in its place.
#2. Update Graphics Card
The graphics card is a crucial hardware component that determines a computer's ability to run games smoothly. If the graphics card is incompatible or outdated, it can significantly impact the gaming performance of the PC, making it difficult to enjoy smooth and seamless gameplay.
Here are the steps:
Step 1. You can either purchase a new graphics card or a gaming graphics card with higher performance to improve your computer's graphics capabilities.
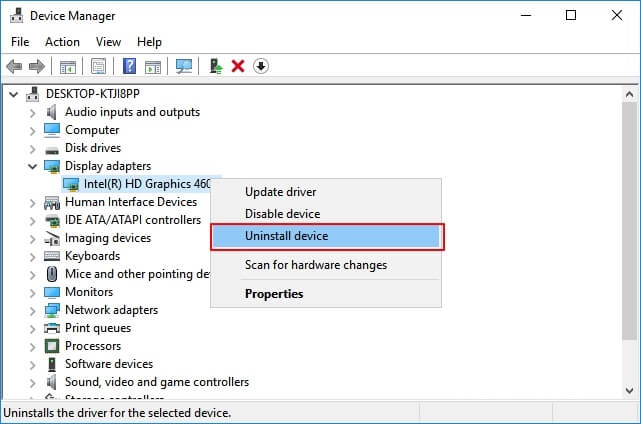
Step 2. Uninstall the current graphics card:
To uninstall the current graphics card, go to Device Manager, navigate to Display adapters, right-click on your current graphics card, and select "Uninstall device".
Step 3. Install the new card.
Step 4. Download and install new graphics card drivers.
You can download the drivers for your graphics card from the manufacturer's website and install them on your PC.
#3. Upgrade Disk to SSD, Migrate OS and Games to SSD
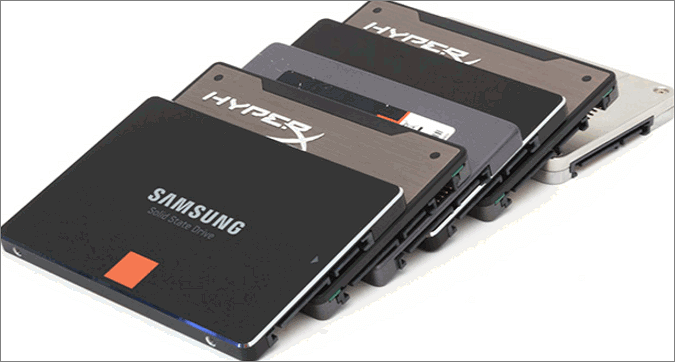
If a computer's hard drive is old or running out of space, it can slow down when running programs, particularly when playing games.
Upgrading the old hard drive by migrating the OS and installed games to a new SSD is the best way out. To do this, you can follow these steps:
1. Purchase and Prepare a New SSD
Step 1. Since you're upgrading from an old hard drive to a new SSD, you might as well get one with more storage capacity. This way, you can store more files, programs, and data without running out of space.
Step 2. To upgrade your computer's storage, install a Solid-State Drive (SSD) and initialize it to the same partition style as your Operating System (OS) disk. This involves physically installing the SSD into your computer, ensuring it is connected to the correct port (usually a SATA port), and then using the OS's built-in tools or a third-party software to initialize the SSD to match the partition style of your existing OS disk (e.
Open Disk Management > Right-To prepare the unallocated SSD volume for use, click on it and select the "Initialize Disk" option. From the dropdown menu, choose either "MBR" (Master Boot Record) or "GPT" (GUID Partition Table) as the disk type, depending on your system's requirements.
2. Migrate OS with Games to New SSD
To migrate Windows to a new PC, you'll need a professional Windows migration tool. Qiling Backup is a recommended tool that can help with the process.
Migrating Windows OS to a new SSD is a straightforward process that can be completed in just a few clicks. To move Windows 10, 8, or 7 and your games to the new disk, follow these steps: simply use the built-in tool to migrate your Windows OS, which will transfer installed games, programs, and software together to your SSD. This process is an example of migrating Windows 10 to an SSD.
Step 1. On the "Tools and utilities" page, click "System clone" to access system clone and other utilities.

Step 2. Qiling Backup will automatically select the boot and system partition, click "Next".
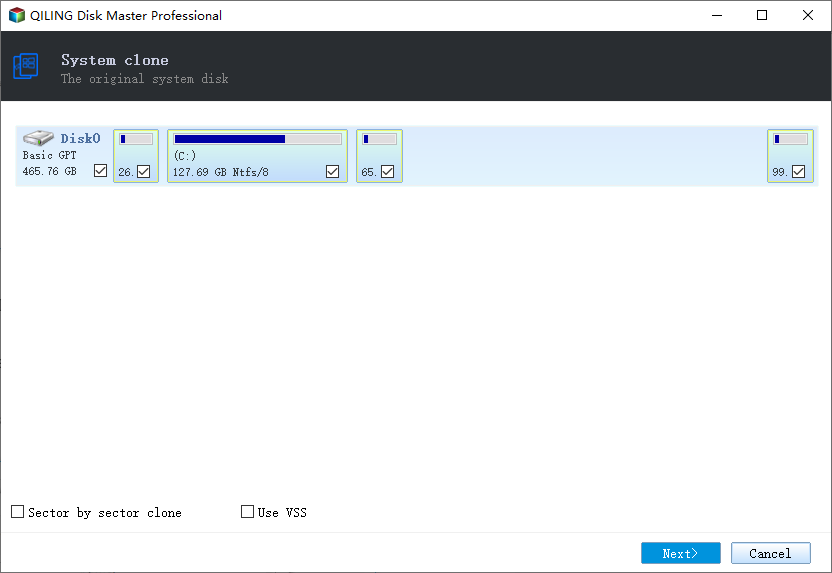
Choose the target disk and click "Next."

System clone will completely erase all data on the target disk and is not compatible with cloning a disk with a Master Boot Record (MBR) to a disk with a GUID Partition Table (GPT) or vice versa, so ensure the source and target disks have the same partition style.
Step 3. If the target disk is a SSD, select "optimize for SSD" in the advanced options.

Step 4. Click "Proceed" to start cloning.
3. Set Up PC and Games Running from SSD
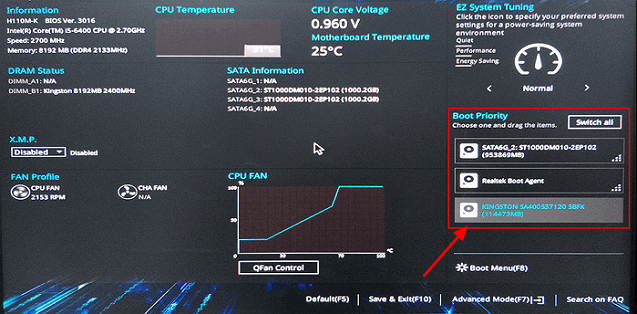
Step 1. To upgrade your PC's storage, install a Solid-State Drive (SSD), restart your computer, and then press the designated key (usually F2, F8, or Del) to access the BIOS settings. This allows you to configure the SSD as the primary boot device.
Step 2. To set the SSD as the primary boot drive, go to the Boot menu, navigate to the Boot Priority section, and select the SSD as the boot drive.
Step 3. Save all the changes and run from the new SSD.
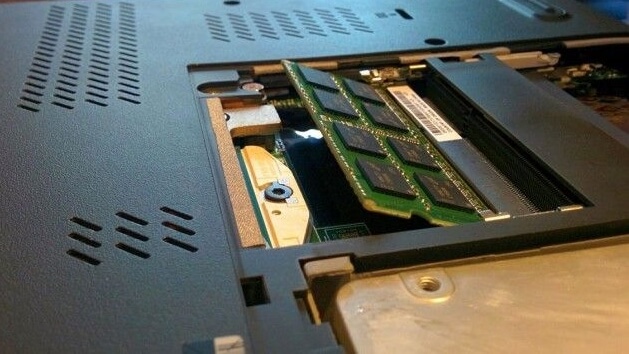
#4. Leave Sufficient Memory, Add New Memory Cards
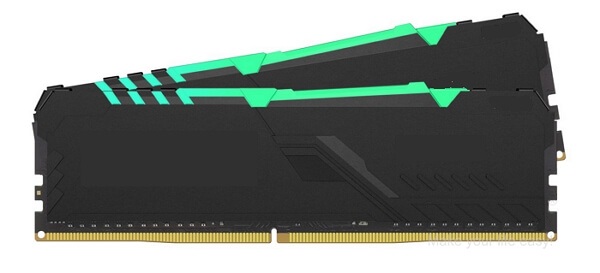
When your computer's memory is running low, it can negatively impact gaming speed. To resolve this issue, consider expanding your memory storage by adding new memory cards. This should help improve your gaming experience.
Step 1. Buy a new memory stick with the same capacity as your current one.
Step 2. Install the memory stick to your computer.
#5. Avoid Overheat
When a computer gets too hot, its performance will decrease due to a built-in protection mechanism that slows down the CPU and graphics card to prevent damage.
To avoid overheating issues on your computer, ensure good airflow around the system by keeping it in a well-ventilated area and cleaning dust from the vents and fans regularly. Additionally, consider upgrading to a more efficient cooling system, such as a liquid cooling system, if you're experiencing persistent overheating problems. Regular cleaning and upgrading can help keep your computer running smoothly and prevent overheating issues.
1. Clear computer dust
When a computer or laptop is used for a long time, dust accumulates inside, covering hardware devices and potentially causing problems.
With too much dust, the computer will get overheat easily.
2. Check if the Fan Is Running
If the fan doesn't work, the computer will overheat, affecting the CPU, graphics, motherboard, and other devices.
If the fan isn't running properly, check its power cable and replace it if necessary. Alternatively, consider replacing the fan with a new one to maintain a cool computer.
Upgrading hardware devices can help resolve the freezing issue on Windows PC, but software issues may also be a culprit. To address the problem, consider upgrading your hardware, such as your graphics card, CPU, or RAM, as these components can be the root cause of freezing. Additionally, ensure your drivers are up-to-date, disable any unnecessary startup programs, and consider reinstalling your operating system.
To make your computer work fast while running games and programs, start by closing unnecessary background applications and disabling startup programs that you don't need. Next, upgrade your RAM to at least 8GB and consider upgrading your hard drive to a solid-state drive (SSD) for faster loading times.
Part 2. Improve Software Condition to Address "Computer Freezes When Playing Games in Windows 10"
To fix the issue of your computer freezing when playing games in Windows 10, try upgrading the software conditions in your PC. This can resolve the problem.
Here are 4 tips to help you resolve software issues on your PC, ensuring a smooth gaming experience:
#1. Clean Up Junk Files in C Drive
When the C drive is full of unnecessary files, it can slow down your computer. To resolve this issue, you can use a professional cleaning tool to remove the junk files.
Here, we'd like to suggest you try Qiling CleanGenius, a tiny but powerful tool for Windows.
Step 1. Download and install Qiling Partition Master Suite.
Step 2. Click PC Cleaner and install Qiling CleanGinus. Then, click "Cleanup" and click "Scan" to start cleaning up the system and make your PC as good as new.
Step 3. The software scans your computer for idle data files taking up large amounts of disk space, allowing you to select and remove useless large files, system junk files, and Windows invalid entries with a single click to initiate the system cleanup process.
Step 4. When the scan is complete, click "Done" to finish cleaning system junk files.
#2. Extend System and Game Drive
If your system or game drive is running out of space, you may experience slow performance while playing games. To resolve this issue, you have two options: 1) free up space by deleting unnecessary files or uninstalling unused games and programs, or 2) consider upgrading your storage capacity to improve overall system performance.
Option 1. Move and Save Large Files to External Hard Drive
The process involves creating a bootable external hard drive with enough space to hold the contents of the target drive, then booting from the external drive and running a disk cloning software to clone the contents of the target drive to the external drive. This process effectively frees up disk space on the target drive by relocating its contents to the external drive. This can be useful for freeing up space on a drive that's running low, but it's worth noting that the target drive will still contain the cloned contents, so the freed-up space isn't actually "gained" but rather "relocated".
Step 1. Connect the external hard drive to your PC.
Step 2. To find the large files on your PC, open File Explorer, navigate to the location of the files you want to check, and sort the files by size in descending order. This will display the largest files at the top of the list.
Step 3. Copy and cut those large files and save them to your external hard drive.
Option 2. Extend System C (Game Drive)
To improve gaming performance, you can try adding more free space to your current system C drive or game drive, allowing games to load images and save game caches, resulting in a smoother gaming experience.
Qiling Partition Master, a professional partition manager software, offers a simple solution to extend your system drive with its Resize/Move feature.
Option 1. Extend System C drive with unallocated space
- 1. Right-click on the System C: drive and select "Resize/Move".
- To add more space to the C: drive, drag the system partition end into the unallocated space to merge them, effectively increasing the size of the C: drive.
- Click "Proceed" to execute the operations and extend the C drive.
Option 2. Extend System C drive without unallocated space
- 1. Right-click a big partition with enough free space on the system disk, select "Allocate Space".
- 2. To resize the C drive, select the system drive at the "Allocate Space From (*) To" section and drag the end of the System C drive into the unallocated space.
- 3. Click "Proceed" to save the changes and extend the C drive.
0:00-To extend the system drive with unallocated space, first, ensure that the unallocated space is adjacent to the system drive. If not, you'll need to move the unallocated space to the end of the system drive.
#3. Disable Windows 10 Automatic Update
If you're using Windows 10 on your computer, you may experience issues while playing games after a new update is installed by the Windows 10 Update Assistant.
To avoid Windows 10 automatic updates, you can follow these steps:
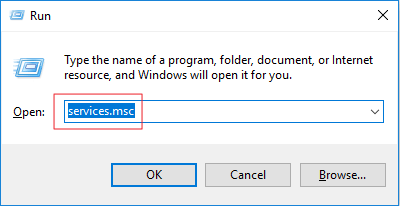
Step 1. Press the Windows key and the R key at the same time to open the Run dialog box.
Step 2. Type services.msc and press Enter.
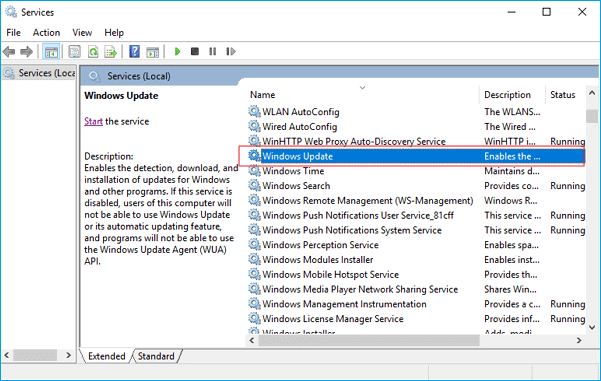
Step 3. Locate and double-click "Windows Update".
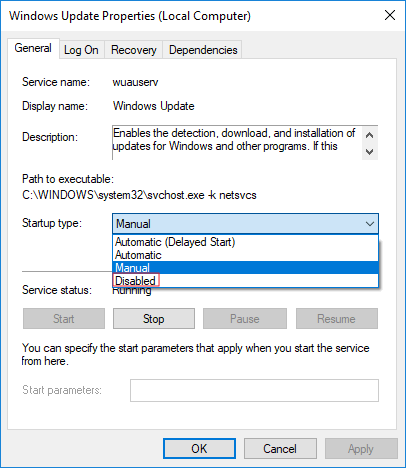
Step 4. In Startup type, select "Disabled". Then click "Apply" and "OK" to save the settings.
#4. Install Compatible Games on Your OS
If your computer's operating system doesn't meet the hardware requirements of a game, it may not run smoothly.
Here, we have two tips for you:
1. Install OS-compatible games on your computer.
2. If the game requires a specific computer operating system (OS) or central processing unit (CPU) to run, consider upgrading your computer's OS and/or CPU to meet the game's requirements. This may involve purchasing a new computer or upgrading individual components such as the CPU, motherboard, or RAM.
If the game requires a specific version of Windows, you can try upgrading your OS to meet the requirement, such as upgrading from Windows 8 to Windows 10.
Here is how to get the latest update on your PC:
Step 1. Click the "Start" menu and click the "Settings" tab.
Step 2. Click "Update & security".
Step 3. Select "Windows Update" in the left pane and click "Check for updates".
Step 4. If there is a new update available, click "Install Now".
To complete the process, ensure you have an active internet connection and follow the onscreen instructions.
The Bottom Line
Discovering why your computer freezes while playing games and resolving the issue are the main focuses of this page.
If your computer freezes while playing games, try disabling and ending the tasks of running programs that are consuming high CPU usage for a quick fix.
To make your computer fast for playing games, upgrade your hardware devices and software settings by following the suggestions shown above.
To avoid file loss or OS crashes, or to save game shots, back up all files to an external storage device using a reliable backup tool like Qiling Backup.
Related Articles
- Fix Computer Slow after Windows 10 Update | Speed Up PC in 6 Ways
- [Fixed] Right Click Not Responding or Working on Windows 10
- FIX 'the device has either stopped responding or is disconnected' Error
- [Fixed] Windows Cannot Run Disk Checking on This Volume Because It Is Write Protected
- Best External Hard Drive for Fail-Proof Backup in 2022
Considering regular backups of your computer files to an external drive, check out the best external hard drives for fail-proof backup. You can also use Qiling Backup for seamless backup and restore. - Best Bootable USB Drive Creator Tool for Windows [2022 Update]
If you're looking for a reliable tool to create a bootable USB drive for Windows, we've reviewed the top options and recommend checking out Qiling Backup, Qiling OS2Go, Rufus, UUByte ISO Editor, and Passcape ISO Burner - each offering a unique solution to suit your needs.