[Fixed] Windows Cannot Run Disk Checking on This Volume Because It Is Write Protected
The error 'Windows cannot Run Disk Checking on this Volume Because it is Write Protected' occurs when a volume or drive is damaged or set to Read Only, preventing CHKDSK from running and checking for bad sectors or verifying system file integrity.
The error "Windows cannot run disk checking on this volume because it is write protected" can be resolved with different solutions depending on the underlying reason. Five possible fixes include addressing the issue, running the check with administrative privileges, checking for write protection on the disk, using the built-in disk management tool, and running the check in safe mode.
| Workable Solutions | Step-by-step Troubleshooting |
|---|---|
| Case 1. Chkdsk Write Protected Because Hard Drive Is Write Protected |
Fix 1. Remove Write Protection via CMD...Full steps |
| Case 2. Chkdsk Write Protected Because File System Corrupted |
Fix 4. Recover Files from Corrupted Hard Drive...Full steps |
Causes of "Windows Cannot Run Disk Checking on This Volume Because It Is Write Protected" Error
You're experiencing a startup issue with your Windows 10 Pro computer that's preventing you from booting into Safe Mode, and running chkdsk results in a write-protected error. This suggests a potential issue with your system's boot sector or disk configuration. To troubleshoot, you might want to try booting from a Windows 10 installation media, running a System File Checker (SFC) scan, or attempting a System Restore from a different computer if you have a backup. If these steps don't resolve the issue, further diagnostic steps or a professional recovery may be necessary. Would you like me to elaborate on any of these steps?
Chkdsk is a built-The Check Disk utility for Windows PC can be used to fix disk errors or startup issues, but running the 'chkdsk /r' command via a Command Prompt may not work and may give an error message if the system is unable to be automatically repaired by Startup Repair.
'The type of the file system is NTFS.
Cannot lock current drive.
Windows can't run disk checking on this volume because it's write-protected.

The error message you're referring to is likely due to a technical issue or a problem with the system's configuration, rather than a specific reason. However, based on the context, it's possible that the error occurred because the system was unable to process the request or retrieve the required information, possibly due to a connectivity issue, a database problem, or a misconfiguration in the system's settings.
- The disk volume attribute is set to read-only
- The file system of the partition is corrupted or damaged.
If you find yourself in a situation where you're unable to run CHKDSK to check and repair your disk, don't get frustrated. There are effective ways to cope with it, and we can help you navigate through them.
To resolve the "Windows cannot run disk checking on this volume because it is write protected" error, simply remove write protection from your hard drive, allowing chkdsk to run again.
To remove write protection on a hard drive and allow CHKDSK to work properly in Windows 10/8/7, follow this tutorial. This method is not only applicable to PC hard disks but also to external memory devices such as SD cards, USB drives, and others. By following these steps, you should be able to successfully remove write protection and make CHKDSK work as intended.
Fix 1. Remove Write Protection via CMD
Step 1. Press "Windows + X" buttons to bring up the power users menu.
Step 2. In the power users menu, select the "Command Prompt (Admin)" option.
Step 3. Click "Yes" when you are presented with a UAC window requesting permission to launch the Command Prompt as Administrator.
Step 4. The command to run the check disk tool on a specific drive is to open a new Command Prompt window, type chkdsk followed by the drive letter of the drive you want to check, and press Enter. For example, if you want to check the hard drive, type chkdsk C: /f /r /x and press Enter, replacing "C" with the actual drive letter of your hard drive, SD card or USB drive. The /f option fixes errors, the /r option locates bad sectors and recovers readable information, and the /x option forces the volume to dismount before scanning.
This command will unmount the disk, SD card or USB drive, remove any write protection status, and allow CHKDSK to run again, eliminating the 'Windows cannot run disk checking on this volume because it is write protected' error.
If this tip won't work, no worry. There are other ways to remove write protection.
Fix 2. Remove Write Protection via Diskpart
You can use the diskpart command to remove the read-only attribute from your hard drive, which may be necessary if you're trying to install an operating system or make changes to the drive. To do this, open the Command Prompt as an administrator, type 'diskpart', and press Enter.
Step 1. Run "Command Prompt" as an administrator.
Step 2. Enter diskpart and click "Yes" in the prompt asking for notification.
Step 3. Enter the following command in order:
list disk
select disk X (Replace "X" with the number of your write-protected hard drive.)
attributes disk clear readonly
Step 4. If you receive the message "Disk attributes cleared successfully", simply type "exit" and then return to the Command Prompt to run the chkdsk command. This time, you should be able to check and fix your disk error with ease.
If you're not familiar with command lines or are not a computing management professional, don't worry. Qiling's R&D team has created a helpful kit to assist with resolving write-protection issues on devices like hard drives, external hard drives, USB drives, and SD cards.
Qiling CleanGenius is a practical computer fixing tool that is both safe and lightweight, making it an ideal alternative to using the command line.
Use this one-click tool to solve the write-protection issues on your own:
If you're not tech-savvy and not familiar with command lines, don't worry. There are graphical-based solutions that can help you remove write-protection from your hard drives, USB drives, and even SD cards.
Qiling CleanGenius is a tool that helps fix issues on drives without requiring command-line knowledge.
Here's an easy-Here's a one-paragraph guide on how to use this tool to get your issues sorted:
Step 1: DOWNLOAD and install Qiling CleanGenius (free) on your computer.
Step 2: Run Qiling CleanGenius on your PC, select Optimization and choose the Write Protection mode.
Step 3: Select the device that is write-protected and click Disable to remove the protection.
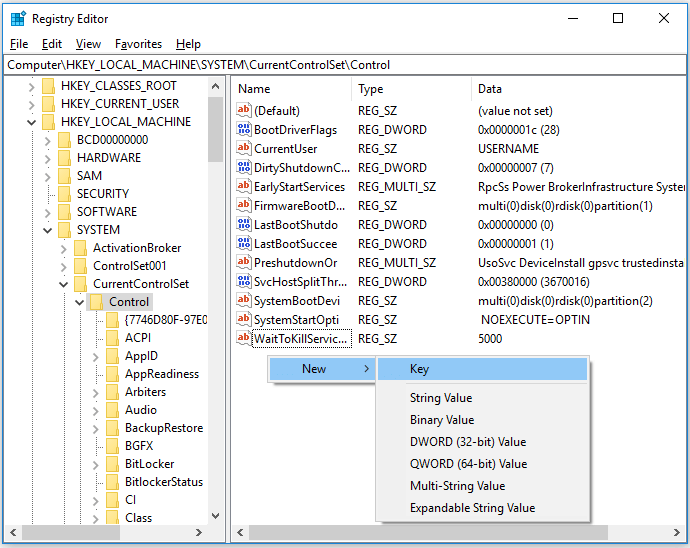
Fix 3. Clear Read-Only in Registry Editor
If Method 2 isn't working for you, don't worry, there's another approach you can try.
Step 1. Press "Windows + R" simultaneously and enter regedit. In the window asking for permission, click "Yes".
Step 2. Go to HKEY_LOCAL_MACHINE\SYSTEM\CurrentControlSet\Control\StorageDevicePolicies.
Step 3. Find and right-click the "WriteProtect" key and set the value as "0".
If you don't see "StorageDevicePolicies" in the specific path, don't worry, you can still achieve the same goal by following the steps below.
Step 1. In Registry Editor, go to HKEY_LOCAL_MACHINE\SYSTEM\CurrentControlSet\Control.
Step 2. On the right pane, right-click in the space and choose "New" > "Key". Name it as "StorageDevicePolicies".
Step 3. Make sure "StorageDevicePolicies" is selected. Go to the right pane, right-click and choose "DWORD (32-bit) Value".
Step 4. Input the name as "WriteProtect" and set its value as "0".
To remove write protection from a hard drive, you can try using the built-in Windows utility, Diskpart, to disable write protection, or use third-party software like Qiling Partition Manager or MiniTool Partition Wizard. You can also try resetting the drive's write protection through the BIOS settings or by using a hardware-based method. If none of these methods work, it may indicate a more serious issue with the file system or the hard drive itself, which would require further investigation and potentially data recovery.
If your hard drive has file system errors, you may encounter issues accessing your data. In this case, you may receive an error message like "Windows cannot run disk checking on this volume because it is write protected". To resolve this issue, you'll need to reassign a file system to the hard drive by formatting, but be aware that this will erase all existing files, so it's recommended to recover files first.
Fix 4. Recover Files from Hard Drive
With the Deep Data Recovery software, you can recover files from a disk with file system errors, such as a disk becoming RAW, file system missing, and more. It can rescue almost all existing file types from a computer, external hard drive, USB, memory card, and more after deletion, formatting, file system becoming RAW, etc.
Step 1. Select file type and click "Next".

Step 2. To recover lost data, select the drive where the data was lost and click "Scan" to initiate the recovery process.

Step 3. When the scan is complete, use the "Filter" or "Search" feature to locate the lost files. This feature allows you to narrow down the search results and find specific files that may have been deleted or lost.

Step 4. Select all the files you want and click "Recover". Then, browse to a secure location to save them.
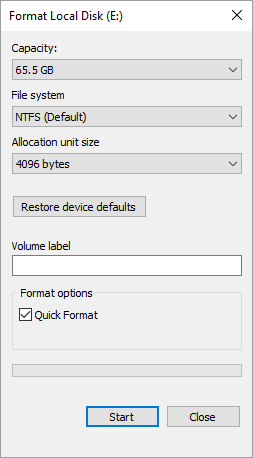
Fix 5. Format the Volume
Formatting a hard drive is a process of reorganizing the data on the drive to prepare it for use. There are several ways to format a hard drive, including the "quick format" method, which is the easiest and most common approach. This method involves deleting all the data on the drive and re-creating the file system, which takes only a few minutes to complete.
Step 1. Go to "This PC".
Step 2. Find and right-click your problematic hard drive partition.
Step 3. Choose "Format".
Step 4. Set the new file system and other options, then click "Start".
Conclusion
The "Windows cannot run disk checking on this volume because it is write protected" error is usually caused by specific reasons, making the solutions clear-cut. To resolve the issue, you can either remove the write protection or fix file system errors. Hopefully, one of the methods above will help you fix your hard drive perfectly.
FAQs About Windows Cannot Run Disk Checking On This Volume
If you have more questions about Windows Disk Checking or CHKDSK on a locked drive, check the following questions and you may find the answers to listed questions may interest you somehow.
1. How do you fix Windows Cannot run checking on this volume because it is write protected?
The error occurs because Windows disk checking is disallowed when the target device is write-protected. To resolve this, remove write protection from the device.
There are 5 ways to unlock a write-protected drive or device, including detailed guides that can be found on this page for further assistance.
2. How do I remove write protection from a hard drive from command prompt?
To remove the write protection of a hard drive from Command Prompt, you should be careful while executing the following steps:
Step 1. Open Command Prompt as Administrator.
Step 2. Type diskpart in Command Prompt and hit Enter.
Step 3. Click "Yes" to open DiskPart.
Step 4. Type list volume, select volume X, attributes disk clear readonly and hit Enter each time. (Replace X with the volume drive of your hard drive.)
3. How do I run chkdsk on a locked drive?
To run CHKDSK on a locked drive, unlock the drive using a CMD command or a third-party write-protection removal tool, then follow the guide on Remove Write Protection on Windows 10/8/7.
After this, you can follow the next steps to run CHKDSK:
Step 1. Open Command Prompt as Administrator.
Step 2. Type: chkdsk E: /f /r /x and press "Enter". (Replace "E" with the drive letter of your hard drive.)
Related Articles
- Quick Fix External Hard Drive Access Denied Error
- Five Things You Need to Do Before Windows 10 Update
- 4 Ways to Fix Windows System Backup Failed in Preparing the Backup Image
- Repair Time Machine Backup (Solved): Time Machine Backup Failed, Corrupted, Missing
- Copy Folders and Subfolders Using Xcopy Command | 3 Ways🔥
Learn how to copy folders and subfolders using the Xcopy command in Windows. This guide covers the Xcopy syntax, common switches, and step-by-step instructions for efficient file copying via the command line. - How to Create Clonezilla Bootable USB in Windows [Quick & Easy]🔥
If you're looking to create a bootable USB drive for Clonezilla in Windows, you have two options. While Clonezilla provides an ISO file, many users are curious about how to create a bootable drive using USB for Windows. Fortunately, there are methods available to achieve this, which will be covered in this post.