[5 Ways] How to Remove Write Protection from USB in Windows
When you see the "The disk is write-protected" error, don't panic. You can resolve this issue by either removing the write protection or using a different disk. This solution applies to USB drives, SD cards, and even internal and external hard drives.
Part 1. How to Remove Write Protection from USB in Windows 11/10/8/7
To disable write protection on a hard drive or a USB drive in Windows, right-click on the drive in File Explorer, select "Properties," and then click on the "Tools" tab. Next, click on "Check" and then click on "Fix issues" to run the Check Disk utility. If the drive is write-protected, the utility will automatically remove the protection.
| Workable Solutions | Step-by-step Troubleshooting |
|---|---|
| Fix 1. Check Physical Lock Switch | Locate and turn the physical switch from ON to OFF on your USB or SD card. Connect the unlocked USB...Full steps |
| Fix 2. Run Diskpart Command | Press Windows + R keys and type cmd in the box that opens. This will launch Command Prompt...Full steps |
| Fix 3. Run Write Protection Remover | Download and install Qiling CleanGenius (free) on your computer. Run Qiling CleanGenius...Full steps |
| Fix 4. Edit Registry | Connect your write-protected removable device to the PC. Open the Registry Editor by pressing...Full steps |
| Fix 5. Turn off BitLocker Partition | Open File Explorer, right-click on your BitLocker partition or USB drive and select Manage BitLocker...Full steps |
Note: To remove write protection from your USB flash drive, memory card, or computer HDD/SSD, follow the easy-to-complex fixes listed one by one. If you're not tech-savvy, consider Qiling's manual repair services, where our professional team can help with system-related issues like system failure, BSOD, unbootable devices, and more.
Consult with Qiling data recovery experts for a one-on-one manual recovery service, which includes the following services after a free diagnosis:
- Fix Windows boot issues, including BSOD
- Fix Windows error and configure Windows environment
- Restore the system when it fails to boot
- Optimize Windows computer to make it run quickly
Method 1. Remove Write Protection from USB with Physical Lock Switch
Sometimes, a USB drive or SD card can become write-protected due to its physical switch being locked, making it inaccessible on all PCs and devices. To remove the protection, you can use the physical switch to unlock it, allowing you to access and write to the device again.
Step 1. To turn off your USB or SD card, you need to locate the physical switch that controls the power supply. This switch is usually located on the side or top of the device.
Step 2. Connect the unlocked USB or SD card to your computer, and check if the write-protected state disappears.
Image 1 - USB flash drive switch
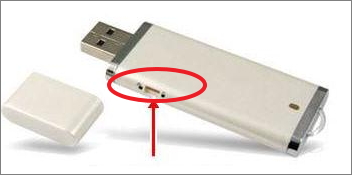
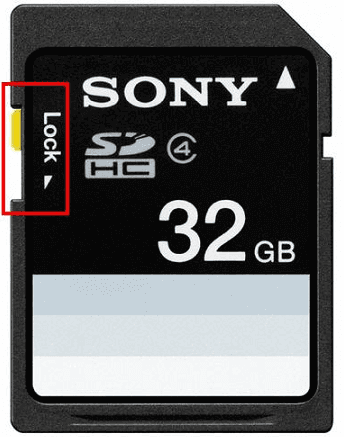
Image 2 - SD card lock switch
Note If your USB doesn't have a switch or the system still warns your USB is write-protected, to remove the write protection, you'll need to follow Method 2, which involves additional steps.
Method 2. Remove Write Protection from USB via Diskpart Command
This option clears the read-only attribute to make your drive writable. You can use the command line by running the Diskpart utility, and the process is the same for internal drives, external drives, USB drives, and SD cards.
To fix a corrupted disk partition using Diskpart, start by opening Command Prompt as an administrator. Then, type `diskpart` and press Enter.
Step 1. Press the Windows key and the R key at the same time, then type "cmd" in the box that opens, and this will launch the Command Prompt.
Step 2. Type diskpart in the Command Prompt window and press Enter.
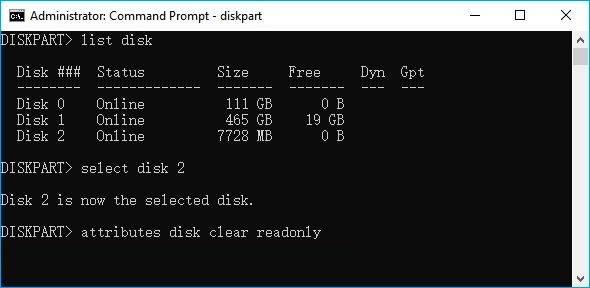
Step 3. To view the available disks on your system, you can type the command `list disk` and press Enter. This will display a list of all the disks that are currently connected to your system, including their drive letters, sizes, and other relevant information.
Step 4. Type "select disk 2" and hit Enter, replacing "2" with the write-protected device number.
Step 5. Type attributes disk clear readonly and hit Enter.
Step 6. Once the write protection removal process completes, type exit to quit diskpart.
After this, restart your PC and check if you can access and use the saved data on your USB or hard drive again.
Method 3. Use Third-Party USB Write Protection Removal Tool
If you're not tech-savvy and not familiar with command lines, don't worry - there are graphical-based solutions to help you remove write-protection from your hard drives, USB drives, and even SD cards.
Qiling CleanGenius helps fix issues on drives without needing to know command-line.
Here is a brief guide on how to use this tool to get your issues sorted:
Step 1: DOWNLOAD and install Qiling CleanGenius (free) on your computer.
Step 2: Run Qiling CleanGenius on your PC, select Optimization and choose the Write Protection mode.
Step 3: Select the device that is write-protected and click Disable to remove the protection.
Method 4. Clear Write Protection from USB Devices Using Registry Editor
Registry Editor can be used to fix write-protected errors on USB, SD, or internal/external HDD/SSD devices by modifying the registry, but this is an advanced procedure that should be approached with caution as incorrect tweaks can cause issues.
Be cautious when using this method to remove write protection on your Windows computer, as it may cause data loss or system instability if not done correctly.
Step 1. Connect your write-protected removable device to the PC.
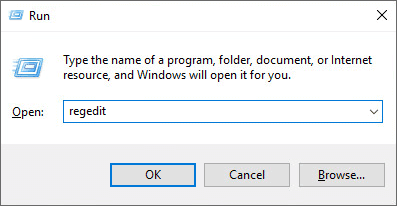
Step 2.To open the Registry Editor, press the Windows key + R to open the Run box, type "regedit" and press Enter.
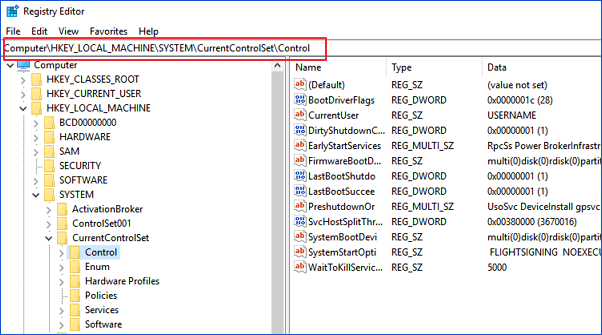
Step 3. Click on HKEY_LOCAL_MACHINE and expand System.
Step 4. Click Current Control Set and then click on Control.
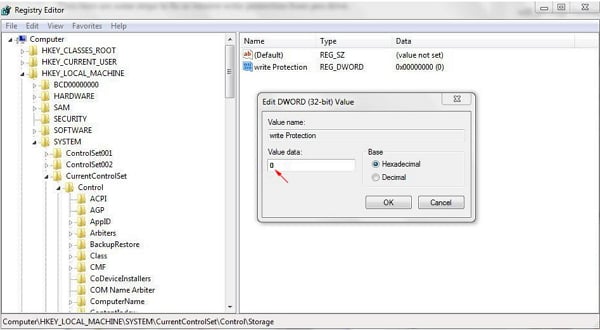
Step 5. To resolve the issue, check the Storage Device Policies and change the DWORD value to 0, then click OK.
Step 6. Exit the Registry Editor and reboot your PC.
To troubleshoot the issue, wait for the computer to restart. After the restart, check if your device is accessible. If it still doesn't work, you may need to reinstall the driver or seek further technical assistance.
Method 5. Turn Off BitLocker to Unlock Write Protected USB in Windows 11/10/8/7
When BitLocker is enabled on a hard drive partition, it encrypts the files and to make changes, the protection needs to be removed first.
Here are the detailed steps of unlocking write-protected BitLocker USB or partitions on your PC: To unlock a write-protected BitLocker USB or partition, you can use the command line utility `manage-bde`. First, insert the USB drive or access the partition.
Step 1. To manage BitLocker, open File Explorer, right-click on the BitLocker partition or USB drive and select Manage BitLocker. This will allow you to view and modify the BitLocker settings, such as the PIN or password, and perform other administrative tasks.

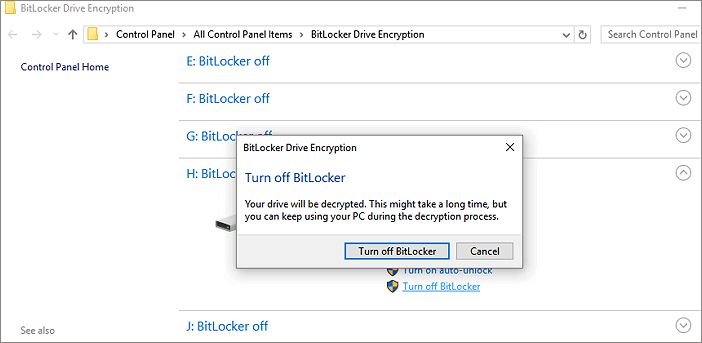
Step 2. Select the locked device and click Turn off BitLocker.
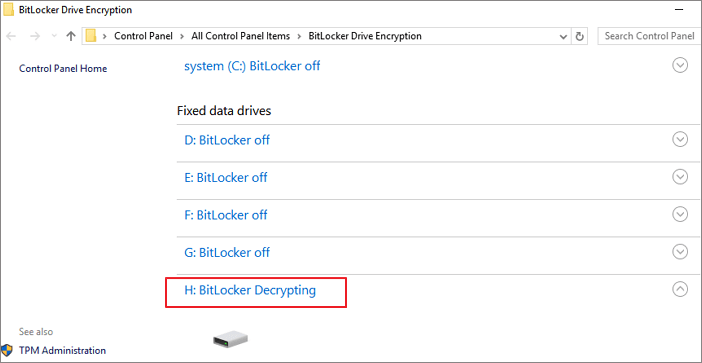
Step 3. Wait for BitLocker to decrypt on its own.
To summarize, after disabling BitLocker, you can access and manage your USB partition, allowing you to save new files to it.
Part 2. Recover Data and Format USB after Write Protection Removal
After removing write protection from your storage devices, you can access files and make changes to your USB flash drive or external USB drive again.
If you're unable to access your USB drive due to a corrupted file system, try using a data recovery software to scan the drive and recover any lost files. Alternatively, if the USB drive is still inaccessible, you can try using a different computer or a USB recovery tool to attempt to recover your data.
#1. Recover Data First If File Lost After Removing USB Write Protection
You can download Deep Data Recovery to recover lost data while removing write protection, and it's also useful for NAS data recovery.
Step 1. Select file types
Connect your USB drive to your computer and launch Deep Data Recovery software. Select the file types you want to recover and click "Next" to begin the process.

Step 2. Choose the USB drive to scan
Plug in the USB drive that has the lost files. Click the "Scan" button to begin the recovery process.

Step 3. Check and preview USB drive data
When the scanning is finished, you can quickly locate a specific type of file by using the Filter feature and the Search option to narrow down the results.

Step 4. Restore flash drive data
After finding lost files on a USB drive, click "Recover" to restore them, and save the recovered files to a safe location on your PC, not back to the USB drive.
#2. How to Format USB Drive to NTFS or FAT32:
To ensure your USB drive remains in good condition, format it to the NTFS or FAT32 filesystem.
To format a USB drive, connect it to your computer and use Disk Management to format it. You can do this by going to the Start menu, typing "Disk Management" in the search bar, and opening the Disk Management application.
Step 1. To open the Disk Management utility, press Windows + R to open the Run box, type diskmgmt.msc, and then press Enter.
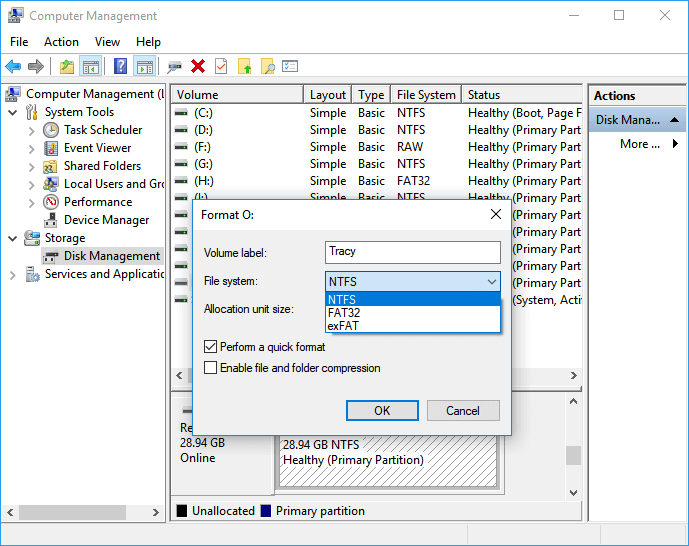
Step 2. Right-click on your USB drive in Disk Management, then choose Format.
Step 3. Select the format for your USB drive as FAT32 or NTFS and click OK to confirm.
FAT32 is used for hard drives with a capacity of 32GB or less, while NTFS is used for hard drives with a capacity of 64GB or more.
What Caused Write Protection on USB
Storage devices like USB flash drives, SD cards, internal or external hard disks may become write-protected due to various reasons, including the addition of write protection to files on the device to prevent modification or erasure, among other causes.
- The physical switch of the USB is on the Lock side.
- USB is set as Read-Only by mistake.
- BitLocker protection partition is turned on USB volume.
- A write-protected error on a USB disk is typically caused by third-party encryption software or a virus, which prevents the disk from being written to.
To regain the ability to save and transfer files, you'll need to remove the write protection from your device. Follow the step-by-step guide on this page to make your device viable for saving and transferring files again.
Conclusion
If you're experiencing write protection issues with your USB, SD, or internal/external hard drive, there are several methods to help you resolve the problem. You can try using a third-party software, such as Qiling Partition Manager, to remove write protection.
- 1. To put a USB or SD card in a device into the off state, you would simply flip the physical switch on the card or device itself to the off position. This is usually a small switch located on the card or device that controls whether it is powered on or off.
- 2. Using Diskpart command to clear read-only
- 3. Using USB write protection removal tool
- 4. Changing registry DWORD value to 0
- 5. Turning off BitLocker partition encryption
If you're wondering how to remove write protection from a USB drive on Windows 11/10/8/7, the guide above is all you need to remove the write protection.
People Also Ask
Below, we have listed some frequently asked questions and their answers to help you remove write protection from your storage devices.
1. How to remove write protection from the Micro SD card?
To remove write protection from your SD card, you can follow these simple steps: first, check if your SD card is write-protected by looking for a small switch or lock icon on the card or its adapter; if it is, simply flip the switch or unlock the icon to disable write protection; if not, you can try using a card reader to access the SD card's properties and disable write protection through the computer's operating system; or, if the above methods don't work, you can try formatting the SD card, which will erase all data on the card, but will also remove any write protection.
- 1. Run Command Prompt as administrator.
- 2. Type diskpart.exe.
- 3. Type list disk.
- 4. Type select disk + number.
- 5. Type attributes disk clear readonly.
For a more detailed guide, follow the guides on "How to Remove Write Protection" and "Format Write-Protected SD Card" for a step-by-step solution to your issue.
2. How can I remove the write protection from a single file?
If your file or folder is locked in a read-only state, you can unlock it by following these tips: you can try unlocking it by right-clicking on the file or folder and selecting the "Unlock" or "Remove Read-Only" option, or by using the built-in file system tool to remove the write protection. Alternatively, you can also try using a third-party software or utility to unlock the file or folder, or by checking if the file or folder is locked by a system or application and removing the lock if necessary.
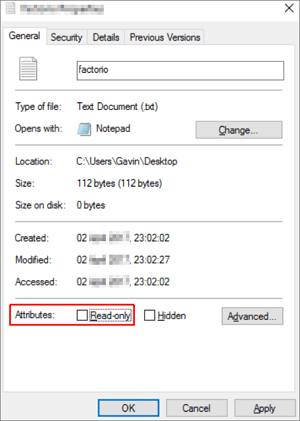
- Right-click on the folder, select Properties.
- On the General tab, uncheck Read-only next to the Attributes section.
- Click OK.
3. How do you add write protection to a flash drive?
To enable write protection on a USB flash drive, there are three ways to do so.
- Use USB write-protection switch.
- Use diskpart to change read-only settings.
- Change security permission in USB properties.
4. How do I remove write protection from Seagate external hard drive?
Connect your Seagate external hard drive to your PC and remember its disk number. Open Command Prompt, type the following command one by one, and hit Enter each time: `chkdsk H: /r` (replace H with your disk number), `chkdsk I: /r` (replace I with your disk number), `chkdsk J: /r` (replace J with your disk number), and so on. This will scan and repair any errors on your external hard drive.
- diskpart
- list disk
- select disk n (Replace n with the disk number of your write-protected Seagate external hard drive.)
- attributes disk clear readonly
Once you've finished, if you find any missing files on the disk, consider using a reliable USB data recovery tool to recover your valuable files.
Related Articles
- Undo Disk Cleanup in Windows, No Data Loss
- Memory Card Unlocker: How to Unlock SD Card Without Losing Data
- Fix 'This Drive Is Read Only' on SD Card/USB/Hard Drive [5 Methods]
- Repair and Recover Corrupted/Unreadable VHD or VHDX Files
- Word Recovery Online - Top 5 Repair Corrupted Word File Online | Qiling
You can restore and repair corrupted Word files online for free using top 5 text recovery converter online solutions, which provide a way to recover corrupted Word files online. - How to Recover Data from Damaged Partition
Damaged partition recovery involves two main steps: recovering data from the damaged partition and creating a new partition to transfer the data. This process helps to salvage important information and set up a fresh partition to store it.