Undo Disk Cleanup in Windows, No Data Loss
Disk Cleanup Deleted My Downloads Folder
"Disk Cleanup deleted my Downloads folder which contained 5 years' worth of personal files and pictures. How can I get them back?"
A user who regularly uses Disk Cleanup to free up disk space, has accidentally deleted their Downloads folder after not paying attention to it during the process. This has happened despite performing the task hundreds of times before.
Microsoft's Disk Cleanup utility helps free up disk space by deleting temporary files, junk files, and other unnecessary items, giving you the option to choose what to remove from your hard drive.
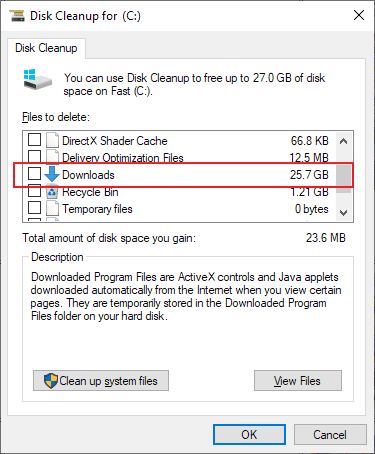
The likelihood of Disk Cleanup deleting personal files is low, as system and personal files are not included in the option. However, the 'Downloads' folder, which was introduced in Windows 10 version 1809, may be mistakenly deleted by Disk Cleanup, leading to the accidental deletion of the Downloads folder while trying to free up disk space, which is why many Windows 10 users are experiencing this issue.
Undo Disk Cleanup in Windows 11/10/8/7 and Restore Deleted Files
When running Disk Cleanup on Windows 10 1809, the Downloads folder is included in the list and is checked by default.
Users may delete Windows ESD installation files, in addition to the downloads folder, and deleting such files can cause computer issues. Unfortunately, Windows utility does not have an undo option for Disk Cleanup, but you can try to retrieve mistakenly deleted files from Windows File History backup or use a third-party data recovery program.
Quick navigation:
- If you've created a backup of your computer disk partition data with File History, please refer to Method 1. Use the other restore function of particular backup methods, e.g. if you created backups to the cloud, using data backup software.
- If you don't have a backup at all, directly go to Method 2. Qiling data recovery software is able to recover deleted files & folders after deletion, formatting, or virus infection. It's by far one of the best Windows data recovery software for file recovery after performing Disk Cleanup as well as other disk cleaning tools.
Method 1. Restore from File History Backup
Step 1. To find the folder path of your lost files on a Windows 10/8/7 PC, click on "This PC" and use the Disk Cleanup utility to see the folder path where the lost disk files are located, such as Desktop, Downloads, Documents, Music, Pictures, Videos, or Libraries.
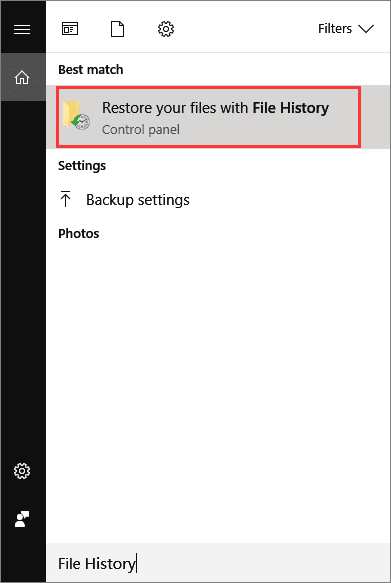
Step 2. Type: File History in the search box > Select and click on Restore your files with File History.
Step 3. Click the "History" button to show all your backed-up folders.
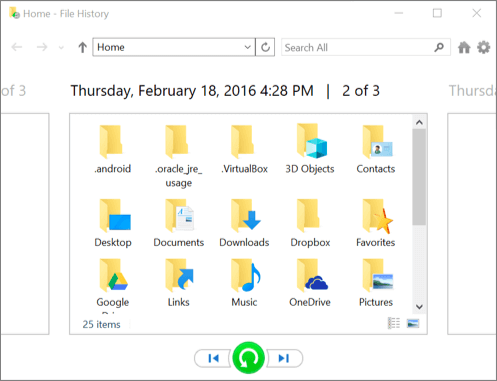
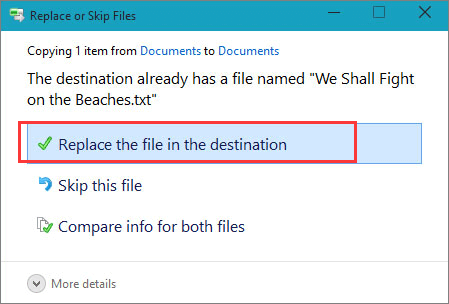
Step 4. To restore lost files, choose the files you want to recover and select the correct version from your File History backups. Then, click the "Restore" button to retrieve the files. If the computer already has a file or folder with the same name, select "Replace the file in the destination" to overwrite it.
After restoring your lost files from the File History backup, you can exit Windows File History and continue using the restored files again. If there's a file conflict, you can choose "Skip This File" or "Compare Info for Both Files" and then proceed with the restored files.
Method 2. Restore from File Recovery Software
If you have accidentally deleted files and don't have a backup or system restore point, you can try using professional file recovery software like Deep Data Recovery to help find and recover your lost files. This software is secure and clean, and uses an advanced scanning algorithm to thoroughly scan your disk partition for deleted files.
Qiling recovery software is a simple, super easy-to-use yet powerful DIY data recovery software, recognized for its straightforward three-step recovery process.
Step 1. Select file types and click "Next" to start
Launch Deep Data Recovery software on your Windows PC, select the desired file types, and click "Next" to initiate the recovery process.

Step 2. Select a location and start scanning
To recover deleted files, hover over the partition or drive where the files were stored. Then, click "Scan" to initiate the search for lost files. This will begin the process of locating and potentially recovering the deleted files.

Step 3. Select the files you want to recover
Once the scanning is complete, select the deleted files you want to recover. You can narrow down the results by filtering by file type, or search for specific files using the "Search files or folders" box, which can be a quick way to find the desired file if you remember its name.

Step 4. Preview and recover deleted files
Preview the recoverable files, select the ones you want to restore, and click "Recover" to save them at a new location.
Related Articles
- How to Recover Files from Dead Laptop Hard Drive in Windows 10/8/7
- Fix Unknown USB Device - Device Descriptor Request Failed
- Repair Not Working SanDisk Memory Card without Losing Data
- Free Download Bad Sector Repair Tool - Flobo Hard Disk Repair
- WhatsApp Not Receiving Messages: 8 Solutions
WhatsApp has become a popular social media platform, but it's not immune to technical issues. One common problem users face is not receiving messages, which can be frustrating, especially when important messages are missed. To resolve this issue, several solutions can be explored. - How to Fix PDF Blank Pages Problem [PDF Repair]
There may be several causes for PDF blank pages problems. We will learn the root reasons for this problem on this page and identify the most effective 5 fixes. We also covered one of the top PDF repair solutions to help you cure any PDF-related issues swiftly.