Solved: Getting Files Ready for Installation Stuck at 0%, 1%, 10%, 100%
Fix Getting Files Ready for Installation Stuck

To resolve the "getting files ready for installation stuck" error, delete the problematic files and folders. This can be done by following these steps: delete the files and folders that are causing the issue. However, please note that the provided text does not offer a solution, but rather a process to aggravate the problem. A more practical approach would be to seek alternative solutions, such as reinstalling the software or seeking technical support.
Step 1. Restart your device, and the Windows Boot System will appear on the screen.
Step 2. To access the command prompt, select the Advanced options and click on it. This will open a new window where you can enter commands and execute them.
7 Ways to Fix Getting Files Ready for Installation Stuck Error
To address the issue of getting files ready for installation stuck, it's essential to understand that this error often occurs due to corrupted or incomplete installation packages, issues with the Windows Update cache, or problems with the Windows Installer service. To resolve this, try restarting the Windows Installer service, clearing the Windows Update cache, or running the System File Checker (SFC) tool to scan and replace corrupted system files.
| Workable Solutions | Step-by-step Troubleshooting |
|---|---|
| Fix 1. Wait Patiently | Microsoft recommends users wait until the installation completes before...Full steps |
| Fix 2. Disconnect Any Peripherals | Make sure you've disconnected any non-essential hardware and unplug all...Full steps |
| Fix 3. Delete Problematic Files | Restart your device, and the windows boot system will appear on the screen...Full steps |
| Fix 4. Boot into Safe Mode | Hold the Power Button down for five seconds or until the computer shuts down...Full steps |
| Other Fixes to Getting Files Ready | Reset the BIOS > Clean Up Large Files > Go to Microsoft Store...Full steps |
Getting Files Ready for Installation Stuck at 0%, 1%, 10%, 100%...
Many Windows users are experiencing a frustrating issue where the installation process gets stuck at "getting files ready for installation" at various percentages, including 0%, 1%, 10%, or 100%.
Case 1. "I have built a brand new PC and now installing Windows. Yesterday the installation was stuck at 92% of the "Getting files ready for installation" stage. Then I tried it this morning. It got stuck again. This time, it is at 0%. Now every time I try, it's getting stuck at "Getting files ready for installation" stage."
Case 2. "Just built a custom PC that works with Windows 10. Every time I try to install Windows 10, it goes through with the process but stops at 75 - 76% on the "Getting files ready for installation" screen. Please help."
Are you experiencing the frustrating issue of Windows 10 getting stuck at "getting files ready for installation"? If your installation process is stuck at 0%, 1%, 10%, or 100%, don't worry - there are tried-and-true methods to resolve this issue.
Also Read: Windows 10/8/7 Stuck on Startup, Boot, or Loading Screen
Bonus Tips - Back Up Data at the Very Beginning
Make a backup of your important files or data by copying and pasting them to an external hard drive, USB, or cloud drive, or using a backup and recovery tool like Qiling Backup to back up files, system, or the whole disk.
Step 1. To begin the backup process, click the File backup button.

Step 2. The top list view displays both local and network files, allowing you to expand the directory and select the specific files to back up.

Step 3. The guidance on the screen is to choose a place to store the backup, which means selecting a location where you want to save the backup file. This could be an external hard drive, a cloud storage service like Google Drive or Dropbox, or even a network drive if you have access to one.

To set up a secure backup, ensure the backup is encrypted and configure the backup schedule by clicking on "Options" within the "Backup Options" section. This allows for customization of various settings.

You can also choose to start the backup at a certain time in Backup Scheme by clicking Options.

Step 5. You can save the backup file to your computer, Qiling's cloud service, or a network-attached storage device (NAS) for safekeeping.

Step 6. To start a backup, click on "Proceed" which will initiate the backup process. Once the process is complete, the backup will be displayed as a card on the left-hand side of the screen. From there, you can right-click on the backup to access more detailed information and options for handling the job.

Fix 1. Do Nothing but Wait Until the Installation Completes
Microsoft recommends waiting 2-3 hours for installation to complete before taking further action, as your computer may be dealing with background tasks. If the installation doesn't complete within this timeframe, you can try canceling the process.
Fix 2. Disconnect Any Peripherals to Fix the Installation Stuck
Disconnect any non-essential hardware, unplug all hard drives except the C: drive, and remove peripherals like extra monitors and keyboards. If possible, turn off Wi-Fi and plug into a router with a LAN cable, then try running the upgrade again.
Fix 3. Delete Problematic Files to Fix Getting Files Ready Error
To resolve the "getting files ready for installation stuck" error, delete the problematic files and folders by following these steps: 1. Open the Control Panel, 2. Click on the "Programs and Features" icon, 3.
Step 1. Restart your device, and the Windows boot system will appear on the screen. Select "Troubleshoot" > "Advanced Options" > "Command Prompt" in the main menu.
Step 2. In the command box, type "C: cd Windows\System32\LogFiles\Srt" and then type "SrtTrail.txt" and press Enter to continue.
Step 3. If you encounter a Boot critical file c:\windows\system32\drivers\vsock.sys that's corrupt, you can resolve the issue by deleting the file using the del command in the command box. This involves tracking the specific location of the file and then using the command to remove it.

Fix 4. Solve Getting Files Ready for Installation by Entering Safe Mode
Safe mode is a diagnostic mode of a computer operating system (OS) that allows users to troubleshoot and fix most, if not all, problems within the OS. It is designed to boot the system with a minimal set of drivers and services, helping to identify and resolve issues that may be causing problems. This mode can be particularly useful when a system is experiencing difficulties, as it can help isolate the root cause of the problem and provide a safe environment for troubleshooting.
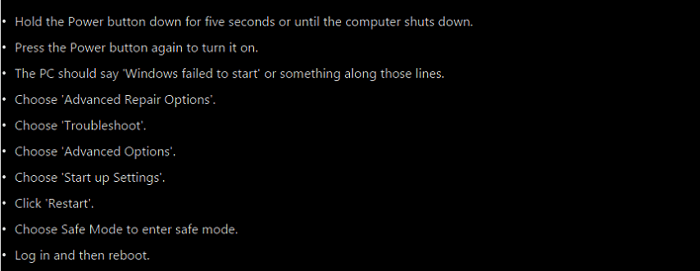
Step 1. To shut down your computer, hold the Power Button down for five seconds or until the computer shuts down.
Step 2. Press the Power button again to turn it on.
Step 3. The Power Down (PD) screen on Windows 10/11 displays a message indicating that Windows failed to start, and it is trying to recover from a boot failure. This screen may appear if Windows encounters an issue during the boot process, such as a corrupted system file, a faulty driver, or a hardware problem.
Step 4. To access the advanced repair options, go to the "Advanced Repair Options" section and select "Troubleshoot", then choose "Advanced Options" and finally select "Start up Settings".
Step 5. Click "Restart" and choose "Safe Mode" to enter safe mode.
Step 6. Log in and then reboot.
Fix 5. Reset the BIOS to Solve Installation Stuck on Windows 10/8/7
If you're still having trouble, try resetting your BIOS. To do this, you'll need to access your BIOS settings, which is usually done by pressing a specific key (like F2, F12, or Del) as your computer boots up. Once in the BIOS, look for a section that says "Save & Exit" or "Exit" and follow the prompts to reset the BIOS to its default settings.
Step 1. To resolve the issue, restart your computer and access the boot settings by pressing the corresponding key (F2, F8, or ESC) as your computer boots up. This will allow you to check and adjust the boot priority to ensure that the operating system is being loaded correctly.
Step 2. If your drive under examination is not set as the primary boot drive, ensure it's marked as the priority boot device instead of Windows Boot Manager, USB HDD, or DVD Rom.
Step 3. Once done, save the changes and exit from BIOS.
Step 4. Reboot the device.
Fix 6. Clean Up Large Files and Junk Files and Do Installation Later
After trying the suggested methods, you may want to clean up junk files and then attempt a clean install of Windows 10. Instead of waiting for Microsoft to clean up, consider using Qiling clean software to wipe your hard drive clean, allowing you to start fresh. This approach can be more efficient than letting Microsoft handle the cleaning process, which can be time-consuming. By putting the upgrading process on hold and using the software to clean up large files, you can ultimately achieve a clean and efficient installation of Windows 10.
Step 1. To begin, download and install Qiling Partition Master Suite for free on your Windows PC, and then launch the program.
To install and launch Qiling CleanGenius, hover your mouse on the "PC Cleaner" option on the suite, click the Download icon to initiate the installation process, and then launch the application once it's installed.
Step 2. To clean up your device using Qiling CleanGenius, simply navigate to the main screen, select the "Cleanup" option, and then click on "Scan" to initiate the scanning process.
Step 3. When the scanning process is finished, select the unnecessary large files and click "Clean" to delete them.
Step 4. After Qiling CleanGenius completes cleaning the files you selected, click "Done" to finalize the cleaning process.
Fix 7. Take Your PC to a Microsoft Store Nearby
If the above methods don't work for you, taking your PC to a Microsoft Store for a professional engineer to install Windows may be the most convenient and effective solution to resolve the issue where files get stuck at 0%, 1%, 10%, or 100% during installation.
Conclusion
If you're encountering issues with getting files ready for installation stuck error, don't worry, these solutions should help. If you're still having trouble, consider doing a fresh installation of Windows 10 or reaching out for further assistance. Additionally, if your C drive is full, you can try increasing the space with a tool like Qiling Partition Master.
Windows 10 Getting Files Ready for Installation Stuck FAQs
Many people are seeking answers to these questions. In addition to the tips provided, further information can be found by reading on.
How long does it take to wait for getting windows ready?
About 2-3 hours
The system may take some time to complete these tasks, so it's best to wait patiently for about 2-3 hours for the system tasks to finish before letting your computer boot properly.
How do you fix Windows Cannot install the required files?
If you're experiencing Error 0x8007025D during a clean install, it's likely due to a corrupt or damaged media, such as a CD, DVD, USB, or ISO. To resolve this, you'll need to download a fresh copy from Microsoft using their media creation tool. This will ensure you have a valid installation media to complete the installation process.
Why is getting windows ready taking so long?
When your computer displays "Getting Windows ready", it may be downloading and installing files or handling background tasks, which can take some time to complete. Simply waiting for the process to finish is usually the first step to take.
What is the error code 0x8007025D?
Error Code: 0x8007025D error occurs when Windows 10 installation is unable to access required files, possibly due to corrupted system files, disk issues, or insufficient disk space. To resolve this, try restarting the installation, checking disk space, and running a system file checker (SFC) or a disk check (chkdsk) to identify and repair any issues. If the problem persists, consider booting in Safe Mode and reinstalling Windows 10. If you're still encountering issues, it might be helpful to seek further assistance from a Microsoft support professional or a computer technician.
What to do if the computer gets stuck installing updates?
How to fix a stuck Windows 10 update:
- 1. Restart your PC.
- 2. Boot into Safe Mode.
- 3. Perform a System Restore.
- 4. Try a Startup Repair.
- 5. Perform a clean Windows installation
Related Articles
- Fix USB Flash Drive Not Working on Windows 10/7
- How to Recover Deleted Emails from Hotmail
- Fixed: Windows 10 Will Not Update with Error Code 0x80240fff
- Windows 10 Creators Green Screen of Death Fix
- 6 Ways to Fix OneDrive Error Code 0x8004de40 in Windows
Are you facing OneDrive Error Code 0x8004de40 in Windows? Are you unable to sync files? Then follow this easy guide to fix the error on Windows PC. - Fix Windows 11 Update Error with Efficient Ways
How to fix Windows 11 updates error? This article will guide you through each one of them, providing a comprehensive solution to resolve the issue.