Fix Hard Drive Won't Power Up/Turn on Without Data Loss
If your external hard drive is not powering up, try to troubleshoot the issue by checking the power cord, cable, and connections. Ensure the drive is properly seated and the power button is functioning. If the issue persists, try using a different power source or cable. If the drive still doesn't power up, it may be a sign of a more serious problem and you may need to seek professional help.
| Workable Solutions | Step-by-step Troubleshooting |
|---|---|
| Fix 1. Change Power Cable | Check the power cable on your computer. Ensure that the external hard drive or internal hard drive is...Full steps |
| Fix 2. Update HDD Drivers | In Windows 10/8.1/8/7, press Windows + R keys to bring up the Run box...Full steps |
| Fix 3. Enable in BIOS | Keep your hard drive or the external hard drive connected to your PC, and restart your computer...Full steps |
| Fix 4. Send for Repair | We suggest you take the hard drive to a local disk repair center for a physical diagnostic...Full steps |
Warning: external hard drive not powering up!
If your computer won't turn on, it could be due to a faulty power supply, a dead hard drive, or a loose connection. Try unplugging the power cord, waiting for 30 seconds, and plugging it back in. If that doesn't work, check the power supply and hard drive for any signs of damage. If the issue persists, it may be worth consulting a professional for further assistance.
- Data loss
- Overheating hard drive
- Hard drive not spinning, light blinking
- Critical system failure
4 methods to fix external hard drive won't power up
To determine the best workarounds for your specific case, you'll need to manually check the symptoms of your hard drive and take action to fix any issues that arise.
Method 1. Change power cable
Step 1: Check the power cable on your computer and ensure that the external hard drive or internal hard drive is securely plugged into your PC.
Step 2: If the computer is not powering on, try switching the power cable or removing the hard drive to another PC to see if it powers up or not. This will help determine if the issue is with the power supply or the hard drive.
Step 3: If the hard drive or external hard drive powers up and shows up on your PC or the new computer, you'll need to swap the old hard drive cable with a new one on your computer.
Method 2. Update hard drive drivers
To update the hard drive drivers, you can start by opening the Device Manager on your computer. From there, you can update the drivers for your hard drive, which may resolve any issues you're experiencing.
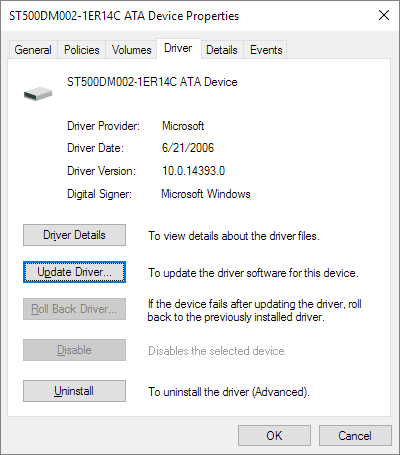
Step 1: In Windows 10/8.1/8/7, press Windows + R keys to bring up the Run box, type devmgmt.msc and hit Enter.
Step 2: In Device Manager, right-click on the hard drive which won't power up and select "Properties".
Step 3: Switch to the "Driver" tab, click on "Update Driver", and proceed with "Search automatically for updated driver software".
If your computer is unable to access your external or internal hard drive, check if it's spinning up. If not, you can try to fix the issue without losing data by following the steps in the second part.
Method 3: Enable hard drive/external hard drive in BIOS
Step 1. Keep your hard drive or the external hard drive connected to your PC, and restart your computer.
Step 2. Hold and long-press F2 to enter BIOS.
If the hard drive is not showing up in the system, check if it's turned off in the system setup. To do this, enter the setup and refer to the system documentation to see if the hard drive is listed as "Off". If it is, turn it on in the system setup.
Step 4. Reboot PC to see if your hard drive powers up and comes back now.
After completing these steps, your hard drive should be able to boot up and appear on your PC again.
Method 4. Send it to repair
Take the hard drive to a local disk repair center for a physical diagnostic and consider manual data recovery service, if available.
How to access data from not powering hard drive
If your hard drive keeps disconnecting or disappearing on your computer, something must be wrong with it. To keep your precious data safe, we recommend cloning the failing hard drive to a new disk or external storage device.
If you've lost access to your hard drive data on your PC, don't worry. Powerful hard drive data recovery software can help you recover your lost data in just three simple steps. With Deep Data Recovery, you can easily find and retrieve your lost hard drive data.
Step 1. Launch Deep Data Recovery in Windows 11/10/8/7, select the file types you want to recover, and click "Next" to initiate the recovery process.

Step 2. Choose the place where you lost data. Then, click "Scan".

Step 3. After scanning, use the file format filter to locate the desired files. You can then click the "Preview" button or double-click a file to view its content.

Step 4. To recover a lost file, click the checkbox next to the file and click "Recover" to get back the lost data to a secure place.
Related Articles
- 4 Ways to Fix Windows System Backup Failed in Preparing the Backup Image
- [3 Solutions] Fix Word Not Opening on Mac
- Fixed: How to Recover Files When Windows 10 Desktop Icons Are Missing
- External Hard Drive Takes Forever to Load
- (Easiest Way) How to Move MySQL Database to Another Server
In this article, you can find methods to move/migrate MySQL database to another server. The easiest way to migrate database from one server to another is Qiling Disk Master - a professional database moving software. And more, we also introduce the backup program of MySQL, getting the details to export/import MySQL database. - How to Move Steam Game to Another Drive 2022
For Steam gamers, moving games to another drive without reinstalling is a convenient solution. There are three ways to achieve this: moving a single game, moving multiple games, or using a more advanced method to relocate all games to a new drive.