Create Bootable USB Without Any Software Using CMD
A bootable USB drive contains all the necessary system booting information and files, allowing it to boot and start a computer's operating system even when it's dead due to corrupted system files, hardware issues, or other unpredictable reasons. While there are many professional tools available to create a bootable media, understanding how to use the Dikspart command can still be useful in achieving the same goal.
PAGE CONTENT:
Guide: use cmd to format and create a bootable USB drive
Notice:
Before making your USB drive bootable, please note that the process will completely erase all data on the target drive. To avoid losing important files, make sure to back up any essential data beforehand.
To format a hard drive quickly with third-party free hard drive formatting software, you can use DBAN (Darling Worm Attack Network Boot) or KillDisk, which are both free and can be downloaded from the internet. These software tools can quickly and securely wipe a hard drive, making it ready for reuse or repurposing. They are often used in situations where a hard drive needs to be completely erased, such as in a business or IT setting, to ensure that sensitive data is properly deleted and the drive is formatted for reuse.
Step 1. Format the USB drive
1. To open the Command Prompt in Windows, press the 'Windows + R' keys to open the Run Dialog box, type 'cmd' and press Enter.
Or, just navigate to Start - All Programs - Accessories; right-click on the Command Prompt and select Run as Administrator.
2. In Command Prompt, type Diskpart and press Enter.
3. The disk list will display all connected drives, including the prepared USB hard drive, with details such as disk number, size, and more.
4. To select your USB hard drive, type `select disk #` in the command prompt, where `#` represents the number of your USB drive. For example, if your USB drive is disk 1, you would type `select disk 1`.
5. Type the following commands one by one, and press Enter after each command. This will allow you to execute each command individually and see the output or results before moving on to the next one.
- clean
- create partition primary
- select partition 1
- active
- Formatting a drive means erasing all data on it and preparing it for use. When you format a drive with the file system NTFS, it means you're using the NTFS file system to organize and store files on that drive.
- assign
- exit
Step 2. Copy files from a DVD to the USB drive
1. To create a bootable USB drive, insert a DVD from which you want to copy the data into the DVD drive, let's assume the DVD drive letter is E:.
2. To open Command Prompt, type the following commands one by one and press Enter after each command:
- E:
- cd boot
- bootsect /nt60 g: (G: is your USB drive)
- copy e:\*.* /s/e/f g:
To copy the content of an OS from an ISO image to a USB drive manually, you can use the dd command in Linux or the Disk Management utility in Windows. The dd command is used to copy and convert data from one format to another.
To create a bootable USB drive without any software, go to the 'My Computer' window, right-click on the DVD drive where you put the ISO image, select Open to view the contents, then copy all the files and folders on the DVD to the USB drive. This will successfully create a bootable USB drive.
Conclusion: think about a bit more
To simplify the process for those who are not familiar with CMD, you can use a third-party software like Rufus or PowerISO to create a bootable USB drive. These tools provide a user-friendly interface and guide you through the process, making it easier to avoid mistakes and create a bootable USB drive without requiring advanced CMD skills.
Qiling Windows backup software saves users from trouble by allowing them to create customized bootable USB hard drives and removable hard disks, benefiting both average and experienced users.
Unique benefits
- You can skip the hassle of formatting the USB hard drive and copying Windows installation, and instead use a tool like Rufus to create a bootable USB drive with Windows. This process is much faster and more efficient, allowing you to get up and running with Windows on your new device in no time.
- Install personalized Windows OS that you're currently running to the USB drive.
- Boot Windows OS from the drive on any computer.
Step 1. Launch Qiling Backup. Click "System Clone" in the Tools page.

Step 2. On the "System clone" window, the software will choose the system partition and boot partition by default.
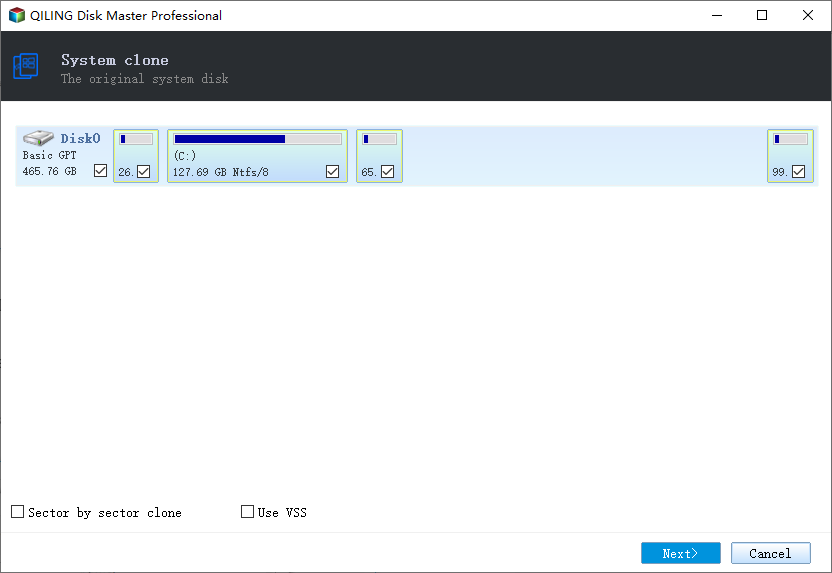
Just Choose the USB drive as the destination disk.

The software will start immediately cloning the default partitions of your desktop/laptop to the USB drive. After the cloning process is over, you can safely plug the USB drive out.

Step 3. To boot the cloned system from the USB drive on other Windows devices, simply connect the drive to the device, wait for the computer to configure system settings, and you'll arrive at the desktop screen that's identical to the cloned system.
To log in to the cloned system, simply enter the username and password that were used to create the image. The cloned system is an exact replica of the original system, so the username and password used to create the image are the same as those used to log in to the original system. By entering the correct username and password, you should be able to successfully log in to the cloned system.
Related Articles
- How to Copy HP Recovery Partition to New Hard Drive
- [Fixed] The drive is not a valid backup location
- Automatically Copy Files from One Folder to Another
- How to Disable Windows 10 Update in Every Way
- How to Clone SSD to Larger SSD in Windows 10/8/7
- Full Guide to Move Games to Another Drive or A New Computer Without Reinstallation
Can you transfer games from one drive to another drive? Do you know how to move games from C drive to D drive or transfer games to a new computer without reinstallation? This page covers complete solutions that you can follow to transfer games to another drive or a new computer in Windows 10/11 successfully.