How to Fix Windows 10 Start Menu Critical Error
If you're experiencing a critical error with the Windows 10 Start menu that causes it to crash, blocks access to installed apps and Settings, or freezes your computer, don't worry! This page can help you resolve the issue and regain access to your Start menu.
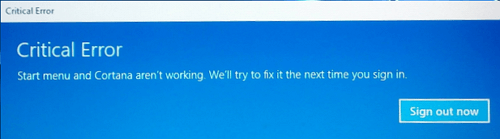
The received error message should be like this:
"The Windows Update error message says that the Start menu and Cortana aren't working. It will be fixed the next time you sign in."

The Windows Update error message "Critical Error – Your Start menu isn't working. We'll try to fix it the next time you sign in" indicates that there is a problem with the Start menu functionality, which is a critical component of the Windows operating system. This error message usually appears when Windows Update is unable to resolve the issue automatically, and it will attempt to fix the problem the next time you sign in to your computer.
How to Fix Windows 10 Start Menu Critical Issue
When you encounter the Windows 10 Start button not working issue due to a critical error message, try refreshing your computer once or twice, or simply turn it off and restart. This is the safest and quickest way to determine the severity of the problem.
While some people may be able to easily resolve the critical error affecting the Start menu and Cortana, many others may not be so lucky. In such cases, a general troubleshooting approach can be helpful to move forward.
Fix 1. Install the Recent Windows 10 Update
To get to the place where the update is available, you can click on the Start button, then click on the "Settings" option, and then click on the "Update & Security" option. From there, you can click on the "Windows Update" option to check for any available updates.
Step 1. To open the Settings app on your Windows computer, press the Windows key + R keys together to bring up the Run box, type "ms-settings:" in the empty box, and press enter. This will directly open the Settings app.

Step 2. To update Windows 10, go to the Settings panel, click on Update & security, and then select Check for updates. If you're running version 1511, navigate to System, then About, and finally Version. Follow the wizard to install the latest available update.
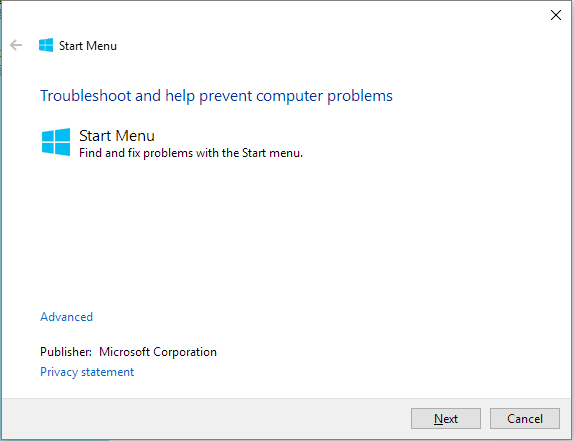
Fix 2. Download the Start Menu Troubleshooter
Microsoft has developed a troubleshooter to help with Start menu issues, which can be downloaded and run to temporarily fix problems.
Start Menu Troubleshooter Download
Fix 3. Boot Into Safe Mode and Then Return to Normal Mode
Booting into safe mode and then returning to normal mode seems to be a temporary fix for the critical error, as some users have reported that the error returns after a while, but it's still worth trying.
Step 1. When Windows 10 starts, press the Windows Key + L to log out.
Step 2. Click the "Power" button in the bottom right corner, hold the "Shift" key on your keyboard and click "Restart".
Step 3. Your computer will restart to boot options. From there, go to Troubleshoot, then Advanced options, and finally Startup Settings. Click the Restart button.
Step 4. Once your computer restarts, press F5 to access "Safe Mode" with Networking.
Step 5. Just by entering the Safe Mode your problem should be resolved. All you have to do now is to restart your computer.
In addition to the usual troubleshooting methods for the Start menu, it's worth noting that third-party antivirus software may be causing the issue. Try uninstalling and then reinstalling the antivirus software to see if it resolves the problem.
Furthermore, there are some other suggestions from experienced users who solved their problem. The upcoming parts are somewhat higher-leveled, so you must show some patience and follow the detailed guide in earnest.
Fix 4. Restore System to an Earlier State Point
If none of the previous solutions work, you can try restoring your computer to a previous version when the Start menu was working properly. This will essentially revert your computer back to a point in time when the Start menu was functioning correctly, effectively bypassing the critical error. This method can be a bit more involved, but it may be the most effective solution if the other methods fail.
- Tip
- Since reverting your current operating system to an earlier state would erase data on the system drive, it's highly advised to create a backup of C drive data, especially installed applications. You can use Qiling Disk Master to quickly transfer applications on the C drive to a second drive, making it the safest way to do a system restore with a backup at hand.
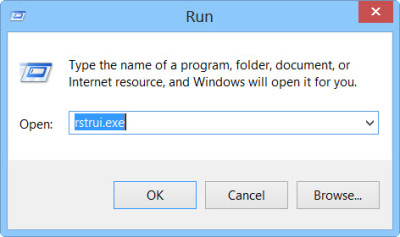
Step 1. To open System Restore, press the Windows key + R to open the Run box, type rstrui.exe, and then press Enter. This will open System Restore.
Step 2. The System Restore window will open. Click on Next.
Step 3. Select a Restore Point which you want to restore your computer to, and click Next.
Step 4. You should follow the wizard to confirm all your selections to take effect.
Related Articles
- How to Recover Unsaved/Lost/Corrupted Adobe Acrobat Files on Windows PC
- [Fixed] Office 365/2016/2013 Won't Open with 'Stopped Working' Error in Windows 10
- Solution for Windows 10 Reset Stuck Issue
- How to Fix Desktop Refers to A Location That Is Unavailable Error
- Upgrade Hard Drive or SSD on ASUS Eee PC 901/900/701
Learn how to do hard drive or SSD upgrade for ASUS Eee PC 901/900/701 laptop without losing personal data as well as reinstalling operating system via Qiling Disk Master. - Automatic Incremental Backup to External Hard Drive with Freeware
You can do automatic or scheduled incremental backup to external hard drive in Windows 7/8/10 with free backup software, Qiling Disk Master Standard.