Install Windows 10 on a New PC Without an OS
A PC with no operating system needs bootable Windows installation media and a compatible storage device. The installer, not backup software, performs the Windows installation.
Before creating media
- Check that the hardware supports Windows 10 and has storage detected in UEFI/BIOS. Record the needed edition and license details.
- On a working PC, use Microsoft's Windows 10 media creation instructions and a blank USB drive of at least the required capacity. Its contents will be erased.
- If the new PC has multiple drives, identify the intended Windows target by model and capacity. Disconnect unrelated disks during setup where practical.
Install Windows
- Insert the installation USB into the new PC, power on, and open the firmware boot menu. Choose the USB entry matching UEFI mode.
- Choose language and keyboard options, then Install now. Enter a valid key if required or follow the licensing prompt for your situation.
- Select Custom: Install Windows only. Identify the correct target disk. On a truly blank disk, choose unallocated space and let Setup create required partitions.
- If the target contains data, stop before deleting or formatting anything. Back it up first. Continue setup and allow normal restarts.
- After the first successful boot, complete account setup, check Device Manager, install drivers and updates, and verify activation.
Common installation blockers
If the drive is missing, check its cable, storage controller, and firmware settings. Do not switch RAID/AHCI or boot mode at random. If setup reports MBR/GPT conflict, match the boot mode to the disk layout or prepare a backed-up conversion plan.
Support status
Windows 10 support has ended, so consider a supported Windows version if this new PC meets its requirements. Installing Windows 10 may still be necessary for a particular legacy workload.
Optional: Move an Existing Windows System with Qiling System Clone
If you already have a working Windows PC and want to move its installation to a compatible new PC, system cloning is an alternative to a clean installation. It does not create a new Windows license or turn a blank PC into an installer. Check hardware compatibility, back up important files, and connect the new target drive to the working PC before starting. The target drive will be overwritten.
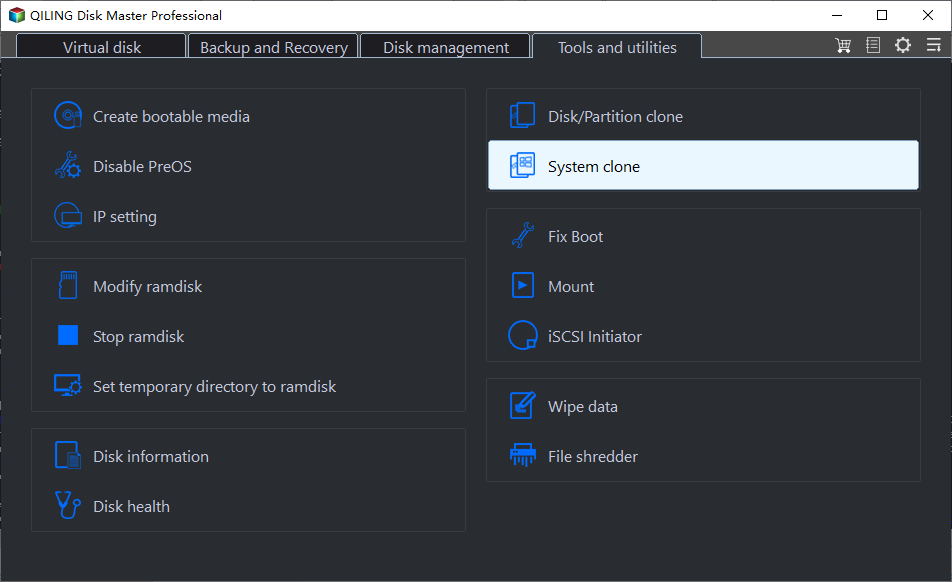
- Step 1. Open Qiling Disk Master on the working PC. Under Tools and utilities, choose System clone.
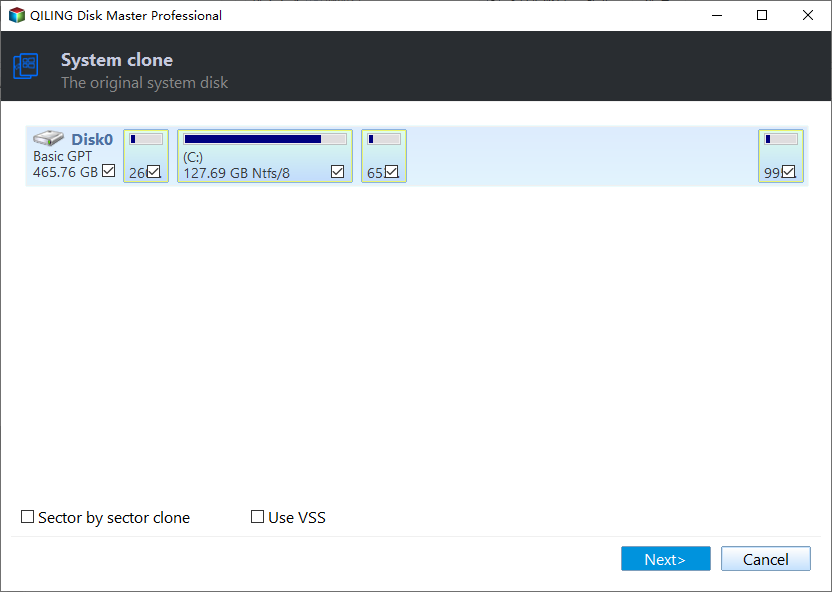
- Step 2. Check the selected source system disk and its boot partitions. Do not select the new blank drive as the source. Click Next.
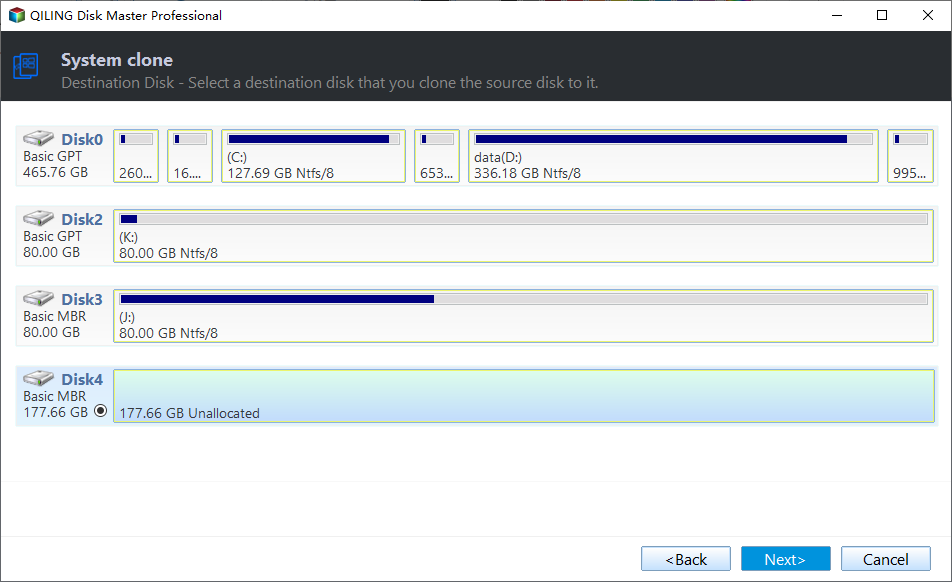
- Step 3. Identify the destination by its model and capacity, select that drive, and click Next. Confirm that nothing on it needs to be kept.
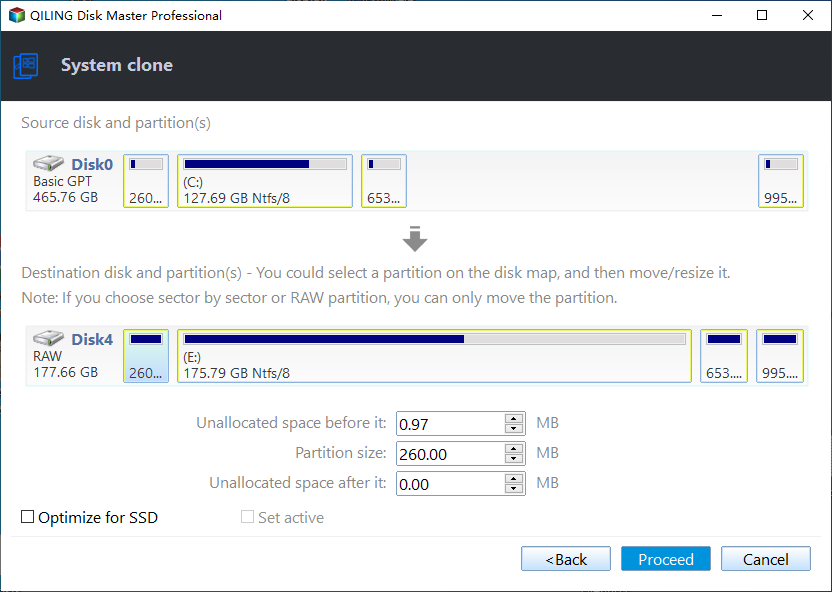
- Step 4. Review the source-to-destination layout. If the destination is an SSD, select Optimize for SSD. Click Proceed, confirm the data-loss warning for the destination, and wait for the clone to finish.
- Step 5. Install the cloned drive in the new PC and choose it as the boot drive in UEFI/BIOS. Check booting, drivers, and Windows activation. If the hardware change prevents a reliable boot, use the clean-install route above instead.
Frequently Asked Questions
Can Qiling replace Windows Setup? No. Use Microsoft's installation media to install Windows on a blank PC.
Should I format a new disk in advance? Not usually. Windows Setup can create the required partitions on unallocated space.
Conclusion
Install Windows from official media on the intended disk, then complete drivers and activation. Avoid formatting any other attached drive.
For installing and activating Windows 10 on a new disk, read How to Install Genuine Windows 10 on a New Hard Disk.
Related Articles
- Windows System Backup and Restore Tutorials
Explore system image, recovery, and restore guides for Windows. - Windows Disk Backup and Restore Tutorials
Find disk image backup and recovery workflows for Windows drives. - Windows File Backup and Restore Tutorials
Compare practical ways to protect and restore personal files. - Install Windows 10 on a New Hard Drive from USB
Prepare Windows installation media, protect files, install Windows 10 on a new drive, and restore data while accounting for Windows 10 support status.
Products
Articles & Tutorials
- Data Recovery
- Data Backup
- File Recovery
- File Backup
- System Backup and Restore
- Disk and Partition Clone
- Technical articles
- Mobile articles
- Disk Master Help
- Windows Data Recovery Tutorials
- Windows Secure Delete Tutorials
- Windows Partition Management Tutorials
- Windows File Backup and Restore Tutorials
- Windows System Backup and Restore Tutorials
- Windows Disk Backup and Restore Tutorials
- Windows Clone Tutorials