How to Install Windows 11/10 on GPT Partition in 2021
Quick Guide to Install Windows 11/10 on GPT:
1. Connect a Windows 10 USB to your PC and boot the PC from the USB.
2. Boot the system into the BIOS by pressing the designated key, such as F2 or the Delete key, to access the system's basic input/output settings.
3. Locate the Boot Options Menu.
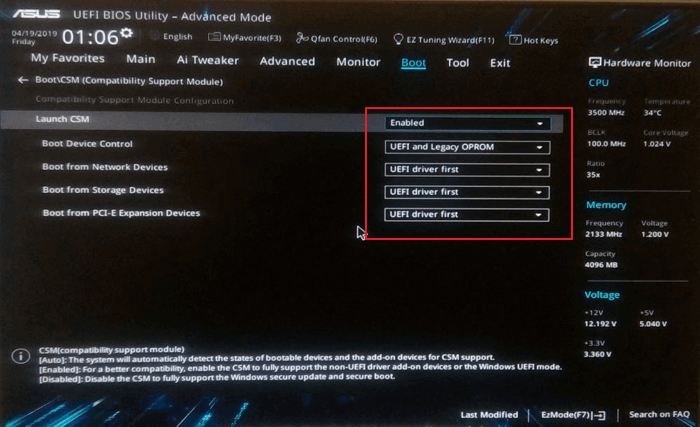
4. Set Launch CSM to Enabled.
5. Set Boot Device Control to UEFI Only.
6. Set Boot from Storage Devices to UEFI driver first.
7. Save your changes and restart the system.
8. Reboot the system and install Windows 10 on GPT.
If you're looking to install Windows 10 on a GPT disk efficiently, follow the tutorials provided to avoid any issues. The process involves quick navigation and attention to detail, but with the right guidance, you can successfully install Windows 10 on a GPT partition on your own.
| Workable Solutions | Step-by-step Troubleshooting |
|---|---|
| Part 1. Prepare GPT Disk for Windows Installation | Confirm computer supports UEFI boot mode > Prepare GPT disk ready for Windows 11 installation...Full steps |
| Part 2. Install Windows 10/11 on GPT Disk |
Step 1. Connect Windows installation USB to PC and reboot it into BIOS; Step 2. Set PC boot from USB and install Windows 10 on GPT...Full steps |
| Part 3. Protect GPT Partition Data | Create a regular backup of vital data > Execute operation carefully > Clean up virus...Full steps |
Can I Install Windows 10 on GPT Partition?
Don't worry if you are having the following problems while trying to install Windows 10 on a GPT disk:
Case 1 - The error "Windows cannot be installed on this disk. The selected disk is of the GPT partition style" occurs when trying to install Windows 10 on a GPT partition, which is a type of disk that uses a GUID partition table (GPT) instead of the traditional Master Boot Record (MBR) partition style. This issue can be resolved by converting the GPT partition to an MBR partition, or by using a tool like Qiling Partition Master to modify the partition style.
Case 2- You're trying to do a clean install of Windows 10 on a GPT partitioned disk, but getting an error message saying the disk is of the GPT partition style. To resolve this, you can try creating a new partition on the disk using a tool like Disk Management or a third-party partition manager, and then try installing Windows 10 on that new partition. Alternatively, you can also try booting from a USB drive and using the built-in Windows 10 installation media to install the OS. Make sure to select the correct disk and partition when prompted during the installation process. If you're still having trouble, you can also try checking the disk for any errors or issues using the built-in Check Disk utility.
The error occurs because your PC is booted in UEFI mode, but your hard drive is not configured for UEFI mode. To resolve this, you can follow the process to install Windows 10 on a GPT disk without losing any data, and avoid the "Windows cannot be installed" error message.
Let's get started to install Windows 10 on your computer now.
Part 1. Prepare GPT Disk for Windows Installation
Applies to: Prepare GPT disk for Windows 10 installation.
To get a successful Windows 10 installation process, you need to have a valid license key and a compatible computer with a 64-bit processor and at least 4GB of RAM, and a 64-bit UEFI firmware.
- #1. Confirm Computer Supports UEFI Boot Mode
- #2. Prepare GPT Ready - Back Up Data and Convert to GPT
#1. Confirm Computer Supports UEFI Boot Mode
If your computer's motherboard only supports BIOS, you won't be able to install Windows 10 on a GPT partition because BIOS only supports MBR partitions.
To confirm if your computer supports UEFI boot mode, you can check the computer's BIOS settings or look for a UEFI firmware update. If your computer does support UEFI boot mode, you can then proceed to install Windows 11 in UEFI mode.
- To access the firmware or boot menu, start by booting the PC and then press the designated key (which may be Esc, F2, F8, F12, Del, or another key) to enter the desired menu.
- On the boot menu, check if the computer supports UEFI boot mode. This can be done by looking for an option to boot in UEFI mode, or by checking the computer's documentation to see if it supports UEFI. If the computer does support UEFI boot mode, it will typically be listed as an option in the boot menu, and may be labeled as "UEFI" or "Secure Boot".
If your computer's motherboard only supports Legacy BIOS boot mode, you won't be able to install Windows 10 on a GPT disk, which requires UEFI boot mode, and therefore you'll have to stop the installation process.
If you see the UEFI boot option in BIOS, exit BIOS and then proceed with the next steps.
Also read: Fix UEFI Boot Errors in Windows 10/8/7
#2. Prepare GPT Disk for Windows 10 Installation
Before installing Windows 10 to a GPT partition, it's essential to make the target disk ready. To do this, follow these tips: ensure the target disk is a GPT partition, and format the disk if necessary. Additionally, you may need to enable the UEFI firmware on your computer, and if you're using a USB drive to install Windows 10, make sure it's formatted in FAT32.
- # For a New Disk - Initialize Disk to GPT
- # For an Old Disk - Convert Disk to GPT, Backup Data, Wipe Everything
To set a disk ready, follow the specific steps for your device. Since the process varies, it's best to consult the instructions tailored to your needs, ensuring you configure your disk correctly.
# For a New Disk - Initialize to GPT
1. Install the new disk to your computer. You may refer to the guide "How to Install a New HDD/SSD" for assistance.
2. Configure and initialize your disk to GPT
If you're an experienced user, you can directly open Disk Management and initialize the disk to GPT.
If you have 0 experience in disk management, we suggest you download reliable partition manager software - Qiling Partition Master and follow the steps here to initialize your new disk to GPT:
Step 1. Open Qiling Partition Master. Connect the hard drive or SSD to PC.
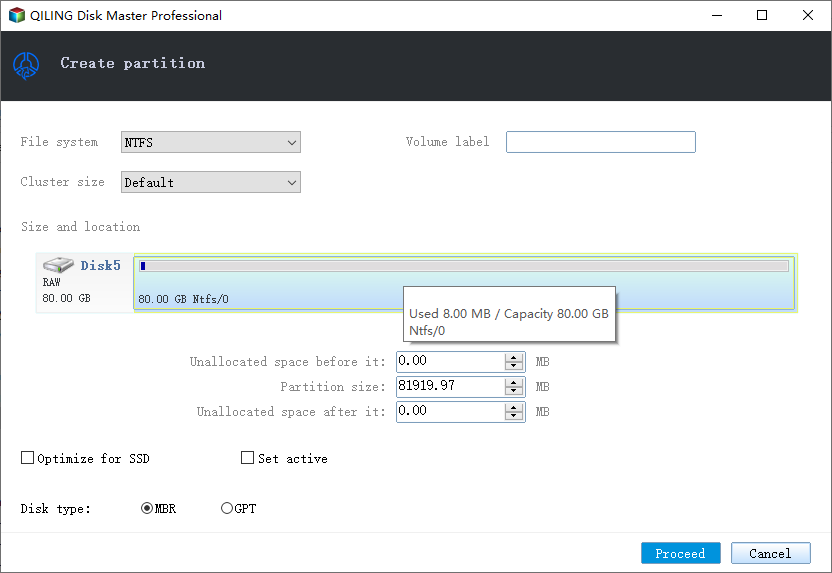
Step 2. Select the target HDD or SSD in the "Disk management" page and click "Create" or "Initialize to GPT" accordingly.
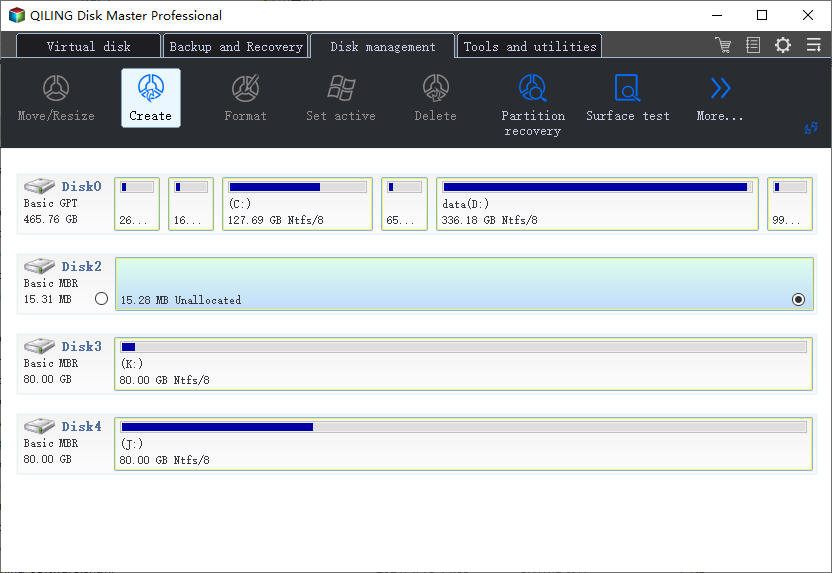
Step 3. Tick "MBR" or "GPT" for disk type accordingly. Click "Proceed".
# For an Old Disk - Convert Disk to GPT, Backup Data
1. Convert Disk to GPT
If your disk uses the MBR partition style, you'll need to convert it to GPT, which can be done using Qiling Partition Master without losing any data.
Step 1. Download and launch Qiling Partition Master on your Windows computer.
Step 2. Select the MBR disk that you want to convert.
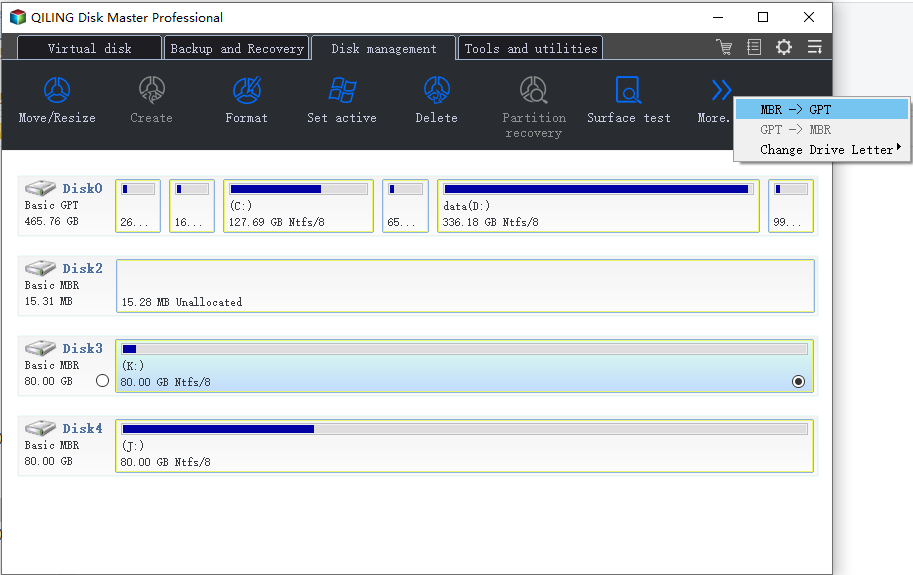
Step 3. Click "More..." and select "MBR -> GPT" to convert partition.
2. Backup Vital Data
If you have important data on the old drive, back it up to another disk or an external hard drive before attempting to clone the drive. This will ensure that you have a copy of your data in case the cloning process fails or the old drive becomes unusable.
3. Format GPT Partition
Format the target GPT partition (with at least 20GB capacity) in advance to install Windows 10 on it.
If you don't format the GPT partition, all files on the partition will be reserved, taking up huge space on your system's C drive, which is not a smart choice.
After completing the steps, you can proceed to Part 2 on this page and install Windows 10 on the GPT disk.
Part 2. How to Install Windows 11/10 on GPT Partition
To install Windows 10 on a GPT disk partition, you will need to create a bootable USB drive or CD with the Windows 10 installation media, and then follow the installation prompts to select the GPT disk as the target drive. This may involve selecting the correct disk in the installation menu, and possibly disabling Secure Boot if it's enabled on your system.
If you already have Windows 7 or 8.1 installed, you can directly upgrade to Windows 10, making the process easier.
To install Windows 10 on a GPT partition, you'll need to create a bootable USB drive with the Windows 10 installation media, and then boot from it. You can use the Media Creation Tool to create the installation media. Once booted, you'll need to select the GPT partition as the installation target, and then follow the installation prompts to complete the installation.
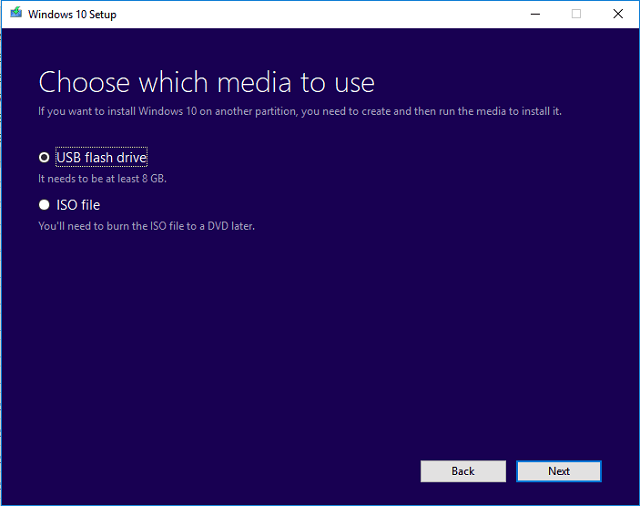
Step 1. Create a Windows 10 installation media on an empty USB (min 8GB).
Tip
You need to prepare:
(1). An empty USB (8GB min)
(2). Download Windows 10 ISO file
Before starting the steps, get a Windows product key as you will need to activate it after the installation.
Step 2. Connect the Windows 10 installation USB to your PC and boot the system into BIOS.
To access the BIOS boot menu, simply restart your PC and press the designated key (usually Esc, F2, F8, F12, Del, or another key) as the computer boots up. This will allow you to enter the BIOS settings and configure various options, including the boot order.
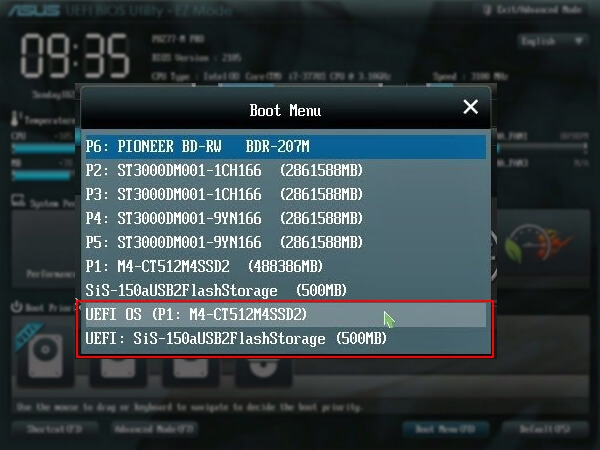
Step 3. Locate the boot options menu and enable the UEFI mode.
- Set Launch CSM to Enabled, if it's currently set to Disabled. This will allow the Launch CSM feature to work properly in the next step. If it's already set to Enabled, you can proceed to the next step.
- Set Boot Device Control to UEFI Only
- Set Boot from Storage Devices to UEFI driver first
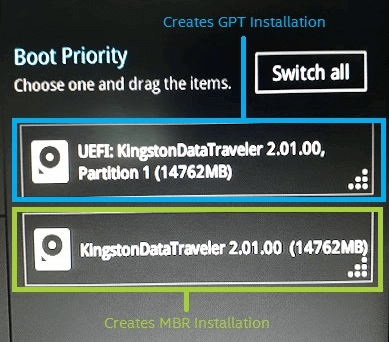
Step 4. Set the USB UEFI OS Boot option is at the top of the Boot Priority List.
Step 5. Save your changes and restart the system to start installing Windows 10 on the GPT disk.
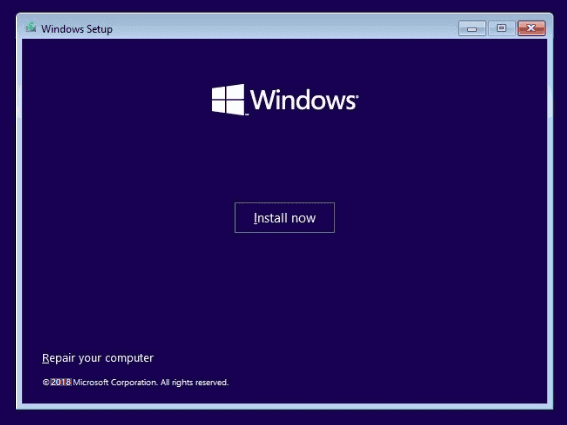
1. Choose which media to use - USB flash drive.
2. Click "Install Now", then set the language and other preferences.
3. Skip entering a product key and select "Install Windows only".
To install Windows 10, select the GPT partition and proceed with the installation process. Wait for the installation to complete, which will take some time.
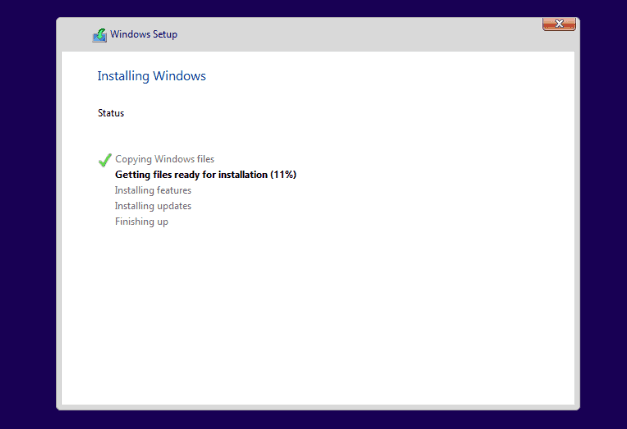
4. The computer may restart several times during the process, and installation may take around half an hour or more, so be patient.
Step 6. When you complete the installation, reboot the PC and enter BIOS.
To set the computer to boot from the new GPT disk with Windows 10, save the changes and restart the PC.
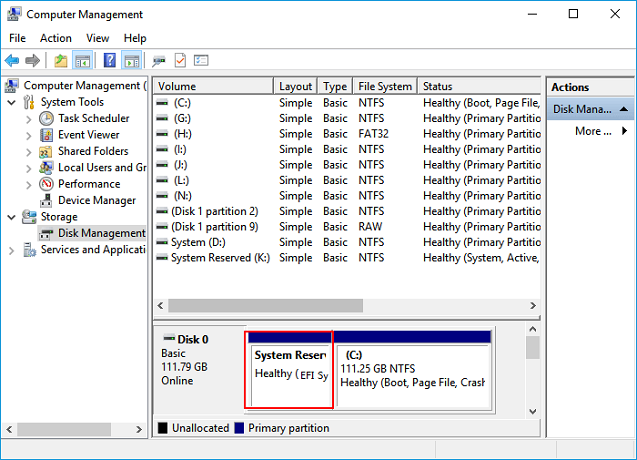
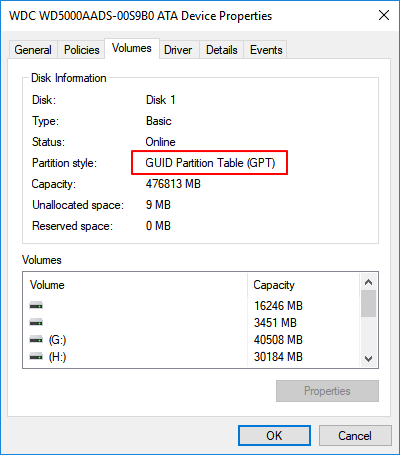
Step 7. Confirm that Windows 10 is installed on a GPT partition.
After Windows 10 boots up, you can check if it's installed on your GPT disk partition by following the tips provided.
- Boot into Windows > Open "Disk Management".
- You see three partitions including the EFI System Partition.
- Right-Here you can confirm the partition style by clicking the disk, selecting "Properties" and then "Volumes".
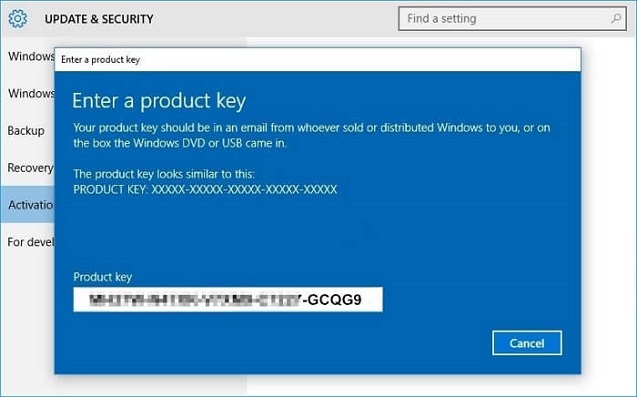
Step 8. Activate Windows 10 with Product Key
After installing Windows, you'll be prompted to activate it with your product key.
To access the full features of Windows 10 on your PC, go to Settings, then click on Update & Security, followed by Activation, and finally enter a product key.
After installing Windows 10, you can enjoy all its full features on your computer, making your life and work easy and enjoyable.
Part 3. How to Protect Your GPT Partition Data (Extra Tips)
Here are some tips to protect your data on a GPT partition:
- Create a regular backup of vital data
- Delete files, format drive partitions, wipe disks with awareness
- Run antivirus software to clean up virus, malware regularly
1. Create a regular backup of vital data
Regularly backing up your vital data on a GPT disk partition is crucial if you frequently make changes to your disk data.
To ease your burden, you can try free backup software, such as Qiling Backup Free, to create a full backup of your data every day by setting up an automatic backup plan.
Refer to: Schedule Backup Software for Automatic Backup
2. Delete files, format drive partitions, wipe a disk with awareness
Be cautious when performing operations that could delete data and files on your computer, ensuring you don't mistakenly delete important files, format the wrong storage device, or wipe the wrong hard drive or partition.
3. Run antivirus software to clean up virus, malware regularly
To prevent unexpected data loss issues on your storage devices, such as GPT disk partitions, it's essential to install reliable antivirus software and regularly scan and clean your computer and devices to detect and remove viruses or malware.
Conclusion
To install Windows 10 on a GPT disk partition, follow these steps: create a bootable USB drive with the Windows 10 installation media, enter the BIOS settings and set the USB drive as the first boot device, save the changes and exit the BIOS settings, boot from the USB drive, select the language and other preferences, and then select the "Next" button to proceed with the installation. Next, select the correct disk partition to install Windows 10 on, and then select the "Next" button to begin the installation process. Finally, follow the on-screen instructions to complete the installation.
#1. Prepare GPT Disk
To download Windows 10 ISO and create Windows installation media to a USB, follow these steps: You can download the Windows 10 ISO from Microsoft's official website. Once downloaded, you can use the Media Creation Tool to create a bootable USB drive. This tool will guide you through the process of creating the installation media, which can be used to install Windows 10 on a new device or upgrade an existing one.
To configure your PC to boot in UEFI mode and boot from a USB drive, follow these steps: First, enter your PC's BIOS settings by pressing the designated key (usually F2, F12, or Del) as soon as you turn it on. Navigate to the Boot Mode or Secure Boot section and select UEFI as the boot mode. Save the changes and exit the BIOS settings.
To start installing Windows 10 on a GPT disk partition, first ensure the UEFI firmware is set to boot from the correct drive. Then, restart the computer and enter the BIOS settings to configure the UEFI firmware to boot from the GPT disk partition. Once configured, save the changes and restart the computer again.
To resolve the issue, reboot the PC and set Windows to boot from the new GPT partition. This involves entering the BIOS settings, selecting the new GPT partition as the boot device, and saving the changes. Once the PC boots from the new partition, Windows should recognize and utilize the new GPT partition, resolving the issue.
#6. Activate Windows 10
If you encounter the "The selected disk is the GPT partition style" error during the Windows 10 installation process, you can refer to Part 1 to convert the disk to GPT using reliable partition manager software, and then proceed with the installation.
To avoid data loss, it's crucial to create regular backups of your GPT partition data.
People Also Ask
If you have more questions about Windows installation, check out the questions and answers listed below.
1. Can you install Windows 10 on GPT?
You can install Windows 10 directly on a GPT disk as long as your computer's motherboard and bootloader support UEFI boot mode.
If you're trying to install Windows 10 but the setup program says the disk is in GPT format and can't be installed on, it's likely because UEFI is disabled. To fix this, you need to enter the BIOS settings during startup, find the option to enable UEFI, and save the changes. This will allow you to install Windows 10 on the disk.
Then you can continue installing Windows 10 on the GPT disk.
2. Should I install Windows 11/10 on MBR or GPT?
To use MBR to GPT to install Windows 10, your disk capacity and motherboard compatibility are crucial factors. The process involves converting the Master Boot Record (MBR) to a GUID Partition Table (GPT) on your hard drive, which is necessary for installing Windows 10.
- 2TB or smaller disks can be used as a Master Boot Record (MBR) to install Windows 10.
- To install Windows 10 on a disk larger than 2TB, you can use the disk as a GPT (GUID Partition Table) drive. This allows you to take advantage of the larger storage capacity and install Windows 10 on it.
- If the BIOS only supports Legacy boot mode, you can install Windows 10 on a Master Boot Record (MBR) partition. This means the computer will only be able to boot in Legacy mode, and not in UEFI mode.
- If your BIOS supports UEFI boot mode and your disk is larger than 2TB, you should install Windows 10 in GPT (GUID Partition Table) mode.
Also read: MBR VS GPT
3. How many partitions are created when you install Windows 10 on a GPTdisk?
- On a brand new GPT Windows will automatically generate two partitions on your disk - a boot partition and a system C drive partition.
- On a used GPT disk, Windows will be installed on a selected partition, without generating any additional partitions.
GPT disk allows for up to 128 partitions to be created, enabling manual management and creation of additional partitions beyond the default setup.
Related Articles
- How to Convert GPT to MBR (Without Data Loss) with 3 GPT to MBR Converter
- How to Merge Non-adjacent Partitions in Windows 11/10
- Fixes for 'File Is Too Large for Destination File System' on USB/External Hard Drive
- How to Clone HDD to 250GB/500GB SSD Without Reinstalling
- Best Partition Recovery Software for Windows 11 ( Reliable and Easy)
- How to Ghost a Hard Drive in 3 Steps
- The Best Free Backup Software That Only Copies Changes
Try to find a backup software that only copies changes? Qiling Disk Master, the best free backup software, will help you achieve this goal easily.