Windows 7 Guide: Create Schedule Backup on Windows 7
The Benefits of Creating Schedule Backup on Windows 7
Microsoft has stopped supporting Windows 7, making schedule backup crucial to protect your data from potential crashes or accidental deletions.
Creating a scheduled backup is a quick and easy process that takes just a few minutes. You can choose to back up your entire computer or select specific files and folders to save. This also allows you to schedule backups to run automatically, eliminating the need to remember to do it manually.
To create a schedule backup on Windows 7, you can use either the built-in Backup and Restore tool or a third-party backup program. These options allow you to automate the backup process, ensuring that your important files and data are safely stored and can be easily restored in case of a system failure or other issues.
Method 1. Create Schedule Backup on Windows 7 - Backup and Restore
Backup and Restore is a built-in Windows tool that was first introduced in Windows 7 and Windows Vista, replacing the predecessor NTBackup. It offers a more user-friendly interface and additional features compared to NTBackup, which was a command-line tool. Despite the introduction of File History in Windows 8, Backup and Restore remained a part of later Windows versions.
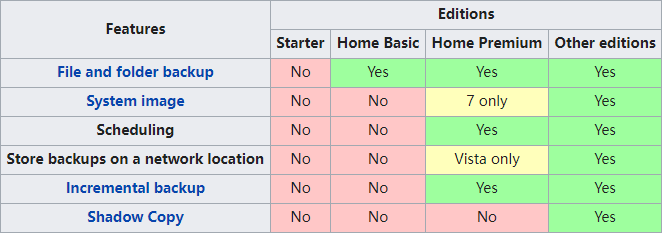
Windows 7 Backup and Restore protects two types of backup: files and folders, system. It also allows users to schedule backups and create incremental backups, although not all versions of Windows 7 support scheduled backups.
*information source: Wikipedia Backup and Restore
To create a scheduled backup on Windows 7, first ensure that your edition supports this feature. Then, open Backup and Restore, select the drive you want to back up, and choose the backup type and location. Set a schedule for the backup by selecting the frequency and time of day.
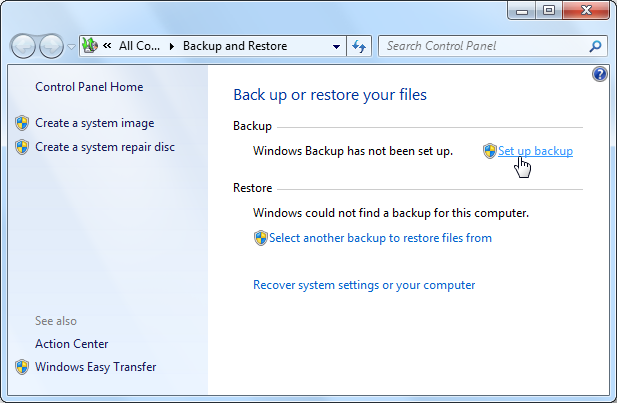
Step 1. To backup your data, open Backup and Restore from the Control Panel or right-click on any of your drives and select "Back up now".
Step 2. To set up a backup plan, such as backing up files and folders, start by selecting the option to create a system image on the left panel if you're backing up a Windows 7 system. This will ensure that your system is fully backed up.
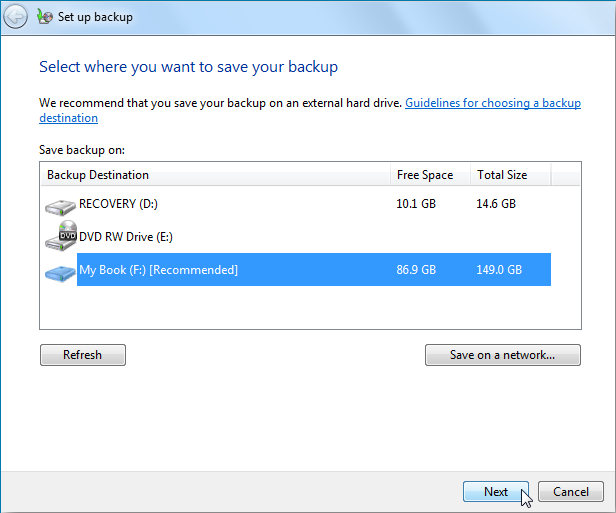
Step 3. To save your backup, decide on a location, preferably an external hard drive, and connect it. Then, follow the on-screen wizard to complete the process.
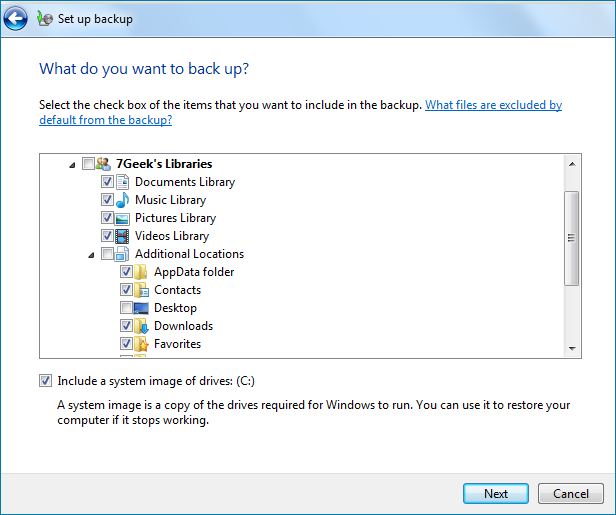
Step 4. Choose what to back up by clicking on the "Let me choose" option, which will take you to a window where you can select the specific files and folders you want to include in the backup. This allows you to customize the backup content beyond the default options provided by Windows.
Step 5. The backup settings should include the location, frequency, and type of backup, as well as any specific files or folders that need to be included or excluded from the backup. This will ensure that the backup is comprehensive and accurate, and that it meets the user's needs and requirements.
Step 6. Set the backup schedule by deciding how often to create a backup, specifying the day and time to start the backup.
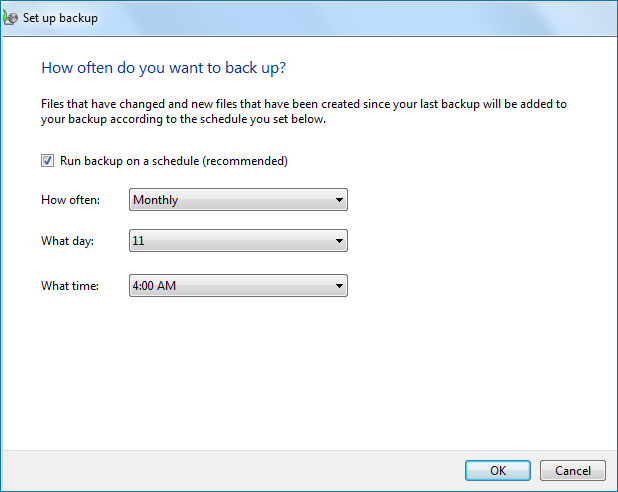
Now you're all set, having a schedule backup plan on Windows 7.
Method 2. Create A Schedule Backup on Windows 7 - Qiling Backup
Qiling Backup, a third-party backup software, helps users overcome the limitations of the built-in Backup and Restore feature, providing a more comprehensive and flexible backup solution.
Qiling Backup can broaden the backup content limitation and provide more flexibility by backing up content down to files, systems, disks, partitions, and emails, allowing for customized backup files based on specific classification.
Qiling Backup offers more thoughtful backup options, including scheduled backups, incremental, and differential backups to manage disk space effectively. It also provides additional features like disk clone and creating a security zone for backup files, making it a comprehensive backup solution.
The key point of Qiling Backup is that it offers more features than the built-in backup tool, yet remains a FREE backup software. It does have a paid version called Qiling Backup Home, but you can compare the two options in this article.
To create a scheduled backup on Windows 7, you can download and launch Qiling Backup on your computer, then follow the guide to complete the process.
Step 1. To use Qiling Backup for the first time, start by clicking on the "File backup" option on the home screen. This will initiate the backup process for your files.

Step 3. To back up files, folders, or directories, follow the paths to locate the items you want to back up, then select them all.

Step 4.To complete the backup process, you need to select a backup location to save and retain the backup. This is where the backup will be stored, so choose a location that is reliable and accessible.

Step 5.Qiling Backup allows users to save backup files to various devices, including local hard drives, external USB drives, SD cards, network drives, and NAS drives, as well as cloud storage provided by Qiling. We recommend storing important backups in the cloud for greater accessibility, flexibility, and safety.

Step 6. If you're looking for a customizable automatic backup schedule for your next file backup task, you can set the "Options" in the software. This allows you to encrypt confidential files, compress the backup image size, and schedule the next backup at a specific time.

Customize an advanced and automatic backup task here:

Step 7. Click "Proceed" to start the file backup process. Your completed backup files are displayed in a card style on the left side.

FAQs
1. How do I schedule a Windows backup?
The Windows built-Microsoft's backup tools - File History and Backup and Restore - allow users to schedule a backup. Each time a backup is created with these tools, a on-screen user guide is provided, which can be followed to set up a scheduled backup.
For Windows users, another option to create a scheduled backup is using third-party backup software, such as Qiling Backup, or exploring other free backup software options available for Windows 11.
2. How do I automatically backup files to an external hard drive Windows 7?
To automatically backup files to an external drive on Windows 7, open Backup and Restore from the Control Panel, click "set up backup", and connect the external hard drive to your computer. Choose to save your backup to the connected drive, select what to back up, review your backup settings, and set up a backup schedule. This will enable automatic backups to the external drive.
Related Articles
- Restore your hard drive and operating system
- Backup User Profile in Windows 10/11 or Transfer to New PC [Complete Guide]
- [Backup Guide] To Solve Windows 10 Backup Starts then Stops
- Windows 11 Backup to External Hard Drive Guide [3-Minutes Solution]
- Windows 7 End of Life Extended What to Do?
Windows 7 end of life extended what to do? You may have such a question, in which case it is important to first learn more about Windows 7 end of life and then get a clear idea of what to do. - Windows 7 Startup Issues Troubleshooting (7 Effective Ways)
How to do Windows 7 startup issues troubleshooting? Here are some ways prepared for you. You can try them one by one until your computer boot successfully.