How to Fix SD Card Unexpectedly Removed Error on Your Phone
If your phone keeps warning you that "The SD card is unexpectedly removed", don't worry! This issue can be fixed with these 3 reliable solutions. Check and follow them to get your SD card working again.
| Workable Solutions | Step-by-step Troubleshooting |
|---|---|
| Fix 1. Re-mount SD Card | On Android phone, go to Settings > Storage > Unmount SD card > Remove SD card and reinsert it...Full steps |
| Fix 2. Reformat SD Card | Unplug and insert SD card to PC > First, scan and restore all data from the SD card. Once that's done, format the SD card to FAT32. This will ensure that all data is safely retrieved and the card is ready for use.Full steps |
| Fix 3. Factory Reset Android | Backup Android data to PC first > Go to settings > Backup & reset > Factory data reset...Full steps |
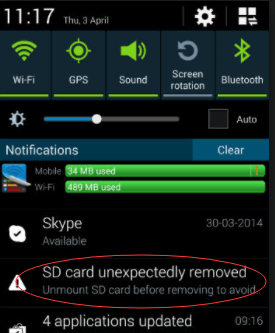
"My Samsung S7 Edge keeps saying SD card unexpectedly removedYou're experiencing an issue where the SD card keeps disappearing after tapping on an app, despite restarting your phone multiple times. This could be due to a corrupted SD card or a problem with your phone's software. It's possible that the phone's operating system is experiencing issues with the SD card, causing it to appear and disappear. You may want to try checking the SD card for physical damage or corruption, or resetting the phone's storage settings to see if that resolves the issue.
Android devices allow users to use an external SD memory card to expand storage capacity, but using a large SD card can lead to issues like "SD card unexpectedly removed" over time.
Why Does My SD Card Keep Ejecting
Here we have listed several possible reasons for SD card unexpectedly removed.
- If your phone or SD card is damaged and makes a loose connection, it may cause issues with data transfer, storage, and overall device performance. The loose connection can lead to errors, corruption, or even data loss.
- Reinsert the card several times and restart your phone.
- Try to connect the memory card to another phone to check if it's functioning properly. If it's not working, the issue might be with the card itself.
- SD card becomes corrupted
The SD card may develop bad sectors, requiring a repair to restore functionality.
- SD card is incompatible with your phone
A class 10 SD card is designed to transfer data at a much faster rate than a class 2 or 4 SD card, which can cause compatibility issues with older devices that can only handle the slower transfer rates of class 2 or 4 SD cards. This can lead to problems such as slow data transfer, freezing, or even device crashes.
- The SD card is just broken beyond fix
Give up the card and buy a new one.
How to Fix SD Card Unexpectedly Removed Error [3 Fixes]
If your Android device's SD card keeps disconnecting, there are three methods to troubleshoot the issue. You can try restarting your device, checking for physical damage to the SD card, and ensuring that the card is securely inserted into the slot. Alternatively, you can try updating your device's operating system or checking for any software updates that may be causing the issue.
Fix 1. Unmount and mount SD Card
Sometimes, a mobile phone or digital camera hardware failure can cause SD cards to be unreadable, resulting in an "unexpectedly removed" error. In Android phones, this can be resolved by unmounting and then remounting the SD card after rebooting the smartphone.
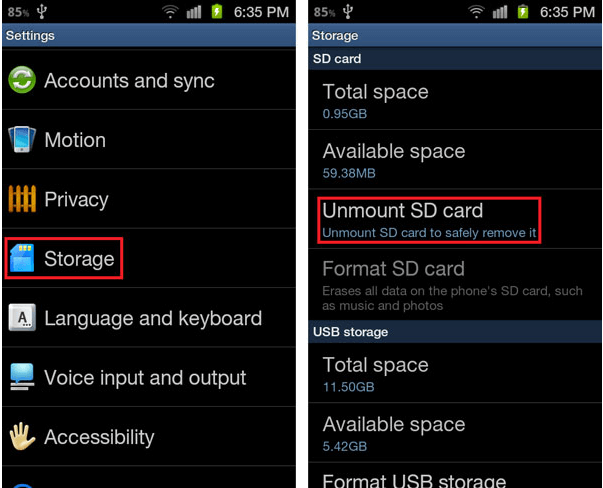
Step 1: To unmount the SD card, go to Settings, then Storage, and finally scroll down to select "Unmount SD card".
Step 2: After unmounting your SD card, remove it from the device.
Step 3: Now turn off your smartphone, and wait for a few seconds.
Step 4: Insert the SD card and then turn it back on.
Step 5: To mount the SD card, go to Settings > Storage, then select "mount SD card".
After completing the steps to troubleshoot the "SD card unexpectedly removed" error, check if the issue still persists.
Fix 2. Re-format SD Card
If your phone's SD card is not formatted, it may display a "not formatted" error, causing it to be unable to read the card and show a message saying "SD card unexpectedly removed". To resolve this, you can simply reformat the SD card, which should remove the error message.
Formatting an SD card would erase all existing data on it. Therefore, do not directly format the SD card, but instead recover the data on it first. A third-party data recovery tool, such as Deep Data Recovery, can be used to accomplish this.
What Deep Data Recovery Can Do:
- Recover deleted, formatted, and RAW files in three steps.
- Protect against various data loss scenarios such as virus attacks, power failures, system crashes, and other unforeseen events.
- Support to preview the recoverable files before executing recovery.
- 100% secure and works well on both Windows and Mac computers, with no known bugs or vulnerabilities.
To recover your SD card data, download Deep Data Recovery and follow the steps below.
Note: To increase the chances of successful data recovery, install Qiling data recovery software on a separate disk, rather than the original one where the files were lost.
Step 1. Launch Deep Data Recovery on your computer, select the file types you want to recover, and click "Next" to begin the recovery process.

Step 2. Select the disk partition or storage location where you lost data and click "Scan".

Step 3. After running the recovery software, it will start scanning the disk to locate all lost and deleted files. Once the scan is complete, you can click "Filter" and then select "Type" to specify the types of lost files you're looking for.

Step 4.To recover lost Windows files, you can use a file recovery tool that scans your PC and allows you to preview the scanned files by double-clicking on them. Once you've selected the target files, you can click the "Recover" button to save them to a safe spot on your PC or an external storage device.
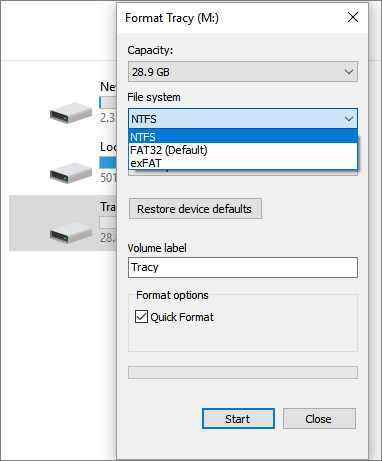
To format an SD card using Windows File Explorer, you can follow these steps: First, open File Explorer and navigate to This PC or Computer. Then, locate the SD card and right-click on it to select Format. In the Format window, choose the file system you want to use (such as FAT32 or exFAT) and select the allocation unit size. Finally, click on the Start button to begin the formatting process.
Step 1: To connect the SD card with a card reader to your PC, first, ensure that the card reader is properly inserted into a USB port on your computer. Next, insert the SD card into the card reader.
Step 2: In the Windows File Explorer, right-click the removable disk representing your card and select "Format" to erase its contents.
Step 3: On the popup window, select FAT under "File System" and Default Allocation Size under "Allocation Size". Leave other options as they are.
Step 4: To resolve the issue, start the formatting process on the SD card. After that, safely eject the card from the phone and reinsert it. This should resolve any error messages and allow you to reuse the card.
If Windows is unable to complete the format, you can use the cmd or a third-party disk format utility to format the SD card.
Fix 3. Factory Reset Android
If the SD card removal error persists, a factory reset of the Android phone can be the last resort to resolve the issue. This is a drastic measure, but it often resolves the problem.
- Important
- Before doing a factory reset on your Android phone, it's a good idea to backup your data to your PC. This will ensure that all your important files, photos, and apps are safely stored and won't be erased during the reset process.
Step 1: To perform a factory data reset, go to Settings, then select Backup & reset, and finally choose Factory data reset.

Step 2: To completely erase all data on your device and restore it to its original factory settings, follow these steps: Tap on "Erase all data (factory reset)" and then select either "Reset phone" or "Reset tablet" as needed, and finally enter your device's PIN, pattern, or password if prompted.
Step 3: To erase all data from your device's internal storage, tap Erase everything.
Step 4: Once your device has finished erasing, select the option to restart.
Step 5: Set up your device and restore your backed-up data.
If all troubleshooting methods have been exhausted, contact the manufacturer for assistance, and they may provide a replacement phone or SD card if it's still under warranty.
Related Articles
- Fix Deleting Files Does Not Free Up Space Error in Windows 10/8/7
- Fix and Repair Volume Shadow Copy Service Not Working Error in Windows 10
- How to Find Recently Deleted Folder/Photos on Mac
- [Fixed] Windows Cannot Run Disk Checking on This Volume Because It Is Write Protected
- Preparations for Windows Server 2016 in-Place Upgrade
This article focuses on how to prepare for Windows Server 2016 upgrade and upgrade Windows Server 2012 to 2016 step by step. No data loss. - Top 2 Ways to Stop Windows Backup Service in Server 2012
You will learn how to stop Windows backup service in server 2012 and protect your system without running backup at startup.