System Backup Says Not Enough Space Although the Drive Has Free Space
Seeing free gigabytes in File Explorer does not prove a system image will fit. You may be viewing the wrong volume, the destination may have a quota, or the backup may include boot and recovery partitions in addition to C:. Qiling shows both Required space and Free space on its System backup screen; compare those values before clicking Proceed.
Check the actual destination
Step 1. Open Backup and Recovery > System backup. Confirm the selected source partitions and read the displayed Required space. The boot partitions are part of a restorable Windows system image even if they are not visible in File Explorer.

Step 2. Read the destination path shown in Qiling. In File Explorer and Disk Management, identify that exact physical drive and volume. A similarly named folder or another partition can show a different free-space figure.
Step 3. If the destination is a NAS, check both free space and your share quota. If it is a USB drive, confirm that the connection is stable and the file system supports large backup files.
Provide enough room without losing backups
Use a separate destination with headroom beyond the displayed requirement. Do not delete the only known-good image to make room for an untested replacement. If old images are safely duplicated and verified, remove only clearly identified obsolete copies.
Step 1. Click the destination browser and select the new folder or drive. Review the updated Free space field before starting.
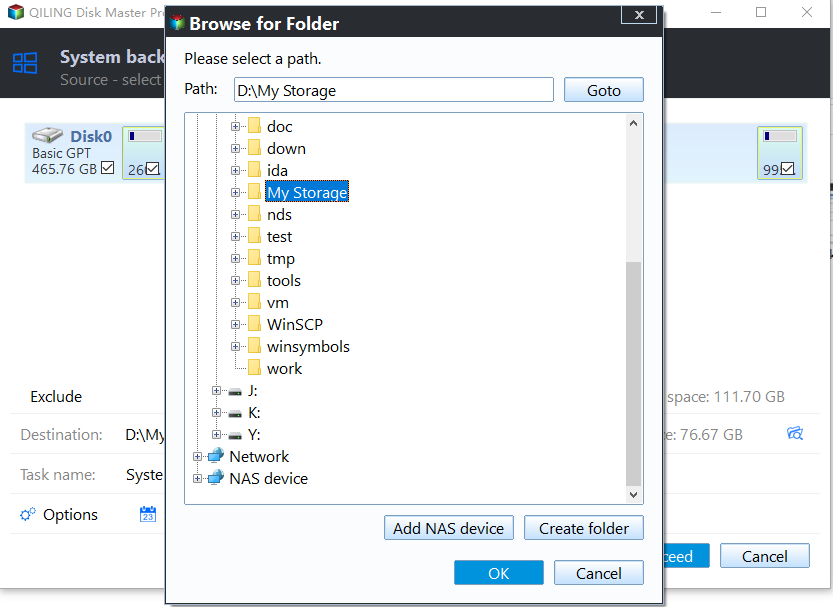
Step 2. Click Proceed only when the destination is correct and has adequate room. Wait for completion, then confirm that the image appears in Qiling's task list and can be selected for recovery.
If capacity was not the cause
If the job still fails while enough space remains, record its error code and time. Check VSS writers, access permissions, and storage-device errors separately. Do not infer a VSS shadow-storage limit merely from a red destination-space warning.
Related Articles
- VSS Shadow-Storage Check
Distinguish snapshot allocation from destination capacity. - System Image Space Error
Review other Windows system-image space conditions.
Products
Articles & Tutorials
- Data Recovery
- Data Backup
- File Recovery
- File Backup
- System Backup and Restore
- Disk and Partition Clone
- Technical articles
- Mobile articles
- Disk Master Help
- Windows Data Recovery Tutorials
- Windows Secure Delete Tutorials
- Windows Partition Management Tutorials
- Windows File Backup and Restore Tutorials
- Windows System Backup and Restore Tutorials
- Windows Disk Backup and Restore Tutorials
- Windows Clone Tutorials