System Image Recovery vs. System Restore in Windows 11/10/8/7
System image recovery and System Restore are two independent ways to restore a previous Windows operating system. While both methods aim to recover the system, they have distinct differences. This article helps users understand these differences and choose the better system recovery solution based on their specific needs.
- What is System Image Recovery for?
- What is System Restore for?
- How to Differentiate System Image Recovery and System Restore
- How to Determine Which Recovery Option is for Me
- Guide: How to Setup Backup for System Image Recovery in Windows 10
- Guide: How to Turn on System Restore in Windows 10
- Guide: How to Perform System Image Recovery and System Restore
- Qiling Backup: One Tool for Two Recovery Needs
What is System Image Recovery for?
To use Windows Backup and Restore in Windows 7, go to Control Panel, then System and Security, and click on Backup and Restore. From there, you can create a system image, back up your files, and restore your computer to a previous state.
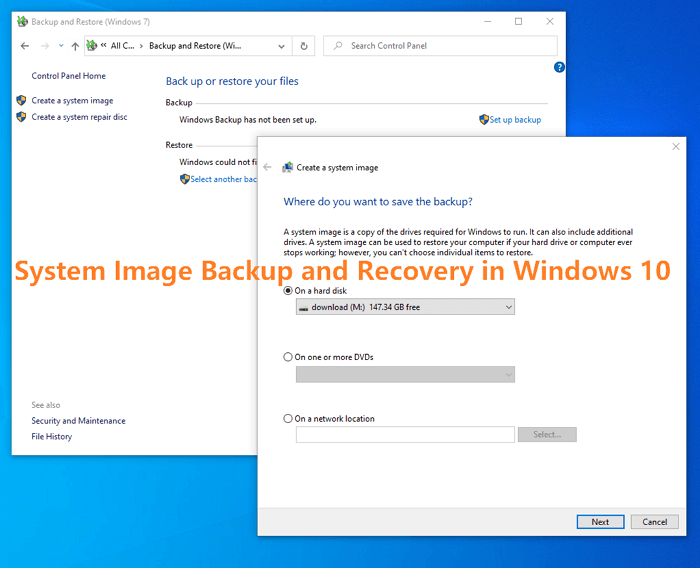
Windows System Image Recovery is based on a system image, which is an exact copy of a drive, and allows you to restore the entire hard drive, including OS, apps, settings, and files, to a previous state when the image was created.
What is System Restore for?
Tools you need: System Protection in System Properties
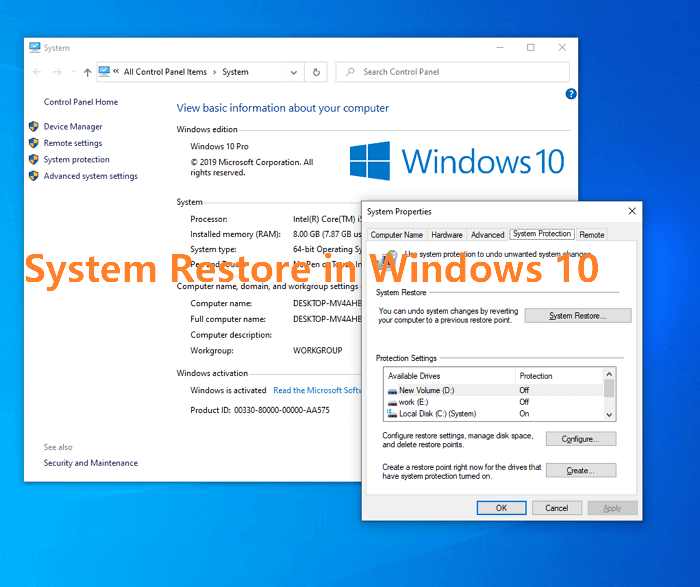
System Restore creates restore points, which are snapshots of your system's files and settings at a particular time. This allows you to revert your system back to a previous state if something goes wrong, such as due to a bad driver, system setting changes, or malware activity.
How to Differentiate System Image Recovery and System Restore
System image backup and System Restore are two different methods of backing up and restoring a computer's state. A system image backup includes the entire hard drive, including the operating system, applications, settings, and files, whereas System Restore only affects system files and settings, and does not include personal files. This means that a system image backup can restore a computer to its exact state at the time of the backup, including all files, while System Restore can only return system files and settings to a previous point in time.
System image recovery requires a separate bootable media such as a CD/DVD or USB drive, whereas System Restore can be performed directly from within Windows.
System restore can be used to go back to a restore point created by Windows itself or one created manually, whereas system image recovery can only be used to restore a system image backup created with Windows Backup and Restore.
Check the comparison table and know each recovery option better:
| System recovery option | Description |
|---|---|
| System Image Recovery | To use this option, you need to have created a system image beforehand. This involves backing up the partition that contains Windows, along with programs and user data like documents, pictures, and music. This personalized backup is called a system image. |
| System Restore |
Restores your computer's system files to an earlier point in time, preserving your files like emails, documents, and photos. If you use System Restore from the System Recovery Options menu, you can't undo the restore operation, but you can run System Restore again and choose a different restore point if one exists. |
How to Determine Which System Recovery Option is for Me
System image recovery is ideal for creating an exact replica of a hard drive, including the operating system, apps, settings, and files, whereas system restore is better suited for reverting to a previous point in time without altering personal files.
If you're still undecided on whether to enable system restore or create a system image backup, consider this: both methods are protective ways to retain a stable Windows system, and both can impact your experience with recovery in the future. Taking into account the time and effort required for each protection measure, we recommend enabling system restore all the time and creating a system image backup on a regular basis. This combination can provide the best protection for your computer.
System Image Recovery's pros and cons:
- System image recovery requires a large-capacity hard drive to store the system image, which is equal in size to the used space on your system drive, system reserved partition, and boot drive.
- The process of system image recovery in Windows Advanced Options can be a daunting and time-consuming task, but it's a crucial step in restoring your system to its original state.
- System image recovery can be effective even when a computer fails to boot, thanks to the aid of a system repair disc on CD/DVD, or a USB recovery drive.
System Restore's pros and cons:
- System Restore is a user-friendly feature that doesn't require additional storage space, as it only uses system restore points - snapshots of system files and settings. This means you can access System Restore directly from your system drive, without needing a system repair disc or USB recovery drive.
- System restore can be used to go back to a previous point in time without affecting your personal files, reverting any changes made to the system since then.
- System restore does not affect personal files, but removes programs installed since the last restore point was created.
System Image Recovery and System Restore are two protective measures for a stable Windows system. System Image Recovery creates an identical copy of your hard drive, while System Restore reverts back to a previous point in time without affecting personal files. Enabling system protection and creating regular backups are the best ways to protect your computer from data loss, regardless of which system recovery method you choose.
Guide: How to Setup Backups for System Image Recovery
To create a system image backup, you need to ensure that you have created a system image, which is a backup of your entire system. This can be done by using a hard disk, external hard drive, CD/DVD disc, or network drive to save the backup file. You can access the Windows 10 system image recovery tool to set up a system backup.
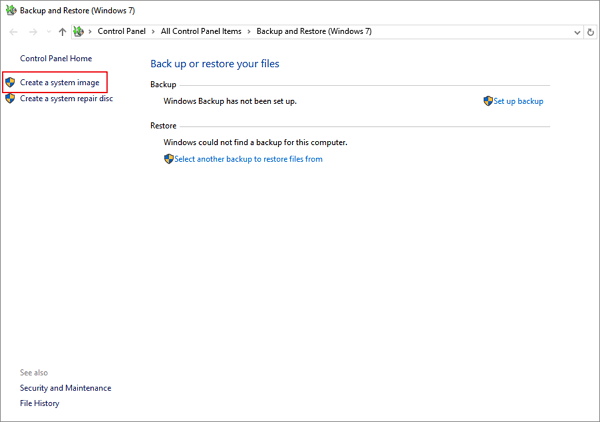
Step 1. To access the Windows Backup and Restore (Windows 7) feature, open the Control Panel, navigate to the Windows Backup and Restore (Windows 7) option, and click on it to open it.
Step 2. On the left side menu, click "Create a system image".
Step 3. Choose a drive that is available to you, click Next, and ensure it's a large hard drive of at least 128GB to store the system image backup, which is typically around 100GB in size. Do not select a drive on the same physical disk as the one being backed up.
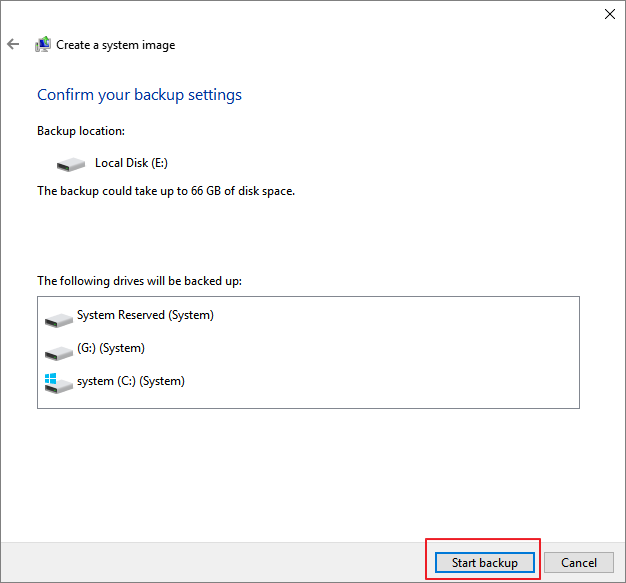
Step 4. Check the backup contents the system has chosen by default, which are all the partitions associated with Microsoft Windows, and add other data drives if needed, then click Next.
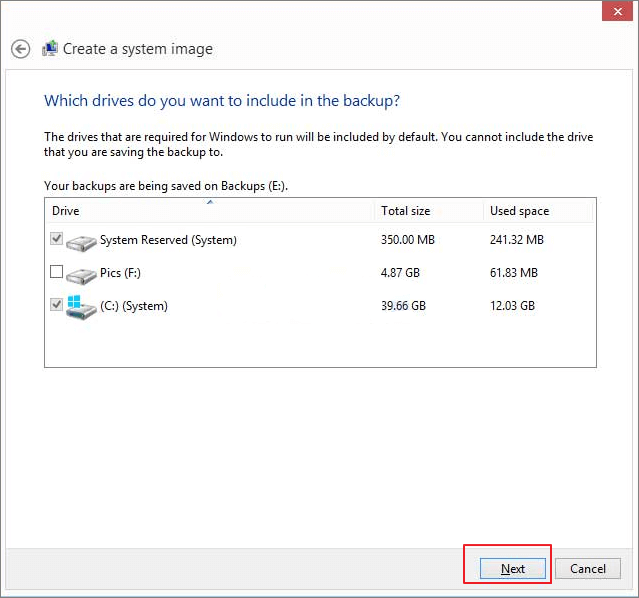
Step 5. To create a system image backup, preview the backup contents and click Start backup. This ensures your operating system and all installed programs are backed up regularly, especially after updates, new file saves, or program installations that can change your system over time.
Guide: How to Turn on System Restore in Windows 10
In Windows 10, System Restore can be set to automatically activate, making the process faster and simpler than creating a system image backup.
Step 1. Right-click on This PC in Windows 10 and choose "Properties".
Step 2. On the left side menu, click System protection.
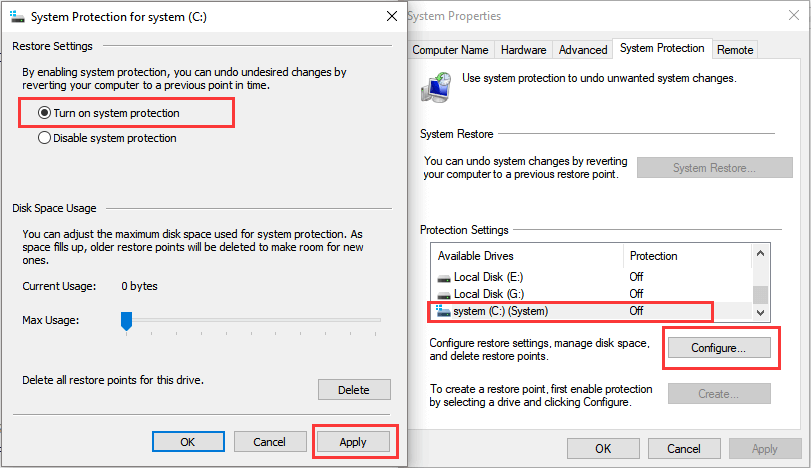
Step 3. The System Properties window will open, showing the protection status of each drive partition. If system restore is not enabled, the status will be "off". To enable system restore on the C drive, click the C drive option and then Configure. This will allow system restore to be enabled on the C drive.
Step 4. To enable system protection, go to the System Protection tab under the System Restore settings, and select the "Turn on system protection" option. You can also set a backup reservation strategy to manage the maximum disk space used for system protection, which helps in maintaining your backup hard drive's disk space. Once you've made the necessary changes, click the "Apply" button.
Tip:
1. System restore can be enabled on each individual partition of a hard drive, but it must be repeated for each drive to take effect.
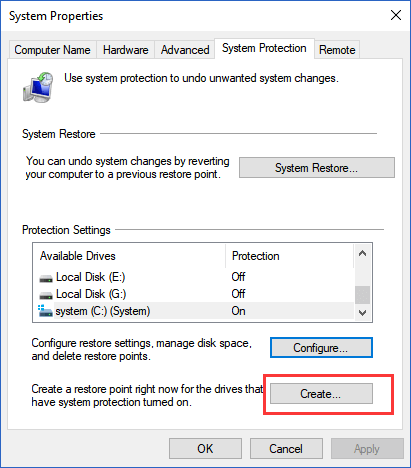
2. Once you've configured System Restore on a drive, Windows will automatically create important restore points, but you can also manually create a significant system restore point by clicking the Create button underneath the Configure button.
Ultimate Guide: How to Perform System Image Recovery or System Restore on Your Computer
To access both system image and system restore point in Windows 10, you can boot into the Advanced options in the Windows RE, which can be accessed by pressing the Shift key while clicking on the Restart button in the Start menu. From there, you can select Troubleshoot, then Advanced options, and finally System Image Recovery or System Restore. This method allows you to access both recovery options even if you're unable to log in to your Windows operating system.
Step 1. To access the Windows 10 Recovery Environment, click Shutdown from the login screen, then hold down the Shift key while selecting Restart. This will initiate the Windows Recovery Environment, allowing you to access advanced troubleshooting tools and options.
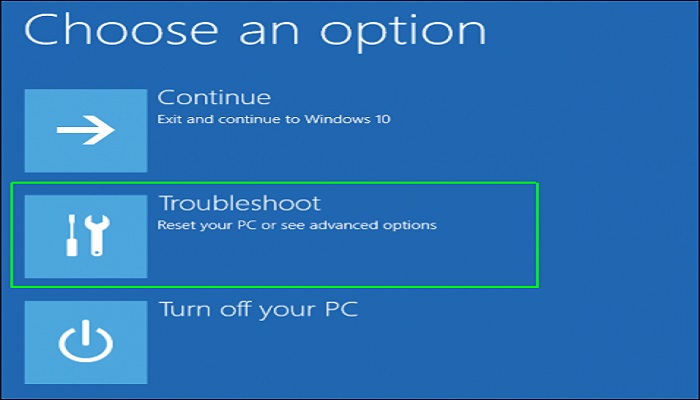
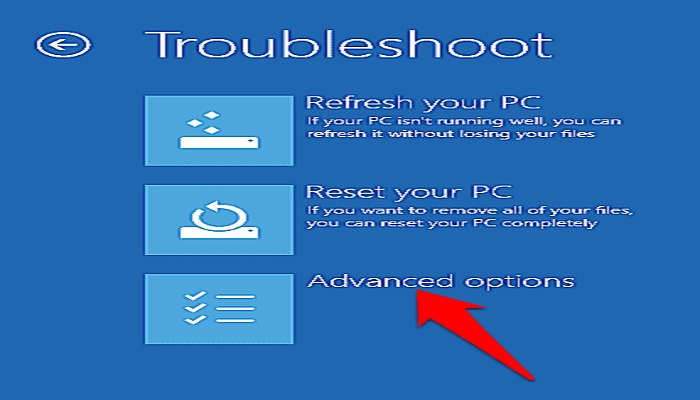
Step 2. Once the Windows RE screen loads up, click Troubleshoot under the Choose an option menu.
Step 3. Move on to the Advanced options.
Step 4. The System Restore and System Image Recovery options are available in the System Protection section of the Control Panel, where you can see both options.
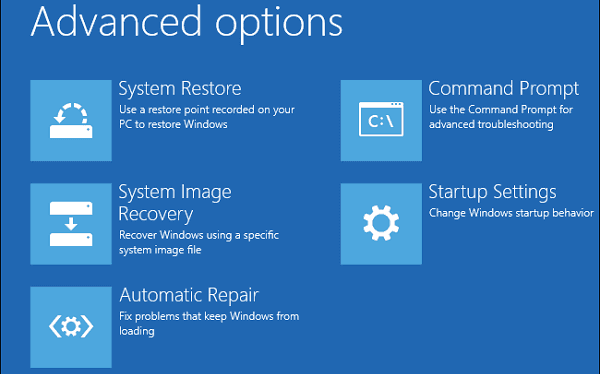
Step 5. To complete the system recovery process, click either of the options you need, and follow the onscreen wizard.
Windows system recovery options include System Image Recovery, System Restore, Startup Repair, Windows Memory Diagnostic Tool, and Command Prompt, which can help restore a crashed or abnormal Windows operating system to a working state.
The choice between System Image Recovery and System Restore depends on the specific needs and preferences of the user. While System Image Recovery provides a full system backup, including personal files, and requires a dedicated backup disk, System Restore only restores the system to a previous point, without affecting personal files. Ultimately, the best approach is to create both a system image backup and system restore points, following the 3-2-1 backup strategy, to ensure maximum protection and ease of recovery in case of a system failure. This way, users can have a full system backup and a point-in-time restore option, making it easier to reinstall Windows 10 if needed.
Qiling Backup: One Tool for Two Recovery Needs
Microsoft Windows has built-in backup and recovery solutions, including File History for file backup and recovery, System Backup and Restore (in Windows 7) for system backup and recovery, and System protection for creating system restore points. However, these features are separate and provide basic backup functions, rather than a comprehensive solution.
Many Windows users are unaware of the built-in backup methods and find the process of creating and recovering backups to be overly complex and time-consuming, requiring advanced computer skills, even for something as simple as booting into Windows Recovery Environment.
Considering the time and learning curve involved in using System Image Recovery and System Restore, we recommend Qiling Backup as a perfect alternative solution to protect your Windows operating system. This comprehensive backup tool also safeguards files, hard disk/partition, emails, OS, and everything else on your computer.
The software comes with advanced backup options that can greatly save your backup disk space, improve the backup and recovery speed, and automate a scheduled backup task.
Create a backup:
Step 1. To start the backup process, launch Qiling Backup on your computer and click on the "System Backup" option on the home screen. Then, click the big question mark icon to select the backup contents.

Step 2.To start the system image backup, Windows will automatically select your operating system information and all system-related files and partitions. You'll then need to choose a location to save the system image backup by clicking on the illustrated area.

Step 3. The backup location can be another local drive on your computer, an external hard drive, network, cloud, or NAS. We recommend using an external physical drive or cloud to preserve system backup files.

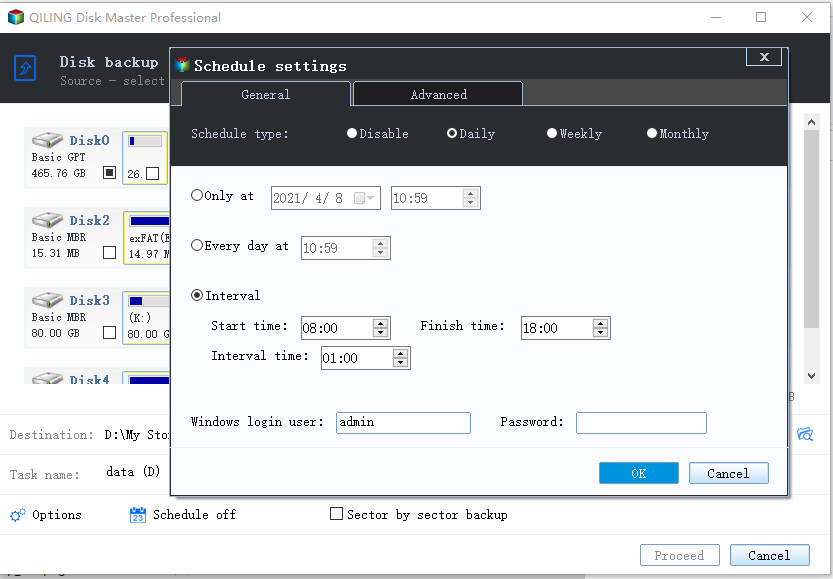
Step 4. Customization settings like enabling an automatic backup schedule in daily, weekly, monthly, or upon an event, and making a differential and incremental backup are available in the Schedule button. If interested, click "Proceed", and the Windows system backup process will begin, displaying the completed backup task on the left side in a card style.
Perform system recovery:
To perform system recovery on a non-bootable machine, try to boot the computer through the installation media, such as a USB drive or CD/DVD, to access the recovery environment, where you can run system recovery tools.Qiling Backup emergency disk.
Step 1. Launch Qiling Backup, click "Browse for Recover".

Step 2. Guide to your backup destination, choose the system backup file you need. (The backup file created by Qiling Backup is a pbd file.)

Step 3. Choose a recovery disk that has the same partition style as the source disk, ensuring compatibility for the cloning process.
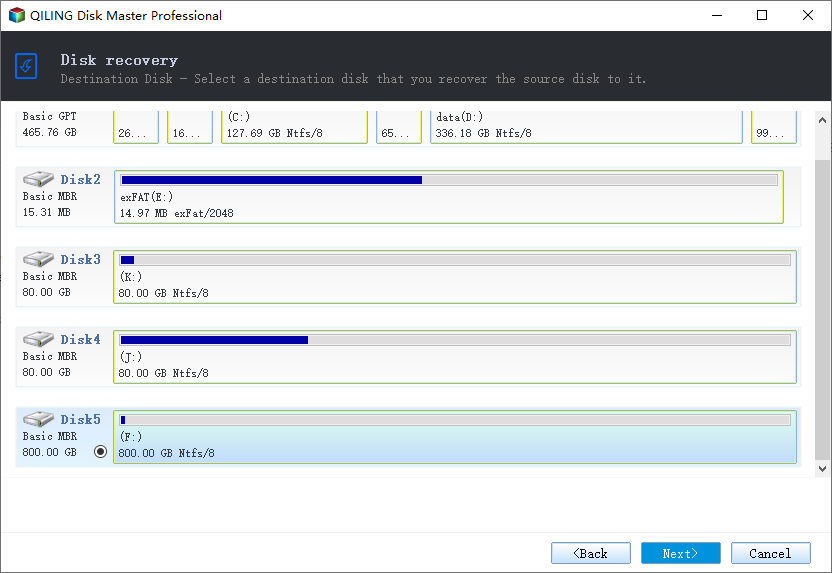
Step 4. To customize the disk layout, you can select the desired options, and then click "Proceed" to initiate the system backup recovery process.
Related Articles
- Windows 10 Backup Not Working: Top Solutions
- How to Disable Windows 10 Update in Every Way (Windows 11 Supported)
- Fixed | System Image Restore Failed 0x80042412 in Windows 7/8/10
If you encountered system image restore error 0x80042412 in Windows 7 or 10, what could be the reason? How to fix it? Here you'll find several solutions along with an alternative to restore system image without such errors. - How to Make An Image File from SD Card on Windows 10/8/7
Learn how to make an image file from SD hard on Windows 11/10/8/7. Qiling Disk Master provides you with the easiest way to create image of SD card. - [7 Solutions] How Do I Backup Computer to Cloud? Here Is the Complete Guide
Learn how to back up a computer to the cloud with practical methods. Protect files, system data, and important folders using cloud backup. - How to Backup Data from Hard Drive without OS in 3 Ways
Learn how to back up data from a hard drive without OS access. Recover files from an unbootable PC before reinstalling Windows or formatting the disk.