Upgrade Windows 10 VM to Windows 11 Safely
A Windows 10 virtual machine needs compatible virtual hardware before upgrading to Windows 11. Check virtual TPM, Secure Boot, CPU cores, RAM, and disk space before you start.
VM Settings to Check
- Enable virtual TPM and Secure Boot if your platform supports them.
- Allocate enough RAM, CPU cores, and disk space.
- Install virtual machine tools or guest additions.
- Create a snapshot or backup before upgrading.
Back Up the VM from Inside Windows
Step 1. Open Qiling Backup inside the Windows 10 VM and choose System Backup.
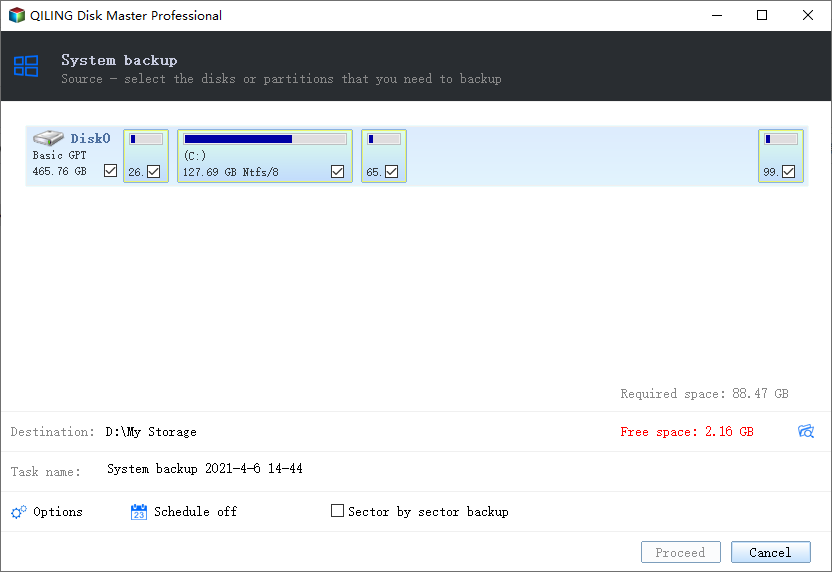
Step 2. Save the image to a shared folder, external location, or another virtual disk.
Step 3. Click Proceed, then start the Windows 11 upgrade after the backup completes.
Step-by-Step VM Upgrade Plan
- Shut down the VM and increase virtual disk space if the Windows 11 upgrade needs more room.
- Enable virtual TPM 2.0 and Secure Boot if your virtualization platform supports them.
- Assign enough memory and CPU cores for the upgrade process.
- Create a VM snapshot, then create a Qiling system backup inside the guest OS for an additional rollback point.
- Boot Windows 10, install pending updates, and run the Windows 11 upgrade assistant or ISO setup.
- After upgrade, install updated virtual machine tools and check network, display, shared folders, and activation.
A VM snapshot is convenient, but it belongs to the virtualization platform. A system image gives you another recovery path if the virtual disk or platform snapshot becomes unavailable.
Conclusion
Upgrading a VM is easiest when virtual hardware is ready and rollback is planned. Keep both a VM snapshot and a system backup if the virtual machine stores important work.
Related Articles
Products
Articles & Tutorials
- Data Recovery
- Data Backup
- File Recovery
- File Backup
- System Backup and Restore
- Disk and Partition Clone
- Technical articles
- Mobile articles
- Disk Master Help
- Windows Data Recovery Tutorials
- Windows Secure Delete Tutorials
- Windows Partition Management Tutorials
- Windows File Backup and Restore Tutorials
- Windows System Backup and Restore Tutorials
- Windows Disk Backup and Restore Tutorials
- Windows Clone Tutorials