Speed Up Windows 11 with RAM Cache and SSD Cache
If your Windows 11 PC feels slow, the bottleneck is often the storage drive. Mechanical hard drives (HDDs) are the slowest component in most computers, and even SSDs can feel sluggish when Windows reads the same files over and over. Two Qiling tools fix this without replacing your hardware: Fast Cache uses spare RAM or a fast SSD as a cache for frequently accessed data, and Qiling Disk Master's RAM disk creates an ultra-fast virtual drive in memory for temporary files.
Used together, these two tools can make an old HDD feel nearly as responsive as an SSD, and an SSD feel even snappier. This guide walks through both tools, explains how they differ, and gives concrete steps to set up each one for the biggest real-world speed gains.
PAGE CONTENT
- Why Windows 11 Feels Slow
- Fast Cache vs RAM Disk: What's the Difference?
- Method 1: Accelerate an HDD with Fast Cache
- Method 2: Create a RAM Disk for Temp Files
- Method 3: Move Browser Cache to RAM Disk
- Combine Both Tools for Maximum Speed
- FAQs About Speeding Up Windows 11
- Back Up Windows Before You Change Settings
Why Windows 11 Feels Slow
Before you change anything, it helps to understand where the slowness comes from. In most Windows 11 PCs, the storage drive is the weakest link.
- HDD boot drive — a 5400 RPM laptop HDD can read at 80-120 MB/s and takes 10-15 milliseconds to seek. Windows needs thousands of small file reads during boot, so an HDD can make startup take a minute or more.
- SSD with heavy writes — SSDs are fast, but browser cache, temporary files, and Windows update caches write to them constantly. Over time this slows the SSD and shortens its life.
- Repeated file reads — Windows, apps, and games read the same files every time they start. Reading them from a slow drive every time wastes time.
- Not enough RAM — if Windows runs out of memory, it uses the page file on the storage drive, which is far slower than RAM.
Fast Cache and RAM disk address these issues directly. Fast Cache makes repeated reads faster by storing hot data in RAM or on a fast SSD. RAM disk makes temporary writes faster and protects your SSD by moving temp data to memory.
Fast Cache vs RAM Disk: What's the Difference?
Both tools use RAM to speed things up, but they work in different ways. Understanding the difference helps you choose the right one — or use both.
| Qiling Fast Cache | Qiling Disk Master RAM Disk | |
|---|---|---|
| What it does | Caches frequently read data from a real drive in RAM or SSD | Creates a virtual drive entirely in RAM |
| Best for | Speeding up an HDD or slow SSD | Storing temporary files, browser cache, scratch data |
| Data persistence | SSD cache persists; RAM cache is volatile | Fully volatile — wiped on reboot |
| Capacity | Limited by RAM or SSD size | Limited by spare RAM (usually 2-32 GB) |
| Transparent to apps | Yes — apps do not need changes | No — apps must be pointed to the RAM disk |
| Setup effort | Low — pick a drive and size | Medium — create disk, then point apps at it |
If your main problem is a slow HDD, start with Fast Cache. If your main problem is SSD wear or you want a faster scratch disk, use a RAM disk. Many users get the best results by running both.
Method 1: Accelerate an HDD with Fast Cache
Fast Cache is the single biggest speedup you can give a PC that boots from or stores data on an HDD. It works by keeping the most-accessed data in RAM or on a fast SSD, so repeat reads skip the slow mechanical drive.
Step 1. Download and install Qiling Fast Cache.
Get the installer from the Qiling website and install it. It works on Windows 11, 10, 8, and 7.
Step 2. Open Fast Cache and create a cache task.
Launch the app and click the + button. Choose whether to use RAM (L1 cache) or an SSD (L2 cache).

Step 3. Set the cache size.
For RAM cache, use about one-third of your free memory (leave at least 4 GB for Windows). For SSD cache, use 40-80% of the free space on a spare SSD partition.
Step 4. Select the drive to accelerate.
Pick the HDD you want to speed up — usually the C: drive or a data drive. Click OK.

Step 5. Let it run.
Fast Cache begins learning your access patterns. After a day or two of normal use, the hit rate climbs and the drive feels much faster. You can watch the statistics in the main window.

For detailed setup and sizing guidance, see Windows 11 Fast Cache: Speed Up HDD with RAM and SSD Cache.
Method 2: Create a RAM Disk for Temp Files
A RAM disk gives you an ultra-fast drive in memory for files you do not need to keep. Moving Windows temporary files and app scratch data there speeds up installations, extractions, and creative work while reducing SSD wear.
Step 1. Download and install Qiling Disk Master.
The free edition includes the RAM disk feature.
Step 2. Create the RAM disk.
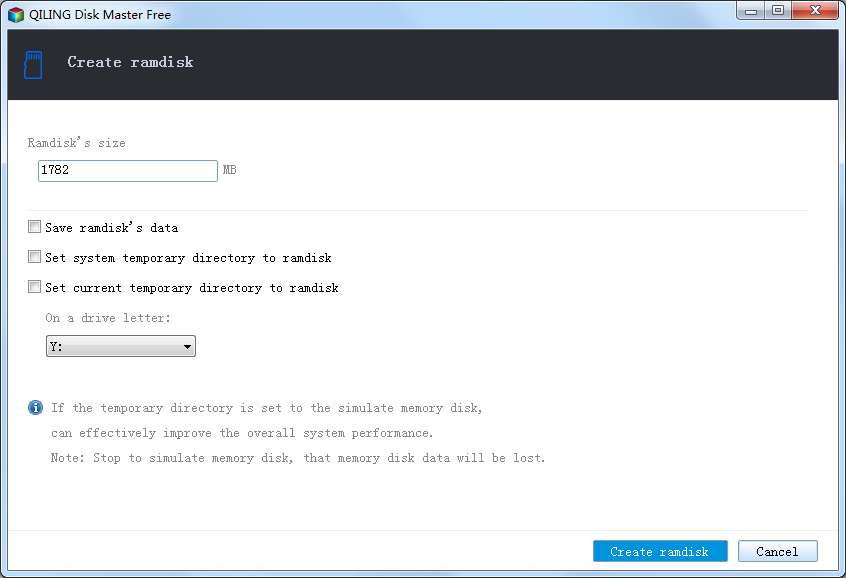
Open Qiling Disk Master, go to Tools and Utilities, and click Create ramdisk. Set the size to 2-8 GB depending on your RAM, choose a drive letter like R:, and select NTFS. Enable auto-mount at startup and click the Create ramdisk button.
Step 3. Move the Windows TEMP folder.
Press Win + R, type sysdm.cpl, and go to Advanced > Environment Variables. Change both the user and system TEMP and TMP variables to R:\TEMP. Restart the PC.
Step 4. Verify.
After rebooting, check that R:\TEMP exists and that files appear there when you run an installer or extract an archive.
For the complete RAM disk walkthrough, see How to Create a RAM Disk in Windows 11.
Method 3: Move Browser Cache to RAM Disk
Browser cache is written and read constantly. Moving it to the RAM disk speeds up browsing and saves your SSD from thousands of small writes.
Chrome and Edge: Right-click the browser shortcut, choose Properties, and add to the end of the Target field:
--disk-cache-dir="R:\BrowserCache" --disk-cache-size=1048576000
Firefox: Open about:config, create or edit browser.cache.disk.parent_directory, and set it to R:\FirefoxCache. Restart Firefox.
Make sure the cache folders exist on the RAM disk after every reboot by adding a startup batch script that creates them. For full instructions on all three browsers, see How to Move Browser Cache to RAM Disk in Windows 11.
Combine Both Tools for Maximum Speed
Fast Cache and a RAM disk complement each other. Here is how to use them together on a typical PC with an HDD and 16 GB or more of RAM:
Scenario: PC boots from HDD, 16 GB RAM, 256 GB spare SSD.
- Use Fast Cache with a 4 GB RAM cache + 100 GB SSD cache targeting the HDD. This accelerates Windows boot, app launches, and game loads.
- Create a 4 GB RAM disk (R:) and move the Windows TEMP folder and browser cache to it. This speeds up installations and browsing while reducing SSD writes.
- Leave 8 GB of RAM free for Windows and apps.
Scenario: PC boots from SSD, 32 GB RAM.
- Use Fast Cache with an 8 GB RAM cache targeting the SSD for hot files. The gain is smaller than on an HDD but still helps with repeated reads.
- Create an 8 GB RAM disk for browser cache, temp files, and creative-app scratch disks.
- Leave 16 GB free for Windows and apps.
In both cases, the result is a noticeably snappier system: faster boot, faster app launches, faster browsing, and less wear on the SSD.
FAQs About Speeding Up Windows 11
Will these tools help if I already have a fast NVMe SSD?
The gains are smaller than on an HDD, but a RAM disk for temp files and browser cache still helps by reducing SSD writes. Fast Cache on top of an NVMe gives modest improvements for frequently repeated reads.
How much RAM do I need to use both tools?
16 GB is the practical minimum. With 16 GB, use 2-4 GB for Fast Cache RAM cache and 2-4 GB for the RAM disk. With 32 GB or more, you can allocate larger amounts to both.
Do I need to reinstall Windows or my apps?
No. Both Fast Cache and the RAM disk are transparent to your existing installation. You just install the tools and configure them. No reinstallation is needed.
Will I lose data if the power goes out?
Data in the RAM disk is lost, because RAM is volatile. Data in the Fast Cache RAM cache is also lost, but the original files remain on the HDD or SSD, so nothing is permanently lost. If you enable write caching in Fast Cache, a power loss could lose unflushed writes — use a UPS if you enable write caching.
Can I use these tools on a laptop?
Yes. The setup is the same. On laptops, make sure you leave enough RAM for normal use and consider that the RAM disk uses a small amount of extra power.
Back Up Windows Before You Change Settings
Fast Cache and RAM disk are safe to set up, but if you are also changing environment variables or storage settings, a backup protects your system. Qiling Disk Master creates a full Windows image you can restore from if anything goes wrong.
Part 1: Create a Full System Backup
Step 1. Install and open Qiling Disk Master. On the home screen, open "Backup and Recovery" and choose "System Backup". This option automatically includes Windows and the hidden boot partitions, so you do not have to select them one by one.

Step 2. Check the source. The disk where Windows is installed and its system partitions are already ticked for you. If you only need your personal documents, run a separate "File Backup" task instead.

Step 3. Click the destination box and choose where the image should be saved. Use an external HDD or SSD, a NAS, or any drive other than the one Windows is installed on, and make sure it has enough free space.

Step 4. Review the task summary and click "Proceed". Wait until the progress bar reaches 100%. Do not unplug the drive or turn off the PC while the backup is running.

Part 2: Restore Windows from the Backup
Step 1. Open Qiling Disk Master again, go to "Backup and Recovery", and select the recovery option. Your backup images are listed, so pick the one you created before the changes began.

Step 2. Choose the target disk or partition. Normally you restore to the original system disk. If the drive was replaced, select the new disk instead, and the restore rebuilds Windows together with its boot partitions.

Step 3. Preview the restore plan, click "Proceed", and confirm the warning. The PC restarts to finish the job, and Windows comes back exactly as it was on the day the image was created, with your files and programs intact.

- Note
- Keep the backup image on a separate drive, and refresh it before changing environment variables or storage cache settings.
Conclusion
Speeding up Windows 11 does not always require buying new hardware. Qiling Fast Cache turns spare RAM or an idle SSD into a cache that accelerates a slow HDD, while Qiling Disk Master's RAM disk creates an ultra-fast drive in memory for temporary files and browser cache. Set up Fast Cache to target your slowest drive, create a RAM disk for temp and cache files, and point your browser at the RAM disk. Together these changes make boot times shorter, apps launch faster, browsing snappier, and reduce wear on your SSD. With 16 GB of RAM or more, you can run both tools comfortably while leaving plenty of memory for Windows and your applications.
Protect your PC with Qiling Backup—create a system image before your next round of settings changes.
For more Windows 11 performance guides, see Windows 11 Fast Cache, How to Create a RAM Disk in Windows 11, Move Browser Cache to RAM Disk, How to Use M.2 Disk for Cache, and Windows 11 Storage Sense.
Related Articles
- How to Move Browser Cache to RAM Disk
- Configure FAST Cache Best Practices and Limitations
- Windows 11 Guide: Features, Upgrade Tips and What to Know
- Docker and WSL2 Performance: RAM Disk and Disk Cache Tips
- Should You Disable SysMain and Prefetch in Windows 11?
- Windows 11 Dev Drive vs Disk Cache: Which Is Faster?
Products
Articles & Tutorials
- Data Recovery
- Data Backup
- File Recovery
- File Backup
- System Backup and Restore
- Disk and Partition Clone
- Technical articles
- Mobile articles
- Disk Master Help
- Windows Data Recovery Tutorials
- Windows Secure Delete Tutorials
- Windows Partition Management Tutorials
- Windows File Backup and Restore Tutorials
- Windows System Backup and Restore Tutorials
- Windows Disk Backup and Restore Tutorials
- Windows Clone Tutorials