How to Create a RAM Disk in Windows 11: Step-by-Step Guide
A RAM disk (also called a RAM drive) is a virtual drive that lives entirely in your computer's memory. Because RAM is many times faster than even the quickest SSD, files stored on a RAM disk open and save almost instantly. Windows 11 does not include a built-in RAM disk tool, but Qiling Disk Master adds this feature with a single click. You can format the RAM disk with any file system Windows supports, and it is available very early in the boot process so apps and services that depend on it can use it right away.
This guide explains what a RAM disk is, when it makes sense to use one, how big it should be, and exactly how to create one in Windows 11. It also covers the most practical uses, such as moving browser cache and temporary files to the RAM disk to speed up browsing and reduce SSD wear.
PAGE CONTENT
- What Is a RAM Disk and How Does It Work?
- Benefits and Limitations of a RAM Disk
- How Much RAM Do You Need?
- Step-by-Step: Create a RAM Disk with Qiling Disk Master
- Best Uses for a RAM Disk
- Move Windows TEMP Folder to the RAM Disk
- FAQs About Windows 11 RAM Disk
- Back Up Windows Before You Change Settings
What Is a RAM Disk and How Does It Work?
A RAM disk takes a chunk of your system memory and presents it to Windows as if it were a regular hard drive. You get a drive letter, you can format it, and you can copy files to and from it just like any other disk. The difference is speed: while a fast NVMe SSD might reach 3,000 to 7,000 MB/s, a RAM disk can hit 10,000 to 40,000 MB/s or more, with near-zero latency.
The trade-off is that RAM is volatile. When you shut down or restart the PC, everything on the RAM disk is gone. For temporary files, browser cache, and scratch data, that is exactly what you want. For important files, it means you should never store the only copy on a RAM disk.
Qiling Disk Master creates the RAM disk as a Windows service, so it is mounted automatically at startup. Any application or service that needs the drive can access it as soon as Windows finishes booting. You can choose the file system (NTFS, FAT32, exFAT) and drive letter during setup.
Benefits and Limitations of a RAM Disk
A RAM disk is not right for every job, but in the right role it delivers a huge performance boost.
Benefits:
- Extreme speed — reads and writes happen at memory speed, far beyond any SSD.
- Zero SSD wear — temporary files are written to RAM instead of your SSD, which extends the SSD's lifespan.
- No fragmentation — RAM disks do not fragment like mechanical drives.
- Automatic cleanup — because data disappears on reboot, temp files never accumulate.
- Privacy — sensitive temporary data is wiped automatically when the PC turns off.
Limitations:
- Volatile — all data is lost on shutdown or power failure.
- Uses RAM — the memory assigned to the RAM disk is no longer available to Windows and your apps.
- Smaller capacity — you are limited by how much spare RAM you have, usually 4-32 GB.
- Not for permanent storage — never save the only copy of an important file on the RAM disk.
- Note
- If you lose power unexpectedly, everything on the RAM disk is gone permanently. Use it for files you can afford to lose, and keep important documents on a real drive.
How Much RAM Do You Need?
A RAM disk only makes sense if you have memory to spare. Here is a practical guide based on total system RAM:
- 8 GB total — not recommended. Windows itself needs most of this, and a RAM disk would leave too little for apps.
- 16 GB total — you can create a 2-4 GB RAM disk for browser cache and temp files.
- 32 GB total — comfortable for a 4-8 GB RAM disk, enough for browser cache, temp files, and a scratch disk.
- 64 GB or more — you can allocate 8-32 GB for a large RAM disk, useful for video editing scratch, game cache, or large temporary projects.
Always leave at least 8 GB of RAM free for Windows and your applications. If you notice the system using the page file heavily or apps becoming sluggish, reduce the RAM disk size.
Step-by-Step: Create a RAM Disk with Qiling Disk Master
Qiling Disk Master includes a one-click RAM disk feature in its Tools and Utilities section. Follow these steps to set one up.
Step 1. Download and install Qiling Disk Master
Download the free version from the Qiling website and install it. The free edition includes the RAM disk feature. Launch the program after installation.
Step 2. Open the Tools and Utilities page
In the Qiling Disk Master main window, look for the Tools and Utilities section. This is where extra features like the RAM disk live.
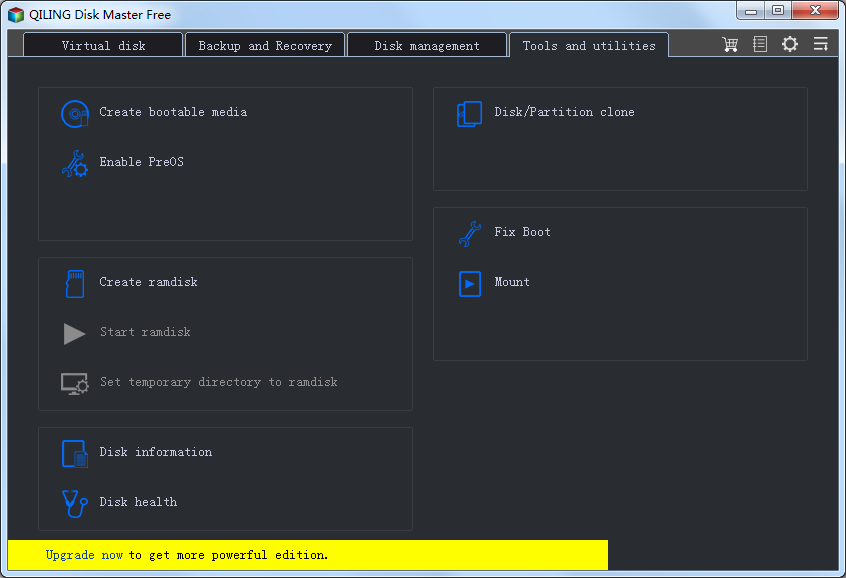
Step 3. Click "Create ramdisk"
Find and click the Create ramdisk option. A new dialog opens where you configure the RAM disk.
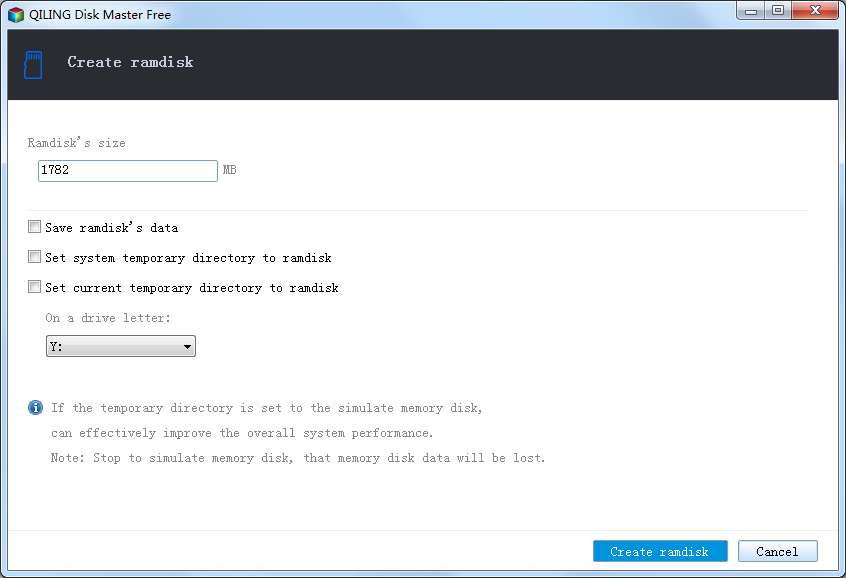
Step 4. Set the RAM disk size
Enter the size you want to allocate. Start small — 2 GB is enough for browser cache and temp files on most systems. You can increase it later if you have spare RAM.
Step 5. Choose a drive letter and file system
Pick an unused drive letter, such as R: or Z:. For the file system, choose NTFS if you need large files or security features, or FAT32 for maximum compatibility. Most users should stick with NTFS.
Step 6. Set automatic mounting
Make sure the option to mount the RAM disk automatically at startup is enabled. This ensures the drive is available every time Windows boots, so apps that rely on it do not break.
Step 7. Verify in File Explorer
Open File Explorer and look for the new drive letter. It should show the size you configured. You can now copy files to it or point applications to it.
Best Uses for a RAM Disk
Because of its speed and volatility, a RAM disk excels at holding temporary or replaceable data. Here are the most practical uses.
- Browser cache — move Chrome, Edge, or Firefox cache to the RAM disk for faster page loads and zero SSD writes from cache.
- Windows TEMP folder — installer temp files and system scratch data go to RAM instead of the SSD.
- Photo and video editing scratch — Photoshop, Premiere, and DaVinci Resolve use scratch disks; putting scratch on RAM speeds up preview rendering.
- Game cache — some games let you move shader or mod caches to a faster drive.
- Database and development temp — developers can point build folders and package caches to the RAM disk for faster compiles.
- Privacy-sensitive work — files you want automatically wiped on shutdown.
Never use a RAM disk for documents, photos, or project files you cannot afford to lose. Save those to your regular SSD or HDD and back them up.
Move Windows TEMP Folder to the RAM Disk
One of the simplest high-impact uses of a RAM disk is moving the Windows TEMP folder there. This reduces writes to your SSD and speeds up installations and extractions.
Step 1. Create a folder on the RAM disk, for example R:\TEMP.
Step 2. Press Win + R, type sysdm.cpl, and press Enter to open System Properties.
Step 3. Go to the Advanced tab and click Environment Variables.
Step 4. Under User variables, select TEMP and click Edit. Change the value to R:\TEMP (or your drive letter).
Step 5. Do the same for the TMP variable.
Step 6. Under System variables, find TEMP and TMP and change them to R:\TEMP as well.
Step 7. Click OK to close all dialogs, then restart your PC for the changes to take effect.
After the restart, Windows and most applications will write their temporary files to the RAM disk. Because the RAM disk is wiped on reboot, old temp files never pile up.
- Note
- If an installer needs the TEMP folder to persist across reboots, moving it to a RAM disk can cause issues. For most users this is fine, but keep the original TEMP path in mind if an installer fails.
FAQs About Windows 11 RAM Disk
Does Windows 11 have a built-in RAM disk?
No. Windows 11 does not include a native RAM disk feature. You need third-party software such as Qiling Disk Master to create one.
Will a RAM disk speed up my games?
It can help with shader caches and mod loading, but most game assets still load from the game's install drive. For game loading speed, moving the game itself to an SSD or using Fast Cache to cache the game drive is usually more effective.
Can I make the RAM disk persistent?
RAM is volatile, so the disk itself is not persistent. Qiling Disk Master recreates it automatically at startup, but any files on it are gone after a reboot. Some RAM disk tools can save and load an image file, but Qiling Disk Master recreates the empty disk automatically.
What file system should I use?
NTFS is the best choice for most users because it supports large files, security permissions, and compression. Use FAT32 only if you need compatibility with very old software.
Can I put the page file on a RAM disk?
Not recommended. The page file is meant to extend RAM when it runs out. Putting it on a RAM disk uses the RAM you are trying to free up, defeating the purpose.
Back Up Windows Before You Change Settings
Creating a RAM disk is safe, but if you are also moving environment variables or changing system paths, a backup protects your system. Qiling Disk Master creates a full Windows image you can restore from if anything goes wrong.
Part 1: Create a Full System Backup
Step 1. Install and open Qiling Disk Master. On the home screen, open "Backup and Recovery" and choose "System Backup". This option automatically includes Windows and the hidden boot partitions, so you do not have to select them one by one.

Step 2. Check the source. The disk where Windows is installed and its system partitions are already ticked for you. If you only need your personal documents, run a separate "File Backup" task instead.

Step 3. Click the destination box and choose where the image should be saved. Use an external HDD or SSD, a NAS, or any drive other than the one Windows is installed on, and make sure it has enough free space.

Step 4. Review the task summary and click "Proceed". Wait until the progress bar reaches 100%. Do not unplug the drive or turn off the PC while the backup is running.

Part 2: Restore Windows from the Backup
Step 1. Open Qiling Disk Master again, go to "Backup and Recovery", and select the recovery option. Your backup images are listed, so pick the one you created before the changes began.

Step 2. Choose the target disk or partition. Normally you restore to the original system disk. If the drive was replaced, select the new disk instead, and the restore rebuilds Windows together with its boot partitions.

Step 3. Preview the restore plan, click "Proceed", and confirm the warning. The PC restarts to finish the job, and Windows comes back exactly as it was on the day the image was created, with your files and programs intact.

- Note
- Keep the backup image on a separate drive, and refresh it before changing environment variables or system paths.
Conclusion
A RAM disk turns a portion of your memory into an ultra-fast virtual drive that is perfect for temporary files, browser cache, and scratch data. With Qiling Disk Master, creating one takes only a few clicks: open Tools and Utilities, click Create ramdisk, set the size and drive letter, and click Create. Make sure you have at least 8 GB of RAM left for Windows, and never store the only copy of important files on the RAM disk. Move the Windows TEMP folder or your browser cache to the RAM disk to see the biggest real-world speed gains.
Protect your PC with Qiling Backup—create a system image before your next round of settings changes.
For more Windows 11 performance guides, see Windows 11 Fast Cache, Move Browser Cache to RAM Disk, Speed Up Windows 11 with RAM and SSD Cache, Fast Cache Best Practices, and Windows 11 Storage Sense.
Related Articles
- Why the RAMdisk can improve overall system performance?
The official Qiling guide explains how a RAM disk speeds up your PC and protects your SSD. - Windows 11 Storage Sense: Automatic Space Cleanup
- Windows 11 Guide: Features, Upgrade Tips and What to Know
- ReadyBoost vs RAM Disk vs SSD Cache: Which to Use in Windows 11
- SoftPerfect RAM Disk vs Qiling RAM Disk: Which Is Better?
- Speed Up Music Production with a RAM Disk and SSD Cache
Products
Articles & Tutorials
- Data Recovery
- Data Backup
- File Recovery
- File Backup
- System Backup and Restore
- Disk and Partition Clone
- Technical articles
- Mobile articles
- Disk Master Help
- Windows Data Recovery Tutorials
- Windows Secure Delete Tutorials
- Windows Partition Management Tutorials
- Windows File Backup and Restore Tutorials
- Windows System Backup and Restore Tutorials
- Windows Disk Backup and Restore Tutorials
- Windows Clone Tutorials