Speed Up Music Production with a RAM Disk and SSD Cache
Audio work looks light from the outside - a few waveforms and a mixer - but a modern session streams gigabytes of samples from disk in real time. When the drive cannot deliver a sample before the next beat, you hear it as a dropout, not as a progress bar.
This guide explains where music production actually waits on storage, what a RAM disk and a disk cache each fix, and what neither of them can change.
PAGE CONTENT
- Why a DAW Waits on the Disk
- What a RAM Disk Can and Cannot Do for Audio
- Speed Up Sample Libraries with an SSD Cache
- How to Set Both Up
- Common Mistakes
- FAQs About Caching for Music Production
- Back Up Windows Before You Change Settings
Why a DAW Waits on the Disk
Recording and mixing are not disk-heavy on their own. The load comes from everything around them:
- Sample libraries stream from disk. Orchestral and cinematic libraries routinely run to hundreds of gigabytes, and each patch pulls different samples as you play.
- Sessions reload their audio. Opening a project re-reads every audio file it references, however small.
- Plugin scanning happens at startup. Hundreds of plugin files are inspected before the DAW becomes usable.
- Freeze, bounce, and render write temporary files. These jobs stage large amounts of data through the disk.
- Recording writes continuously. Long multitrack takes create sustained write traffic, the opposite pattern from sample streaming.
On a mechanical drive, streaming a large library is where cracks and dropouts come from: the drive cannot serve scattered sample reads fast enough to keep the audio buffer filled. On a fast SSD the same session plays cleanly, because the storage simply keeps up.
What a RAM Disk Can and Cannot Do for Audio
Good uses for a RAM disk:
- Session temporary files. Freeze, bounce, and render staging data can live in memory and vanish afterwards.
- Render scratch space. Mixdown and stem export write a great deal of intermediate data.
- DAW cache folders. Waveform, peak, and preview files rebuild automatically if they are lost, which makes them safe on volatile storage.
Bad uses, and why:
- Your only sample library. Libraries are far larger than any practical RAM disk, and a reboot erases everything on it. Keep them on real storage.
- Irreplaceable recordings. A RAM disk avoids disk-induced dropouts, but a crash or power cut loses the take completely. Record to an SSD instead.
- Anything you expect to lower latency. Audio latency is set by the interface buffer and its driver, not by storage speed, so a RAM disk cannot make ASIO latency smaller.
The rule for audio is the same as everywhere else: a RAM disk for data you can afford to lose, real storage for data you cannot.
Speed Up Sample Libraries with an SSD Cache
Sample libraries are too large to keep in memory, but you rarely play every patch in a day. An SSD cache keeps the samples you actually use on fast storage while the rest stays on the hard drive.
- Repeated patches load faster. The first time you open a library its samples are read from the hard drive; from then on the most-used ones come from the cache.
- Session reloads speed up. Opening the same project a second time reads much of its audio from the cache instead of the platter.
- Nothing is moved. The library stays exactly where it is, so there is nothing to migrate, reinstall, or re-authorise.
Select the drive that holds your libraries when you create the task. If your libraries live on a network share, caching behaves differently - see SSD cache for a NAS or network drive.
How to Set Both Up
Create the RAM disk for scratch and temp files
Step 1. Check your free memory first. Open Task Manager and note the available memory while a typical session is open.
Step 2. Install Qiling Disk Master, which includes the RAM disk feature in the free edition.
Step 3. Open the Tools and Utilities page and click Create ramdisk.
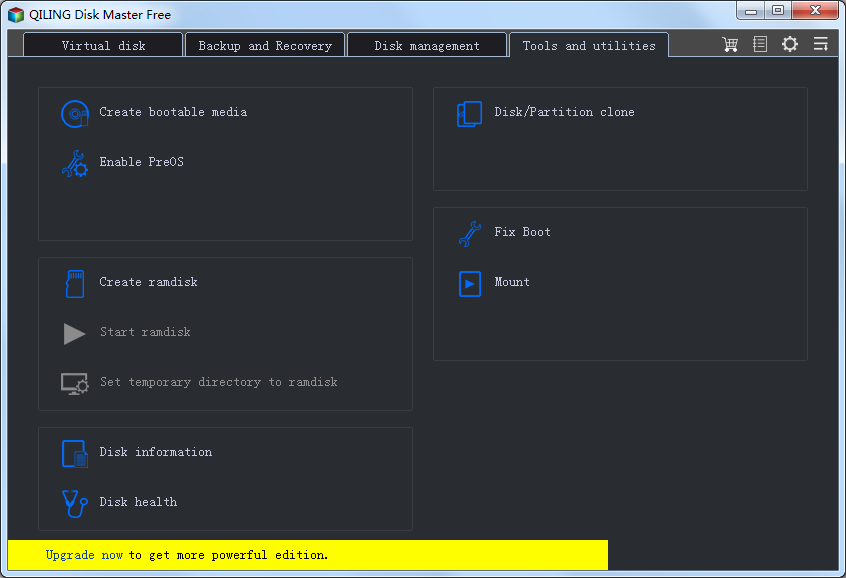
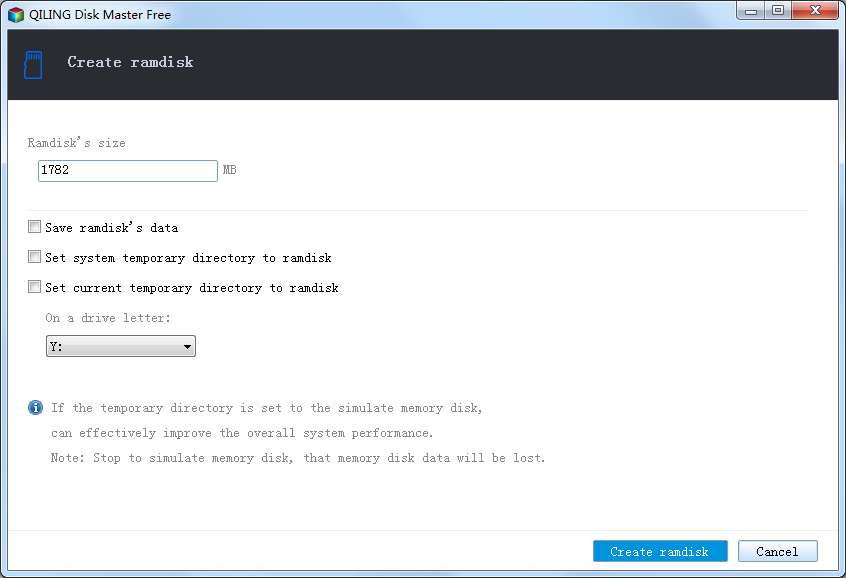
Step 4. Allocate no more than a quarter to a third of your free memory, pick a drive letter such as R:, choose NTFS, and enable mounting at startup. Then point the DAW's scratch, temp, and waveform cache folders at R:.
Cache the drive that holds your libraries
Step 1. Download, install, and open Qiling Fast Cache. On first run the task list is empty.

Step 2. Click the "+" button to create a cache task and select the drive holding your sample libraries and project audio.
Step 3. Choose the cache medium and size. A RAM tier accelerates the hottest samples, while an SSD tier keeps the wider working set after a restart.

Step 4. Create the task and work normally for a few sessions. The hit rate climbs as the cache learns which libraries you actually play.

Common Mistakes
- Putting the library itself on a RAM disk. It is far too large, and a reboot removes it. Cache the library instead.
- Recording to a RAM disk without protection. The take exists only in memory until it is copied off, so a crash costs the whole session.
- Expecting lower latency. Audio buffer size belongs to the interface and its driver, not to the disk.
- Disabling the page file to free memory for the RAM disk. Sample-heavy sessions use a great deal of memory, and removing the page file causes out-of-memory failures rather than speed.
- Caching a drive that only stores finished masters. Nothing is read there twice, so the cache never warms up and the hit rate stays near zero.
- Assuming a cache fixes processor-related dropouts. If the CPU cannot run your plugins in real time, storage changes will not help.
FAQs About Caching for Music Production
Will a RAM disk fix audio dropouts?
Only if the dropouts are caused by disk access. If they come from buffer settings, an overloaded processor, or a driver, memory will not change them.
How much RAM do I need for a music production RAM disk?
32 GB is a practical starting point for an 8-12 GB RAM disk alongside a real session. On 16 GB, either keep the RAM disk very small or skip it, because sample players need that memory themselves.
Can I install VST plugins on a RAM disk?
You can, but the gain is small. Plugins are read once when the DAW scans them at startup, and an SSD cache covers that case without consuming memory.
Does an SSD cache help Kontakt or other sample libraries?
Yes, when you reuse the same patches and libraries. The first load still comes from the hard drive, and everything after it is served from the cache. A genuine SSD is faster still, because it removes the hard drive from the path entirely.
Will caching reduce my audio latency?
No. Latency is determined by the audio interface buffer and its driver. A cache shortens load times and prevents disk-related dropouts, which is a different problem.
Back Up Windows Before You Change Settings
Moving scratch folders and cache configuration is safe, but if you also change system paths, a backup protects your setup. Qiling Disk Master creates a full Windows image you can restore from if anything goes wrong.
Part 1: Create a Full System Backup
Step 1. Install and open Qiling Disk Master. On the home screen, open "Backup and Recovery" and choose "System Backup". This option automatically includes Windows and the hidden boot partitions, so you do not have to select them one by one.

Step 2. Check the source. The disk where Windows is installed and its system partitions are already ticked for you. If you only need your personal documents, run a separate "File Backup" task instead.

Step 3. Click the destination box and choose where the image should be saved. Use an external HDD or SSD, a NAS, or any drive other than the one Windows is installed on, and make sure it has enough free space.

Step 4. Review the task summary and click "Proceed". Wait until the progress bar reaches 100%. Do not unplug the drive or turn off the PC while the backup is running.

Part 2: Restore Windows from the Backup
Step 1. Open Qiling Disk Master again, go to "Backup and Recovery", and select the recovery option. Your backup images are listed, so pick the one you created before the changes began.

Step 2. Choose the target disk or partition. Normally you restore to the original system disk. If the drive was replaced, select the new disk instead, and the restore rebuilds Windows together with its boot partitions.

Step 3. Preview the restore plan, click "Proceed", and confirm the warning. The PC restarts to finish the job, and Windows comes back exactly as it was on the day the image was created, with your files and programs intact.

- Note
- Keep the backup image on a separate drive, and refresh it before changing storage cache settings.
Conclusion
Music production is a streaming workload, and streaming is exactly what a slow drive cannot do reliably. A RAM disk removes the temporary and rebuildable traffic - render scratch, session temp, waveform caches - while an SSD cache keeps the patches and project audio you reuse on fast storage without moving anything. Neither will lower your audio latency, and neither can rescue an unreliable drive. If your libraries live on a mechanical disk and you have memory to spare, caching them is the change that stops the dropouts; the RAM disk is the smaller second step that cleans up the rest.
Protect your PC with Qiling Backup—create a system image before your next round of settings changes.
For more Windows 11 performance guides, see How to Create a RAM Disk in Windows 11, Windows 11 Fast Cache, How to Move the Windows TEMP Folder to a RAM Disk, Best RAM Disk Software for Windows 11, and How Big Should Your Disk Cache Be?.
Related Articles
- How to Use a RAM Disk as a Scratch Disk for Video Editing
The same scratch-disk pattern in another media workload, with its own capacity traps. - Is a RAM Disk Worth It? An Honest Look at Speed and Risk
- How to Use Extra RAM (16GB/32GB) to Speed Up Your PC
- Speed Up CAD Software with a RAM Disk and SSD Cache
- Should You Put the Page File on a RAM Disk? (Short Answer: No)
Products
Articles & Tutorials
- Data Recovery
- Data Backup
- File Recovery
- File Backup
- System Backup and Restore
- Disk and Partition Clone
- Technical articles
- Mobile articles
- Disk Master Help
- Windows Data Recovery Tutorials
- Windows Secure Delete Tutorials
- Windows Partition Management Tutorials
- Windows File Backup and Restore Tutorials
- Windows System Backup and Restore Tutorials
- Windows Disk Backup and Restore Tutorials
- Windows Clone Tutorials