How to Move Windows TEMP Folder to a RAM Disk
The Windows TEMP folder holds temporary files that programs create while installing, extracting archives, and processing data. By default it sits on your system drive, which means every installer and every unzip writes and deletes files on your SSD. Moving the TEMP folder to a RAM disk sends all of that traffic to memory instead: temporary files are created at memory speed, and your SSD is spared thousands of small writes.
This guide explains why relocating TEMP is worth it, how to create a RAM disk with Qiling Disk Master, and exactly how to point Windows and your applications at it by changing the TEMP and TMP environment variables. It also covers how to make the setup survive reboots and how to revert if anything goes wrong.
PAGE CONTENT
- Why Move the TEMP Folder to a RAM Disk?
- Step 1: Create a RAM Disk
- Step 2: Create a TEMP Folder on the RAM Disk
- Step 3: Change the TEMP and TMP Variables
- Step 4: Restart and Verify
- Handle the Reboot Wipe Automatically
- Troubleshooting + FAQs
- Back Up Windows Before You Change Settings
Why Move the TEMP Folder to a RAM Disk?
The TEMP folder is one of the busiest locations on a Windows PC. Every time you run an installer, open a compressed file, or launch certain apps, Windows writes temporary files there and deletes them shortly after. On an SSD this is fine but not free — those writes count against the drive's endurance.
Moving TEMP to a RAM disk brings several benefits:
- Faster installs and extractions — temp data is written to and read from memory, which is many times faster than an SSD.
- Less SSD wear — temporary writes no longer touch your SSD.
- Automatic cleanup — because a RAM disk is wiped on reboot, old temp files never accumulate.
- No fragmentation — a RAM disk does not fragment, so it stays fast indefinitely.
The only trade-off is that the TEMP folder starts empty after every reboot. For temporary files that is exactly what you want, and readers who keep temp data long-term are rare.
Step 1: Create a RAM Disk
Before changing any variables, you need a RAM disk to hold the new TEMP folder. Qiling Disk Master makes this a few clicks.
Step 1. Download and install Qiling Disk Master. The free edition includes the RAM disk feature.
Step 2. Open Qiling Disk Master and go to the Tools and Utilities page.
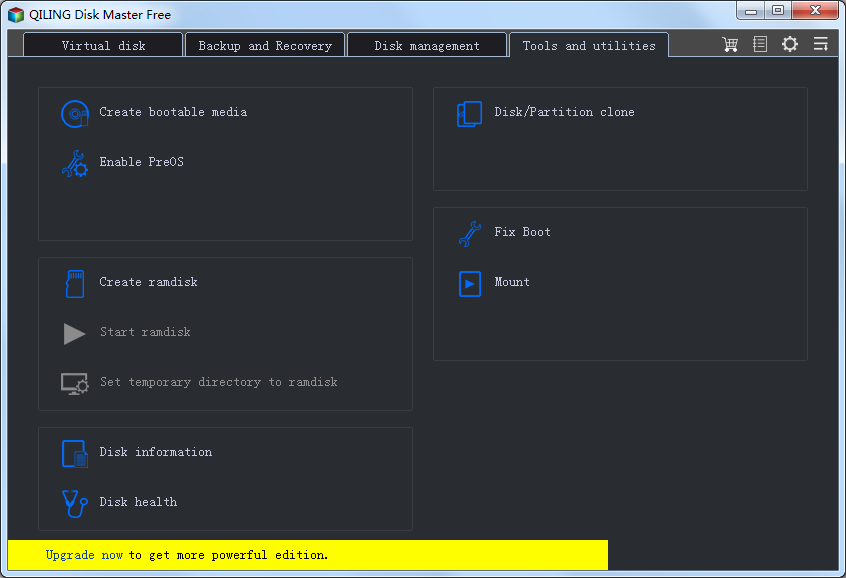
Step 3. Click Create ramdisk.
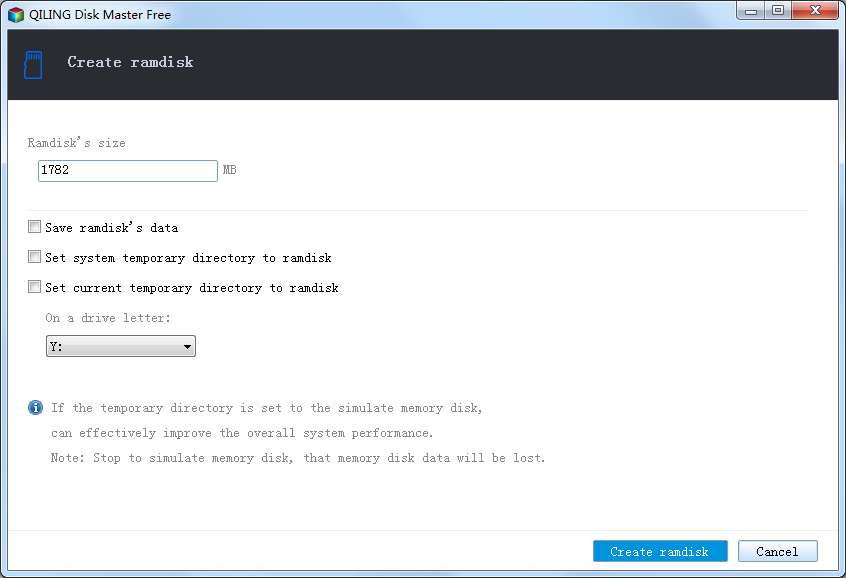
Step 4. Set the size. For a TEMP folder, 2 GB is usually enough; use 4 GB if you handle large archives or run big installers.
Step 5. Choose an unused drive letter such as R:, select NTFS as the file system, and enable auto-mount at startup.
Step 6. Click the Create ramdisk button. The new drive appears in File Explorer.
For the complete RAM disk walkthrough, see How to Create a RAM Disk in Windows 11.
Step 2: Create a TEMP Folder on the RAM Disk
Now create a folder that will become the new TEMP location.
Step 1. Open File Explorer and go to your RAM disk, for example R:.
Step 2. Right-click in the drive and choose New > Folder.
Step 3. Name the folder TEMP. The full path will be R:\TEMP.
Step 4. You can leave the folder empty; Windows and your apps will fill it as needed.
Step 3: Change the TEMP and TMP Variables
Windows uses the TEMP and TMP environment variables to know where to store temporary files. You need to change four of them: the user-level pair and the system-level pair.
Step 1. Press Win + R, type sysdm.cpl, and press Enter. This opens the System Properties window.
Step 2. Go to the Advanced tab and click Environment Variables at the bottom.
Step 3. Change the user variables. Under the User variables for [your name] section, select TEMP and click Edit. Change the value to R:\TEMP and click OK. Then do the same for TMP.
Step 4. Change the system variables. Under the System variables section, find TEMP and click Edit. Change the value to R:\TEMP and click OK. Repeat for TMP.
Step 5. Click OK to close the Environment Variables window, then OK again to close System Properties.
- Note
- If you see an error saying the folder does not exist, create R:\TEMP first, or type the path carefully. Windows validates the path when you click OK.
Step 4: Restart and Verify
Step 1. Restart your PC so the new variables take effect everywhere.
Step 2. After the restart, confirm the RAM disk R: is present in File Explorer.
Step 3. Run an installer or extract a zip file, then check that files appear in R:\TEMP while the operation is running.
Step 4. To double-check from a command prompt, type echo %TEMP% and press Enter. It should print R:\TEMP.
Once confirmed, all new temporary files from Windows and most applications will be written to the RAM disk instead of your SSD.
Handle the Reboot Wipe Automatically
Because the RAM disk is recreated empty on every boot, the R:\TEMP folder must be recreated each time as well. If some app tries to use TEMP before the folder exists, it may fail. A small startup script prevents this.
Step 1. Open Notepad and paste the following line:
@echo offif not exist R:\TEMP mkdir R:\TEMP
Step 2. Save the file as create-temp-folder.bat in a permanent location, such as C:\Scripts\.
Step 3. Press Win + R, type shell:startup, and press Enter to open the Startup folder.
Step 4. Create a shortcut to the .bat file in the Startup folder, or move the file there directly.
Qiling Disk Master mounts the RAM disk early in the boot process, so by the time this script runs, the drive is ready and the folder is recreated automatically at every login.
Troubleshooting + FAQs
An installer fails after moving TEMP. Some installers need TEMP to persist across a reboot that happens mid-install. If a specific installer fails, temporarily point TEMP back to a real drive, run the installer, then switch it back.
The RAM disk filled up during a large install. Increase the RAM disk size, or run only one large install at a time. A 4-8 GB RAM disk handles almost any installer.
TEMP is still on C:. Make sure you changed all four variables — both user and system, TEMP and TMP — and that you restarted. Some apps hold their own TEMP setting and ignore the system variables.
Is it safe to move the TEMP folder to a RAM disk?
For everyday use, yes. Temporary files are meant to be disposable, and wiping them on shutdown is harmless. The only caution is for installers that reboot mid-way, as noted above.
How big should the RAM disk be for TEMP?
2 GB covers typical use. Choose 4-8 GB if you regularly extract large archives or run big game installers.
Can I move TEMP to a regular folder instead of a RAM disk?
Yes. You can point TEMP to any folder on any drive. A RAM disk is simply the fastest option and the only one that also reduces SSD wear automatically.
Will this speed up my whole PC?
It speeds up anything that uses temporary files — installs, extractions, some games, and certain apps. For overall system speed, pair it with an SSD cache such as Qiling Fast Cache.
Back Up Windows Before You Change Settings
Changing environment variables is reversible, but a backup protects your system if you edit other settings at the same time. Qiling Disk Master creates a full Windows image you can restore from if anything goes wrong.
Part 1: Create a Full System Backup
Step 1. Install and open Qiling Disk Master. On the home screen, open "Backup and Recovery" and choose "System Backup". This option automatically includes Windows and the hidden boot partitions, so you do not have to select them one by one.

Step 2. Check the source. The disk where Windows is installed and its system partitions are already ticked for you. If you only need your personal documents, run a separate "File Backup" task instead.

Step 3. Click the destination box and choose where the image should be saved. Use an external HDD or SSD, a NAS, or any drive other than the one Windows is installed on, and make sure it has enough free space.

Step 4. Review the task summary and click "Proceed". Wait until the progress bar reaches 100%. Do not unplug the drive or turn off the PC while the backup is running.

Part 2: Restore Windows from the Backup
Step 1. Open Qiling Disk Master again, go to "Backup and Recovery", and select the recovery option. Your backup images are listed, so pick the one you created before the changes began.

Step 2. Choose the target disk or partition. Normally you restore to the original system disk. If the drive was replaced, select the new disk instead, and the restore rebuilds Windows together with its boot partitions.

Step 3. Preview the restore plan, click "Proceed", and confirm the warning. The PC restarts to finish the job, and Windows comes back exactly as it was on the day the image was created, with your files and programs intact.

- Note
- Keep the backup image on a separate drive, and refresh it before changing environment variables or system paths.
Conclusion
Moving the Windows TEMP folder to a RAM disk speeds up installs and extractions while sparing your SSD from constant small writes. Create a 2-4 GB RAM disk with Qiling Disk Master, make an R:\TEMP folder, then point all four TEMP and TMP variables at it through System Properties > Advanced > Environment Variables. Add a startup script so the folder is recreated after every reboot, and verify with echo %TEMP%. The change is quick, reversible, and pays off every time you install or extract something.
Protect your PC with Qiling Backup—create a system image before your next round of settings changes.
For more Windows 11 performance guides, see How to Create a RAM Disk in Windows 11, Move Browser Cache to RAM Disk, SSD Cache vs RAM Disk, Use a RAM Disk for Video Editing, and Speed Up Windows 11 with RAM and SSD Cache.
Related Articles
- How to Create a RAM Disk in Windows 11: Step-by-Step Guide
Complete walkthrough for creating and sizing a RAM disk with Qiling Disk Master. - How to Move Browser Cache to RAM Disk in Windows 11
Send Chrome, Edge, and Firefox cache to the RAM disk alongside TEMP for the same benefits. - SSD Cache vs RAM Disk: Which Speeds Up Windows 11 More?
- Windows 11 Guide: Features, Upgrade Tips and What to Know
- How to Speed Up Programming Builds with a RAM Disk on Windows 11
- Speed Up Music Production with a RAM Disk and SSD Cache
Products
Articles & Tutorials
- Data Recovery
- Data Backup
- File Recovery
- File Backup
- System Backup and Restore
- Disk and Partition Clone
- Technical articles
- Mobile articles
- Disk Master Help
- Windows Data Recovery Tutorials
- Windows Secure Delete Tutorials
- Windows Partition Management Tutorials
- Windows File Backup and Restore Tutorials
- Windows System Backup and Restore Tutorials
- Windows Disk Backup and Restore Tutorials
- Windows Clone Tutorials